
Tired of bland spring gardens that never wow your neighbors? Most gardeners plant tulips wrong, leading to weak blooms or bulbs that rot before they even sprout.
But here’s the thing: tulip planting isn’t rocket science when you know the right steps. With proper timing, soil prep, and a few insider tricks, you can create stunning spring displays that come back year after year.
This comprehensive guide reveals everything, from selecting the best bulbs to timing your planting perfectly for your specific climate zone.
You’ll learn the exact depth to plant, how to protect bulbs from pests, and which varieties give you the biggest bang for your buck.
Let’s alter those ordinary flower beds into neighborhood showstoppers with tulips that truly thrive.
Why Plant Tulip Bulbs in the Fall?
Tulip bulbs are like little power packs. They store everything the plant needs to grow and bloom. To make those flowers pop, they need a cold spell in winter, think of it as their beauty sleep.
That’s why fall is the best time to plant. The bulbs settle in, grow roots, and wake up ready to shine in spring.
There are tons of tulip types out there. Some, like species tulips, come back year after year in cooler areas.
Others, like fancy hybrids (think big, bold blooms), might only dazzle for a season or two. Pick what fits your vibe, there’s no wrong choice!
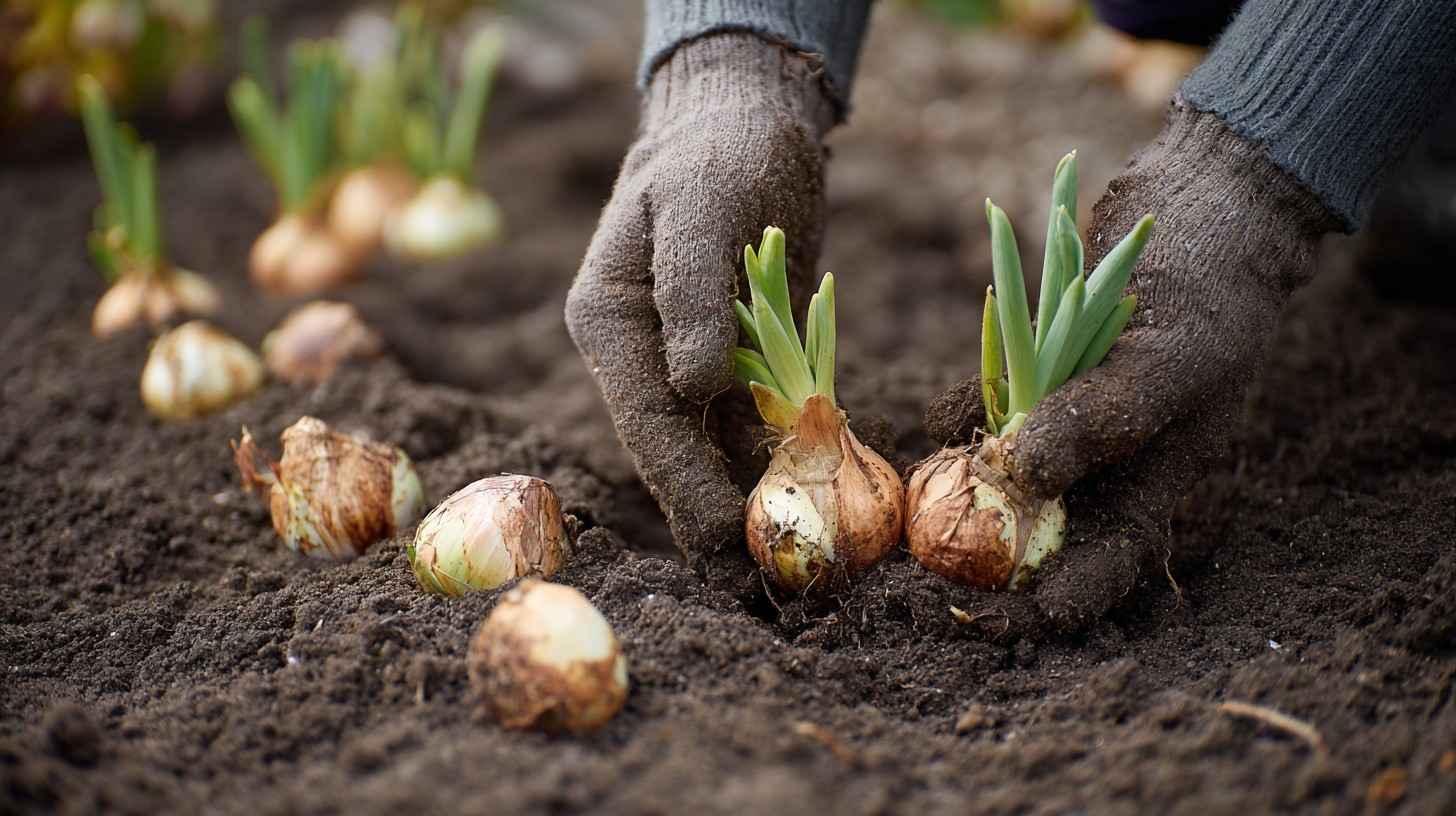
Grab the biggest, firmest bulbs you can find. They’re the ones that’ll give you the showiest flowers. Small or soft bulbs?
Pass on those that might not bloom well. You can also mix early-blooming tulips (March bloomers) with mid or late ones (April or May) to keep your garden colorful for weeks.
When to Plant Tulip Bulbs: Timing It Right
Fall is tulip-planting season. You want to get those bulbs in the ground about 6-8 weeks before it freezes hard, when the soil’s around 50-60°F.
That’s cool enough to keep the bulbs from sprouting too soon, but warm enough for roots to grow. A good clue? Wait for the first light frost, then get planting.
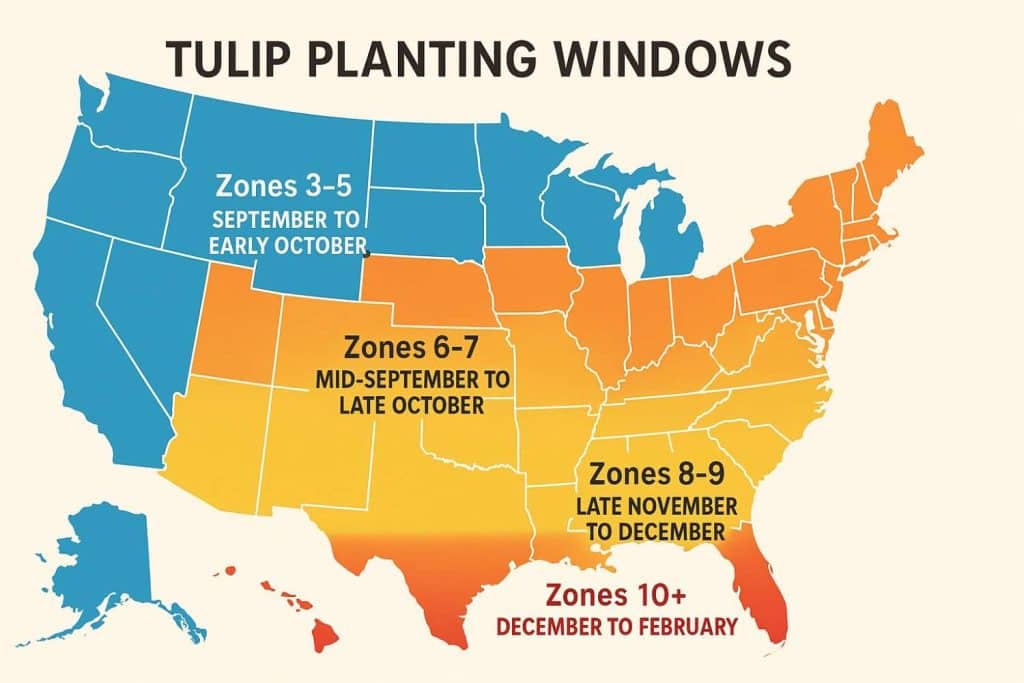
Planting Timeline by Region
Where you live changes the game. Here’s a quick rundown based on USDA zones (check your zone online if you’re unsure):
|
Zone |
When to Plant |
Quick Tip |
|---|---|---|
|
3-5 (Cold spots like Minnesota) |
September to early October |
Get them in early: the ground freezes fast! |
|
6-7 (Places like Ohio or Oregon) |
Mid-September to late October |
Perfect timing is after a chilly night or two. |
|
8-9 (Warmer areas like coastal California) |
Late November to December |
Chill bulbs in the fridge for 10-12 weeks first. |
|
10+ (Hot spots like Florida) |
December to February |
Treat tulips like annuals and chill them before planting. |
If you’re not sure about your soil temp, stick a thermometer 6 inches down or just eyeball it when nights dip into the 40s°F.
Missed the fall window? No stress. You can plant as late as January in milder areas, but the blooms might be weaker. Or try forcing bulbs indoors for winter color pop them in the fridge for 12 weeks, then plant in pots. It’s like cheating winter!
Getting Your Garden Ready for Tulips
Tulips love sunshine for at least 6 hours a day. If you’re in a warm spot like Zone 8 or 9, a bit of afternoon shade keeps them from frying.
The soil’s gotta drain well; soggy dirt is a bulb’s worst enemy. To check, dig a 12-inch hole, fill it with water, and see if it drains in a few hours.
If it sits like a puddle, mix in 2-4 inches of compost or coarse sand to loosen it up. Aim for neutral soil (pH 6-7). Grab a test kit from a garden store if you want to be sure.
Clear out weeds and rocks, too, so your bulbs have a cozy home. If you’re working with heavy clay, raised beds are a game-changer for improving drainage and preventing rot.
Step-by-Step Guide: How to Plant Tulip Bulbs
Planting tulips is easier than you might think.
With just a few simple steps, you can turn a handful of bulbs into a stunning spring display. Follow along, and you’ll be enjoying a garden bursting with color in no time.
Tools and Supplies Needed
| Category | Items Needed |
|---|---|
| Tools | Trowel or bulb planter (for small jobs), Shovel (for larger batches) |
| Soil Prep | Gravel or crushed oyster shells, Optional: thorny rose clippings (pest deterrent) |
| Bulbs | Tulip bulbs (plant pointy end up, flat side down) |
| Finishing | Soil (to backfill), Water (for deep soak after planting) |
In-Ground Planting
Planting tulips in the ground is super straightforward. Here’s how to do it right:
-
Grab your tools: A trowel or bulb planter makes digging easy. For big batches, a shovel works faster.
-
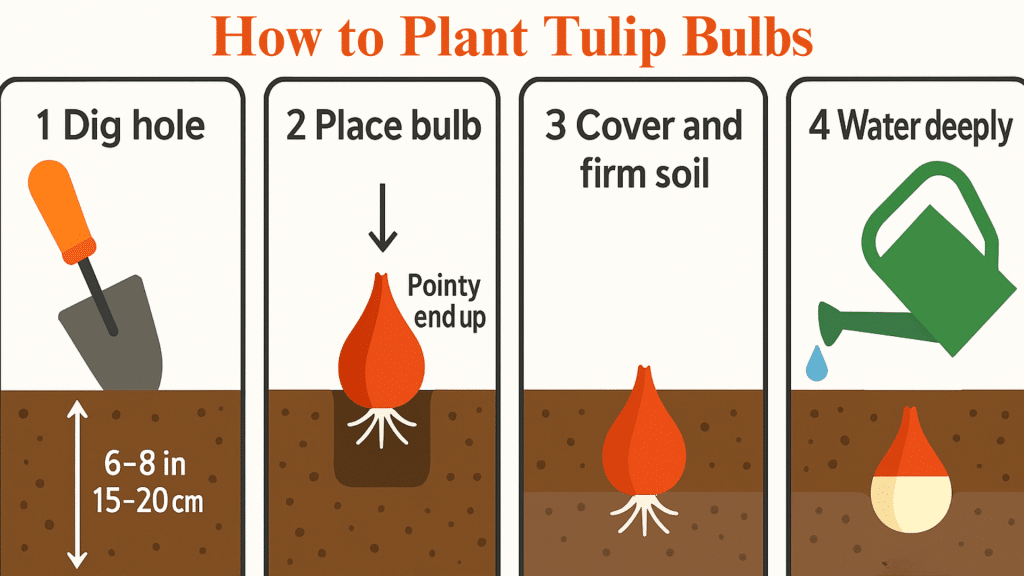
Dig the right depth: Go 6-8 inches deep—about three times the bulb’s height. In areas with pesky rodents like voles or squirrels, dig down to 10-12 inches for extra protection.
-
Space them out: Place bulbs 4-6 inches apart for a full, lush look. Want a bold display? Group 10-25 bulbs together in a cluster. It’s like painting with flowers!
-
Position them properly: Set each bulb pointy end up, flat side down. If you accidentally flip one, don’t sweat it—tulips are forgiving and will usually sort themselves out.
-
Add pest protection: Sprinkle a layer of gravel or crushed oyster shells in the hole to deter critters. Some gardeners even add thorny rose clippings for extra defense.
-
Cover and water: Fill the hole with soil, press it down gently to avoid air pockets, and give it a good soak. One deep watering (about an inch) settles the soil and kicks off root growth.
|
Naturalizing and Mass Planting Want that wild, meadow-like look? Try naturalizing: scatter bulbs across your garden and plant them where they fall for a casual vibe. Space them unevenly for a more organic feel. You can also mix tulips with perennials like hostas or low-growers like pansies to hide the yellowing leaves later. For a big impact, plant in drifts of 25-50 bulbs. Pro tip: toss in some daffodils nearby; they’re toxic to rodents and help protect your tulips. |
Tulip Care: From Planting to Blooms
Taking care of your tulips from planting to blooming is easier than you think, and it’s the key to those jaw-dropping spring flowers.
With a little attention at the right times, your tulips will thrive. Here’s how to keep them happy every step of the way.
Right After Planting
Water the bulbs well after planting to kickstart root growth. If fall is dry, give them a drink once a week for a month. Add 2-3 inches of mulch (like bark or straw) to keep the soil cozy and weeds away.
Spring Care
When green shoots poke up, it’s go-time. Sprinkle a bulb fertilizer (like 4-10-6) around them to boost growth. If it’s dry, water about an inch less per week for pots.
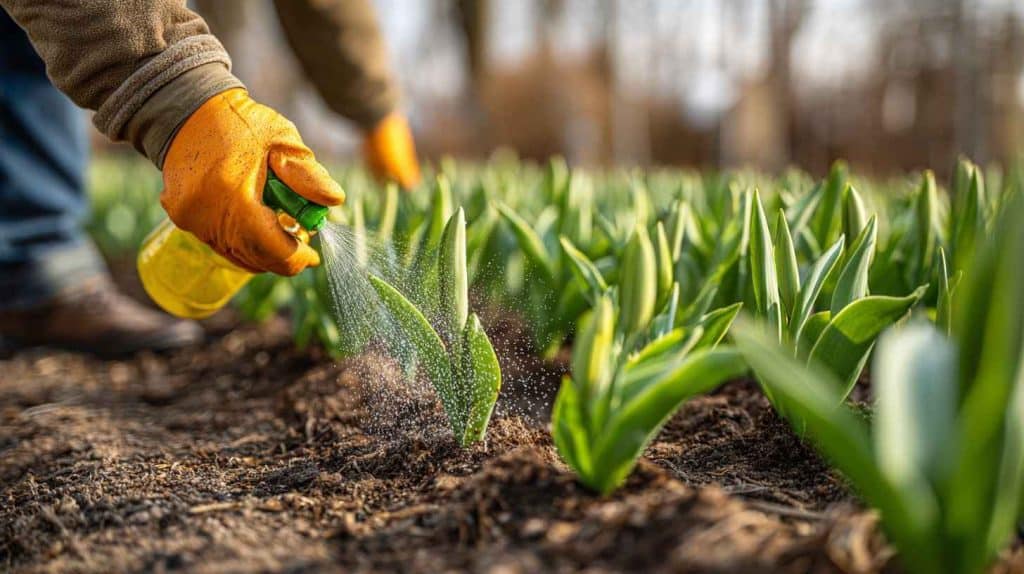
Watch for pests like aphids (blast them off with a hose) or deer (try repellents or fences). Rodents digging up bulbs? Sprinkle some cayenne pepper or plant daffodils nearby—they hate those.
After the Blooms Fade
Once the flowers drop, snip off the dead blooms to save the plant’s energy. Don’t touch the green leaves! They need 6 weeks to soak up the sun and feed the bulbs for next year.
When the leaves turn yellow and floppy, cut them at the base. In cooler zones, tulips might come back for years. In warmer spots, you may need to replant annually.
Overwintering
In cold areas, mulch after planting to protect from deep freezes. In warm zones, dig up bulbs after leaves die back, store in a cool, dry spot, and replant next fall (after chilling in the fridge).
Common Mistakes and Fixes for Planting Tulip Bulbs
Tulips are easy, but small mistakes can stop those spring blooms. Here’s how to dodge trouble and fix it fast.
- Wrong Timing: Too early (soil >60°F) risks rot; too late, weak roots. Fix: Plant in fall when soil’s 50-60°F (September-October for Zones 3-7, November-December for 8-9 with pre-chilling).
- Soggy Soil: Wet dirt rots bulbs. Fix: Add compost/sand or use raised beds for drainage.
- Cutting Green Leaves: Removes energy for next year. Fix: Wait 6 weeks until leaves yellow, then cut.
- Overcrowding: Crowded bulbs bloom less. Fix: Dig and divide every 3-5 years.
- Pests: Squirrels or deer eat bulbs. Fix: Plant deeper, use gravel, chicken wire, or cayenne.
No Blooms? Check for poor chill, shallow planting, or weak soil. Pre-chill bulbs in warm zones, fertilize, and replant deeper. Easy tweaks, big blooms!
5 Pro Tips for Awesome Tulips
Want your tulip garden to steal the show? These pro tips will help you get the most out of your bulbs, from vibrant displays to easy upkeep. Here’s how to level up your tulip game with simple, practical ideas:
-
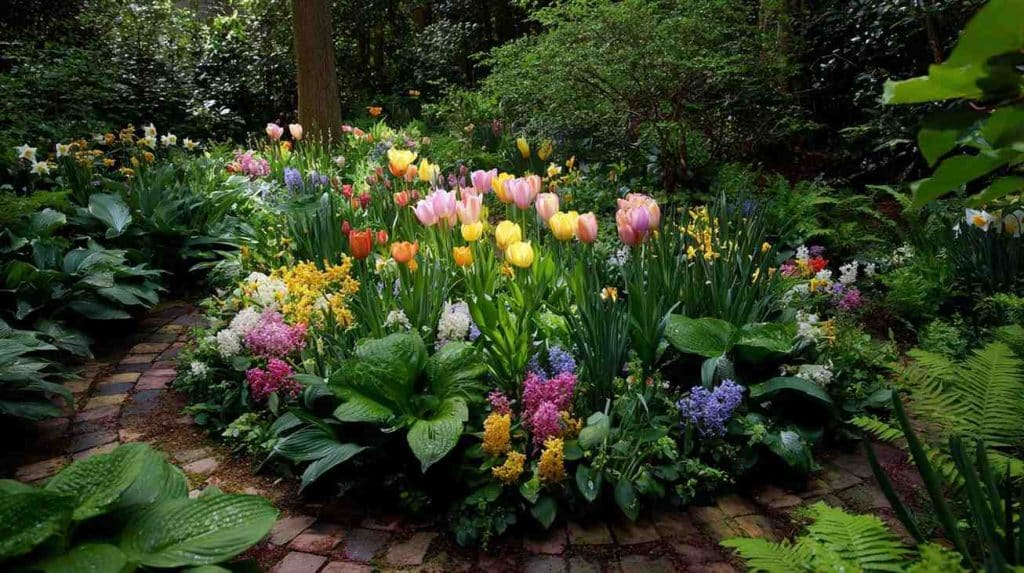
Pair with Perennials: Mix tulips with perennials like daylilies, hostas, or ferns. Their leaves grow just as tulip foliage yellows, hiding the messy die-back for a tidy garden all season.
-
Extend the Bloom Season: Plant a mix of early, mid, and late-season tulip varieties. This spreads your blooms from March to May, keeping your garden colorful for weeks.
-
Go Organic for Healthier Soil: Skip chemical fertilizers and use compost or organic bulb food. It feeds your tulips naturally and builds richer soil over time.
-
Outsmart Pests: Bury bulbs deeper (10-12 inches) to deter squirrels and voles. Or add sharp gravel or crushed shells to planting holes critters hate digging through it.
-
Add Companion Bulbs: Plant tulips with daffodils or hyacinths. They bloom together for a bolder look, and daffodils’ toxicity keeps rodents away.
Conclusion
Your tulip garden success starts with one simple decision: planting this fall. With the right timing, proper depth, and quality bulbs, you’re just months away from a spring display that turns heads and brightens your entire yard.
So what’s next? Mark your calendar for September through December (depending on your zone), grab some firm, healthy bulbs, and start preparing your planting spots. Remember to check that soil drainage and choose a sunny location.
Why does this matter? Because spring gardens filled with vibrant tulips don’t happen by accident—they’re the result of smart fall planning. Your future self will thank you when those first colorful blooms push through the soil.
What’s your biggest concern about planting tulip bulbs? Share your questions in the comments below!