
Is your basement suffering from water leaks or moisture buildup? Waiting for the problem to worsen can lead to costly repairs and health risks, such as mold growth.
Interior waterproofing is the solution you need to keep your basement dry, safe, and structurally sound.
This method doesn’t just address the symptoms; it targets the root causes of water infiltration and prevents further damage.
Whether you’re dealing with cracks, seepage, or high humidity, the right waterproofing system can save you from extensive repairs down the road.
In this article, we’ll walk you through the key methods and materials and explain why investing in waterproofing now is one of the best decisions you can make for your home’s long-term protection.
What Is Interior Waterproofing?
Interior waterproofing is a water-management system that works from inside your basement. It collects water as it enters your foundation and safely redirects it before it spreads or causes damage.
This approach manages seepage, hydrostatic pressure, and moisture within walls by using drainage channels and pumps to remove water out.
Instead of preventing water from reaching your foundation, it removes it quickly, keeping your basement dry.
Why is it important:
- It prevents basement flooding and water damage.
- It reduces mold, mildew, and indoor air-quality problems.
- It protects your foundation materials from rot, rust, and weakening.
- It helps maintain or increase your home’s resale value.
Interior waterproofing is needed because it manages water at the point of entry, protects your home’s structure, and creates a healthier, safer environment, especially for basements in moisture-prone regions.
Signs Your Basement Needs Interior Waterproofing

Your basement often shows early warning signs long before major flooding happens. Knowing what to look for helps you catch moisture problems early and prevent expensive repairs.
- Moisture stains and surface damage: Includes damp or discolored concrete, peeling paint, and bubbling coatings, all early signs that water is pushing through foundation surfaces.
- Mold, mildew, and musty odors: Musty smells and visible mold growth show ongoing moisture inside walls, floors, or stored items.
- Mineral deposits (efflorescence): White, chalky residue on concrete indicates water is moving through your foundation and evaporating.
- Active water seepage or puddles: Water at floor–wall joints, puddles after rain, and window well leaks all confirm active water intrusion.
- Structural deterioration: Rusting metal and rotting wood signal long-term moisture damage that affects structural integrity.
Spotting these signs early helps prevent mold, foundation deterioration, and costly interior repairs. Addressing moisture quickly keeps your basement dry, safe, and structurally sound.
Interior vs. Exterior Waterproofing: What’s the Difference?
Both interior and exterior waterproofing help protect your basement from water, but they work in very different ways. Here’s a clear breakdown to help you understand which method fits your home’s needs.
| Category | Interior waterproofing | Exterior waterproofing |
|---|---|---|
| Installation location | Installed inside the basement | Installed outside the foundation walls |
| How it works | Manages water after it enters | Blocks water before it reaches the foundation |
| Cost | Lower and budget-friendly | Higher, due to excavation |
| Disruption level | Minimal, no digging required | Major disruption, heavy excavation needed |
| Impact on the yard | No damage to landscaping or driveways | Yard, landscaping, and hardscape may be removed |
| Best for | Existing homes, finished basements, and moderate leaks | New construction or homes with severe foundation issues |
| Primary benefit | Fast, affordable water control inside the home | Strong exterior defense that prevents water from touching the walls |
Interior waterproofing is typically the best choice for most existing U.S. homes due to its affordability and minimal disruption, while exterior waterproofing is ideal when deeper structural protection is required or during new construction.
What Causes Basement Leaks?
Basement leaks can occur for many reasons, and understanding the root cause helps you fix problems more effectively rather than treating surface symptoms. Here are the most common sources of water intrusion in homes.
1. Hydrostatic Pressure
When the soil around your foundation becomes saturated, water pressure builds up. This pressure forces water through cracks, gaps, and weak points in basement walls and floors.
2. Poor Grading and Surface Drainage
If the ground slopes toward your home, water collects near the foundation. Standing water increases seepage, especially during heavy rain or snowmelt.
3. Failing Gutters and Short Downspouts
Clogged gutters or downspouts that discharge too close to the house push water directly into the soil beside your walls. This extra moisture often leads to basement leaks.
4. Cracks in Walls or Floors
Small cracks create easy pathways for water to enter. As pressure builds during wet seasons, water seeps through even the smallest openings.
5. High Water Table Levels
In some regions, groundwater naturally sits close to the basement level. When the water table rises during rainy periods, moisture constantly exerts pressure on your foundation.
6. Aging or Deteriorating Foundation Materials
Concrete settles, shifts, or shrinks over time. As foundations age, they develop new cracks that allow moisture to pass through more easily.
7. Clogged or Poorly Drained Window Wells
Blocked window wells trap water against the basement windows. Without proper drainage, water can eventually seep into the basement.
Identifying the true cause of basement leaks helps you choose the right waterproofing solution and prevents recurring moisture problems in the future.
Interior Waterproofing Material Cost
Understanding the cost of interior waterproofing materials helps you plan your budget and choose the right options for your basement. Here’s a quick look at the average price ranges residents typically encounter
| Waterproofing Material | Average Cost Range (USD) |
|---|---|
| Interior Drain Tile System | $40–$85 per linear foot |
| Sump Pump (Primary Pump) | $800–$2,000 installed |
| Battery Backup Sump Pump | $600–$1,500 installed |
| Vapor Barriers / Wall Panels | $1.50–$4.00 per sq. ft. |
| Crack Injection (Epoxy or Polyurethane) | $300–$1,000 per crack |
| Waterproof Coatings & Sealants | $3–$7 per sq. ft. |
These prices can vary based on basement size, labor rates, and the severity of your moisture problem, but this breakdown gives you a reliable starting point for estimating your overall project cost.
Disclaimer:
Please note that the costs listed are average estimates and can vary based on your location, the size of your basement, the complexity of the project, and local labor rates. For an accurate quote, it’s recommended to consult with a professional waterproofing contractor in your area.
Interior Waterproofing Materials and How They Work
Interior waterproofing uses several components that work together to manage water inside your basement. Each material or method serves a specific purpose, helping move water out efficiently and protect your foundation long-term.
| Tool | Purpose |
|---|---|
| Hammer drill | Drills into concrete for drainage installation. |
| Concrete saw | Cuts floor sections to access the perimeter trench. |
| Wet–dry vacuum | Clears dust, debris, and water during work. |
| Pipe cutter | Cuts drain tile and sump discharge piping. |
| Caulking gun | Injects epoxy or polyurethane into cracks. |
| Injection ports | Deliver sealing materials deep into cracks. |
| Utility knife | Trims vapor barriers or wall panels accurately. |
| Brushes/trowels | Apply waterproof coatings to concrete surfaces. |
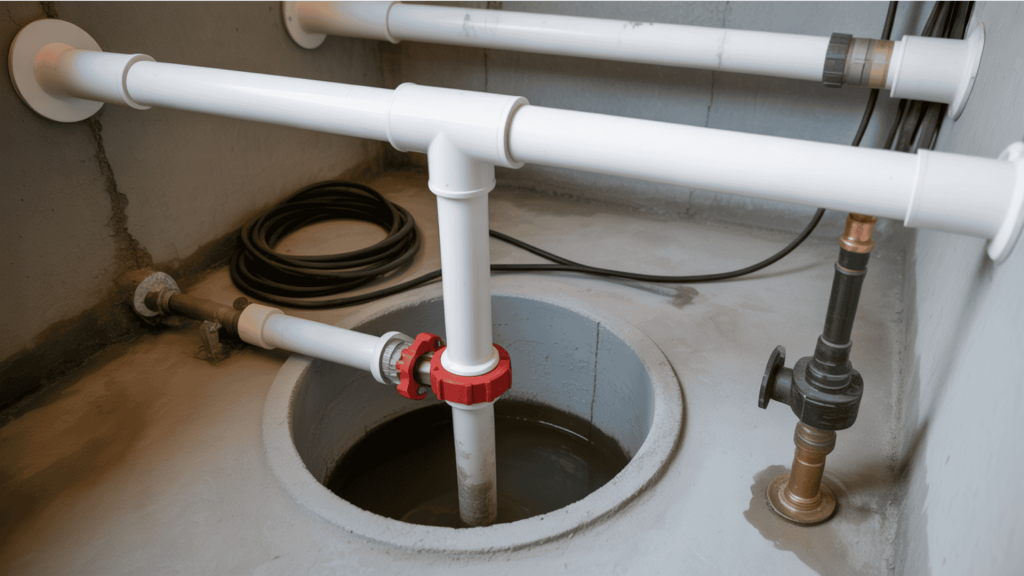
1. Interior Drain Tile System
An interior drain tile system directs water away from the basement at the point where it enters. A perforated pipe is installed in a trench along the inside perimeter of the floor.
The trench is filled with drainage stone and then sealed with fresh concrete. As water reaches the base of the walls or rises from below, the pipe carries it toward the sump basin.
- Placed beneath the concrete floor
- Surrounded by drainage stone for steady flow
- Finished with new concrete after installation
- Moves water directly to the sump basin
This system keeps water from spreading across the basement floor.
2. Sump Pump and Backup System
A sump pump removes the water collected in the drain tile system. When the basin fills, the pump automatically activates and sends water out through a discharge line.
A battery backup ensures the pump continues working during outages, when water issues are most common.
- Pumps water out automatically
- Routes water away from the home
- Supports basements with ongoing moisture
The backup adds reliable protection during storms and power failures.
3. Vapor Barriers and Wall Panels
Vapor barriers and wall panels help manage moisture that moves through concrete walls. These materials are secured directly to the wall surface, creating a channel that guides moisture downward into the drainage system rather than allowing it to enter the basement air.
- Plastic or dimpled panels attach to the wall
- Create a controlled path for moisture
- Direct water into the drainage track below
- Help lower humidity and discourage mold growth
This method keeps surface moisture out of the living space.
4. Crack Injection
Crack injection seals small openings in walls or floors. Epoxy or polyurethane is injected into the crack through ports, filling the full depth of the void. Once cured, the material blocks water passage and strengthens the damaged area.
- Penetrates deeply into cracks
- Stops isolated seepage points
- Reinforces weakened sections of concrete
Ideal for single cracks or localized leaks.
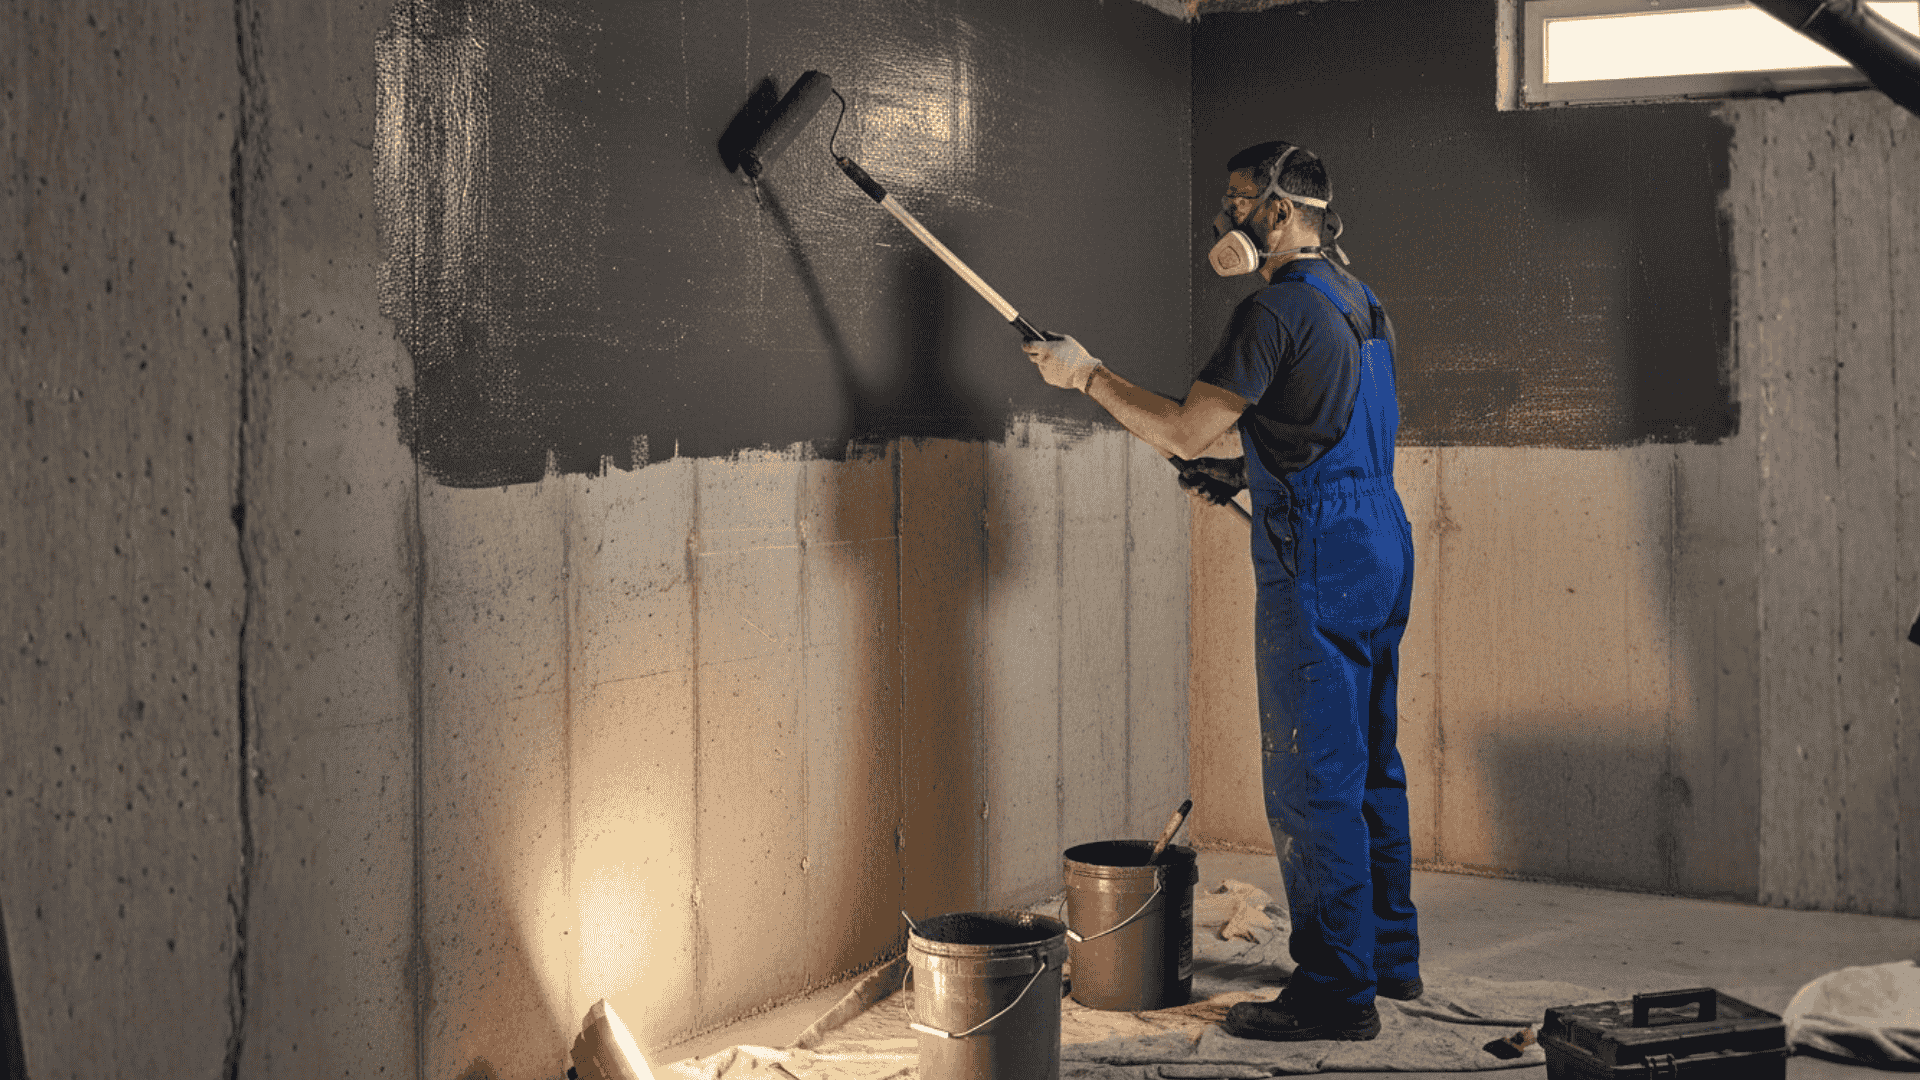
5. Waterproof Coatings and Sealants
Waterproof coatings add a protective layer to concrete surfaces experiencing mild dampness. These coatings are applied directly to the wall and help reduce moisture movement through porous concrete.
Types include:
- Cement-based coatings that bond tightly to concrete
- Elastomeric products that flex with minor wall movement
These coatings provide surface protection and perform best when combined with a drainage system.
Common Interior Waterproofing Mistakes to Avoid
Even the best waterproofing plans can fail if key steps are overlooked. Many residents make simple mistakes that lead to recurring leaks, mold, or basement flooding. Here are the most common errors and how to avoid them.
| Mistake | Why It’s a Problem | Solution |
|---|---|---|
| Painting the Walls Only | Paint hides moisture but doesn’t stop water pressure. | Use coatings with a full drainage system. |
| Ignoring Gutters & Grading | Water pools near the foundation and seeps inside. | Clean gutters, extend downspouts, regrade soil. |
| Sealing Cracks Without Finding the Cause | Cracks return when pressure or drainage issues persist. | Fix drainage/pressure first, then seal cracks. |
| DIYing Major Waterproofing Work | Incorrect installation leads to system failure and flooding. | Hire trained waterproofing professionals. |
| No Backup Sump Pump | Power outages disable the main pump, leading to flooding. | Install a battery or water-powered backup pump. |
Avoiding these mistakes helps your waterproofing system work the way it should, protecting your basement, preserving your foundation, and giving you long-term peace of mind.
Exterior Waterproofing Techniques
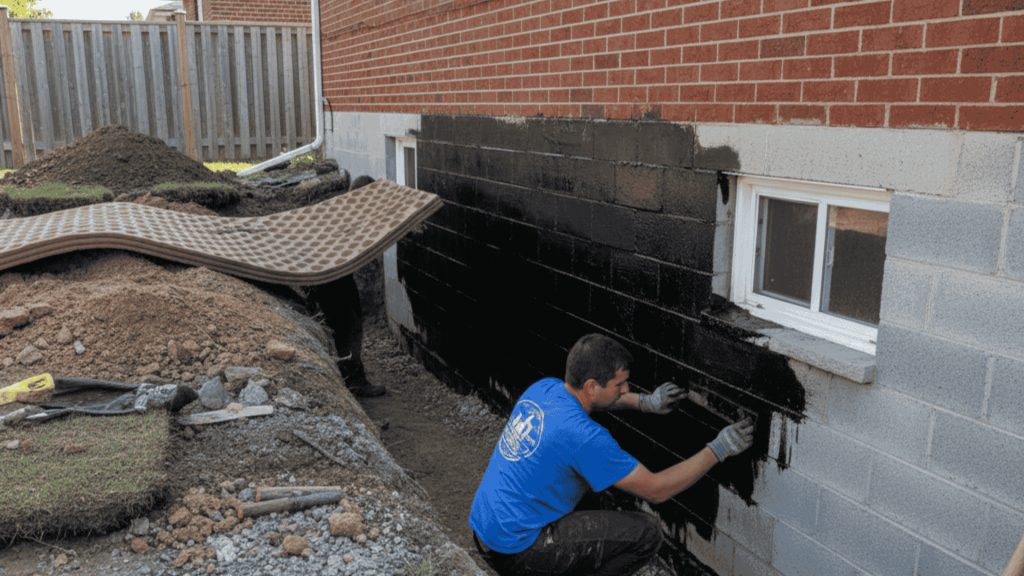
Exterior waterproofing focuses on preventing water from ever reaching your foundation. It often begins with excavation, so contractors can clean the walls and apply a waterproof membrane or an asphalt coating to create a strong external barrier.
Exterior drain tiles, or French drains, are installed at the footing level to capture groundwater and redirect it away from the home. Simple improvements, such as correcting soil grading and extending downspouts, help move rainwater away from the foundation.
Window well drainage using gravel and drainage pipes prevents water from collecting around basement windows. Together, these exterior measures keep moisture from entering your basement in the first place.
Common Exterior Waterproofing Mistakes to Avoid
Exterior waterproofing protects your foundation before water ever reaches the inside. But small oversights outdoors can create major moisture issues later. Here are the most frequent mistakes and how to prevent them.
| Mistake | Why It’s a Problem | Solution |
|---|---|---|
| Poor Grading | Water flows toward the foundation. | Slope the soil away from the house. |
| Ignoring Foundation Cracks | Cracks let water enter and spread. | Seal cracks and address the cause. |
| Short or Clogged Downspouts | Water pools near the home. | Clean and extend downspouts 4–6 feet. |
| No Exterior Drainage | Water has no exit path. | Add French drains or footing drains. |
| Damaged Waterproof Membrane | Exposed walls absorb moisture. | Repair or install a proper membrane. |
Addressing these issues early keeps water away from your foundation and strengthens your entire waterproofing system.
Final Thoughts
Waterproofing your basement is a needed investment in your home’s long-term protection.
By addressing moisture problems early, you prevent potential damage to your foundation, structure, and indoor air quality.
Interior waterproofing systems help manage water infiltration, reduce mold growth, and preserve your basement space, ultimately saving you money on future repairs.
Whether you’re dealing with minor leaks or persistent dampness, investing in a quality waterproofing solution now ensures your basement remains dry, safe, and healthy.
Don’t wait until it’s too late; taking action today can avoid major issues down the road.
Ready to protect your basement from water damage? Contact a trusted waterproofing professional now to schedule a consultation and keep your home safe for years to come.