Do you watch your hydrangeas produce lush green leaves all summer with no flowers in sight?
Many gardeners face this frustrating problem because they prune their hydrangeas at the wrong time. Getting the timing wrong can cost you an entire season of beautiful blooms.
Learning when to prune hydrangeas based on your specific variety is the key to abundant flowers.
Different hydrangea types form their flower buds at different times throughout the year. Some need pruning right after flowering, while others can wait until late winter.
This article will show you exactly when to cut back hydrangeas for each variety type.
You’ll learn to identify your hydrangea species, follow the proper timing schedule, and use step-by-step pruning techniques, along with essential aftercare tips, for the best results.
Why Timing Matters for Hydrangea Pruning?
Timing makes all the difference when you cut back hydrangeas. Poor timing can cost you a full season of beautiful blooms. Understanding when to prune hydrangeas protects your flower display and keeps your plants healthy year after year.
Most gardeners learn this lesson the hard way by pruning in early spring, thinking they’re helping their plants. Instead, they watch their hydrangeas grow lush green leaves all summer with no flowers in sight.
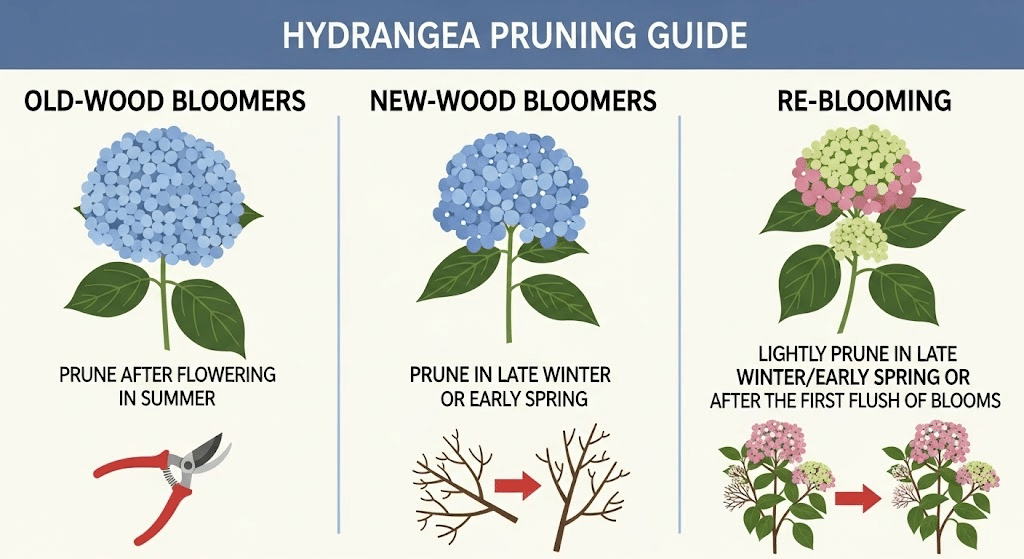
Understanding wood types is key to successful pruning. Old wood refers to stems from previous seasons, while new wood means fresh growth from the current year. This difference determines your entire pruning approach:
- Old wood bloomers set flower buds on last year’s stems that sit dormant through winter
- New wood bloomers form buds on fresh stems that grow each spring
- Cut old wood too late, and you lose next year’s flowers
- New wood varieties can be pruned in late winter without losing blooms
This explains why some gardeners struggle with certain hydrangea types while others succeed easily.
Common Hydrangea Pruning Mistakes to Avoid
Learning from these common errors saves you time, frustration, and lost blooms. Most pruning problems stem from timing issues or using the wrong approach for your hydrangea type.
The most frequent mistakes that gardeners make are:
- Pruning all varieties at the same time: Choosing one weekend in spring to trim everything fails with hydrangeas since each type has different needs.
- Cutting too much at once: Hydrangeas don’t need heavy pruning like some shrubs – light, selective cuts work better.
- Using dull or dirty tools: This can damage stems and spread disease between plants instead of making clean cuts that heal quickly.
- Ignoring the plant’s natural shape: This leads to awkward-looking shrubs instead of working with their natural growth patterns.
When to Cut Back Hydrangeas?
Knowing when to prune hydrangeas depends entirely on your specific variety. Each type forms flower buds at different times, making timing critical for next year’s blooms.
When to Cut Back Hydrangeas by Season:
- Late Winter (February-March): Perfect time for panicle and smooth hydrangeas. Cut back to 12-18 inches above ground if desired. Avoid pruning during freezing periods.
- Mid-Summer (July-August): Prime time for old-wood bloomers. Prune within 4-6 weeks after flowers fade. This gives plants time to develop next year’s buds before winter.
- Early Fall: Avoid pruning old-wood types now – you’ll remove developing buds. Light cleanup of broken branches only.
Use this timeline to protect your blooms and maintain healthy plants. Getting the season right makes the difference between flowers and disappointment.
The Right Way to Prune Hydrangeas
Learn the correct pruning approach to protect your hydrangea’s future blooms and maintain plant health. Start by gathering the right tools to ensure clean cuts and safe handling.
What You’ll Need:
- Clean, sharp pruning shears (secateurs)
- Garden gloves
- Small hand saw for thick branches (optional)
Once you have your tools ready and your hydrangea shows signs of new growth, you can begin the pruning process.
Follow each step carefully to ensure the best results for your specific hydrangea type.
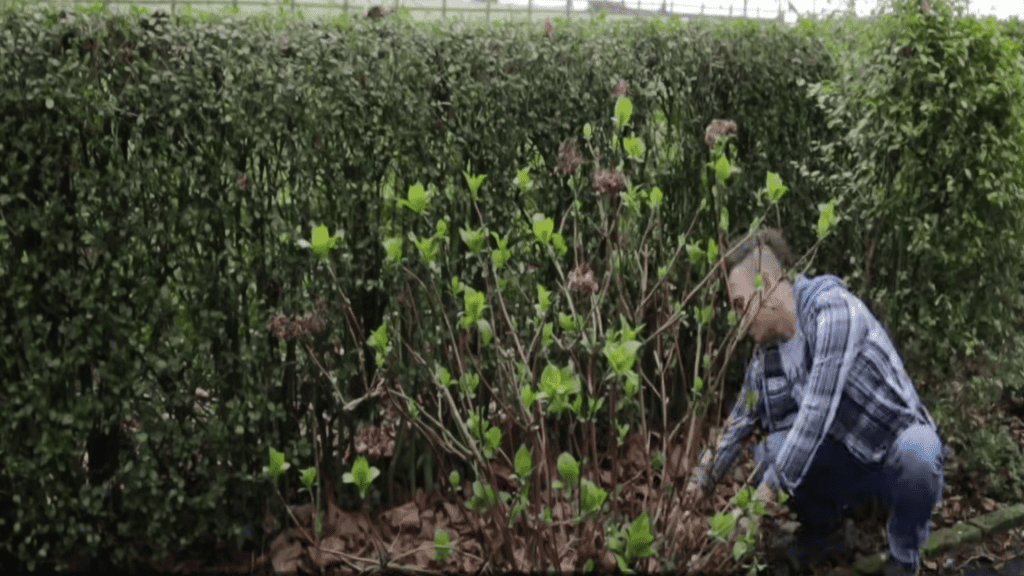
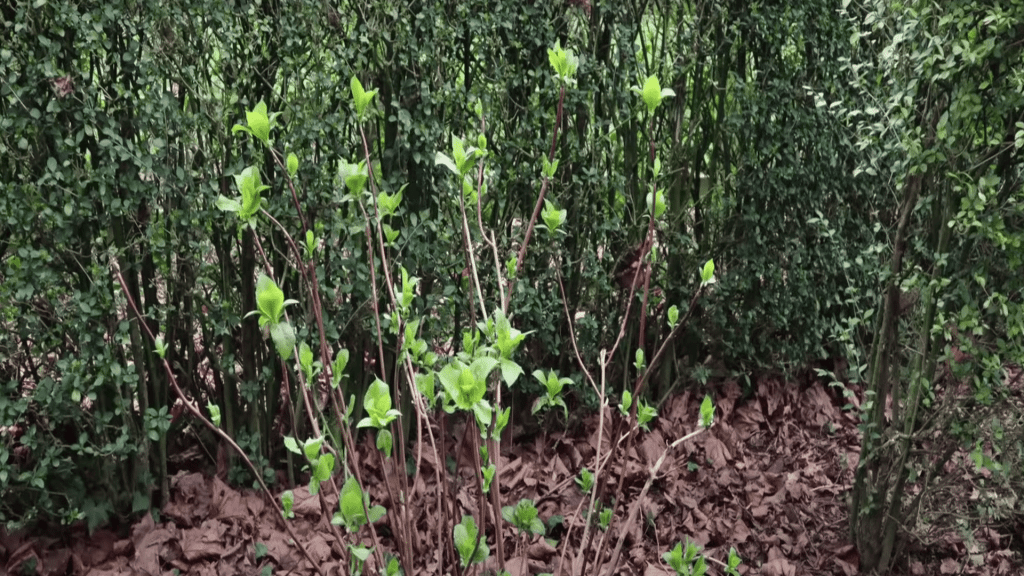
Step 1: Check for Readiness
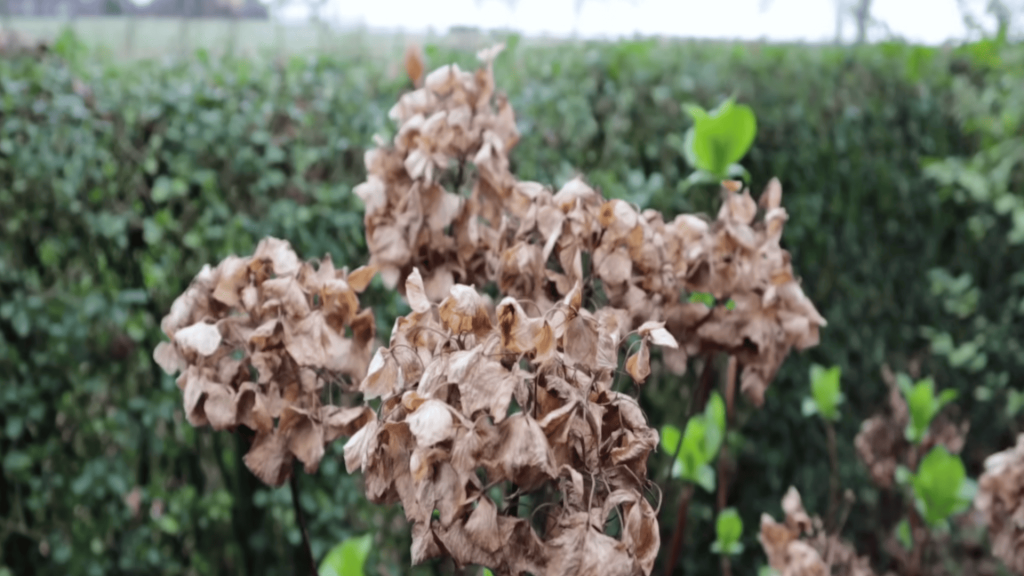
Look for dried seed heads from last year and bright green buds bursting out from the stems.
When you see new green growth starting to emerge, your hydrangea is ready for pruning. This typically happens in late winter, around February, in most climates.
Don’t rush this step – pruning too early can expose new cuts to harsh winter weather.
Step 2: Remove Old Flower Heads
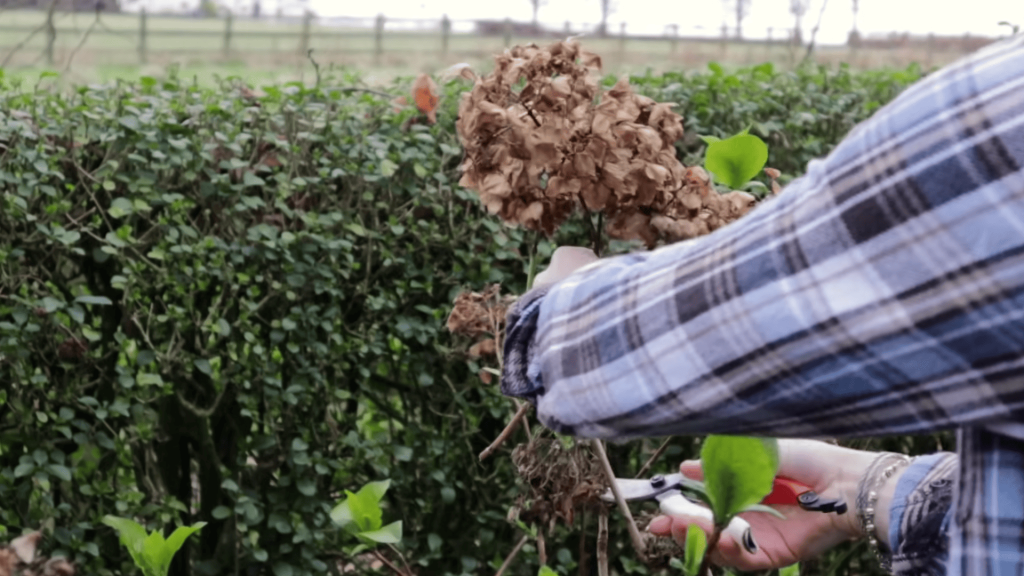
Cut off all the old, dried flower heads from last year. Make your cuts just above the first set of healthy, green buds you can see on each stem.
This removes dead material and directs the plant’s energy toward producing new growth and flowers. The old flower heads should come off easily if they’re properly dried.
Step 3: Make Proper Cuts
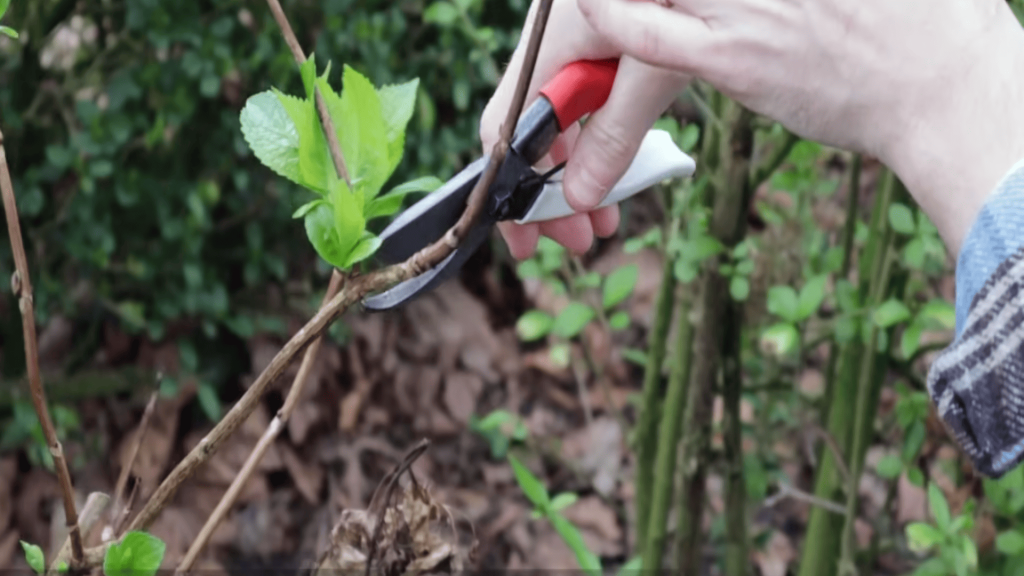
Always cut at an angle away from the next bud using sharp, clean secateurs. Cut about 1/4 inch above the bud at a slight downward angle.
This angled cut prevents water from sitting on the cut surface, which could lead to rot or disease. Clean cuts heal faster and reduce stress on the plant.
Step 4: Thin Out Older Stems
Remove about one-quarter of the oldest stems completely by cutting them back to ground level.
Old stems often produce fewer flowers and can become woody. Removing them encourages fresh, vigorous growth from the base and opens up the center for better air circulation.
Step 5: Clean Up the Base
Tidy up around the base by removing any dead material or weak growth. Leave strong new shoots intact, as these will produce this year’s flowers.
A clean base improves air circulation and makes it easier to spot potential problems early.
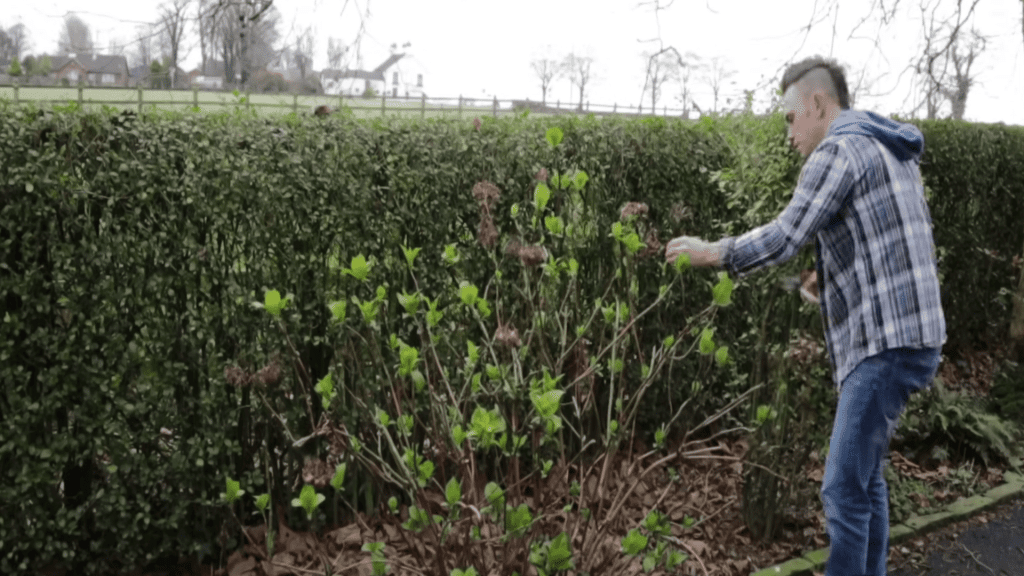
Step 6: Final Shape Check
Step back and look at your hydrangea’s overall shape.
The plant should look open and airy, not congested. You want good spacing between branches so air and light can reach all parts of the plant.
Make any final adjustments needed for a balanced appearance.
Video Tutorial
I’d like to give credit to Garden Ninja: Lee Burkhill for their informative video, as a reference for this guide.
After-Care for Healthy Hydrangea Regrowth
Your hydrangeas need proper care after pruning to recover from the stress and produce healthy new growth. Following these essential aftercare steps ensures strong plants and abundant blooms for the coming season.
- Water deeply at the base right after pruning, and keep the soil consistently moist.
- Apply 2-3 inches of organic mulch around the base, away from stems.
- Wait until early spring to apply balanced fertilizer, avoiding high-nitrogen types.
- Watch for aphids, powdery mildew, and scale insects in the weeks following pruning.
- Ensure good air circulation and avoid overhead watering to prevent diseases.
- Clean pruning tools between plants and address problems early.
- Consider compost or organic fertilizers for gentle, long-term nutrition.
The Bottom Line
Proper timing makes all the difference when you prune your hydrangeas.
By identifying your hydrangea type and following the right schedule, you can enjoy spectacular blooms year after year.
Old wood varieties need attention right after flowering, while new wood types can wait until late winter.
Remember that hydrangeas are forgiving plants. The key is understanding when to prune hydrangeas based on their specific growth habits and bud formation patterns.
Start by identifying which type you have. With proper timing and technique, your hydrangeas will reward you with healthy growth and abundant flowers.
What type of hydrangeas do you have in your garden? Share your pruning experiences and questions in the comments below.
Frequently Asked Questions
What is the 1:3 Rule for Hydrangeas?
Remove one-third of the oldest stems each year to keep hydrangeas healthy and blooming well. This prevents overcrowding and encourages new growth.
When to Use Coffee Grounds on Hydrangeas?
Apply coffee grounds in spring around blue hydrangeas to make the soil more acidic. Used grounds work better than fresh ones for soil improvement.
Can You Take a Cutting from a Hydrangea and Grow It?
Yes, take four to six-inch cuttings from new growth in early summer. Remove lower leaves and root in water or moist potting soil.