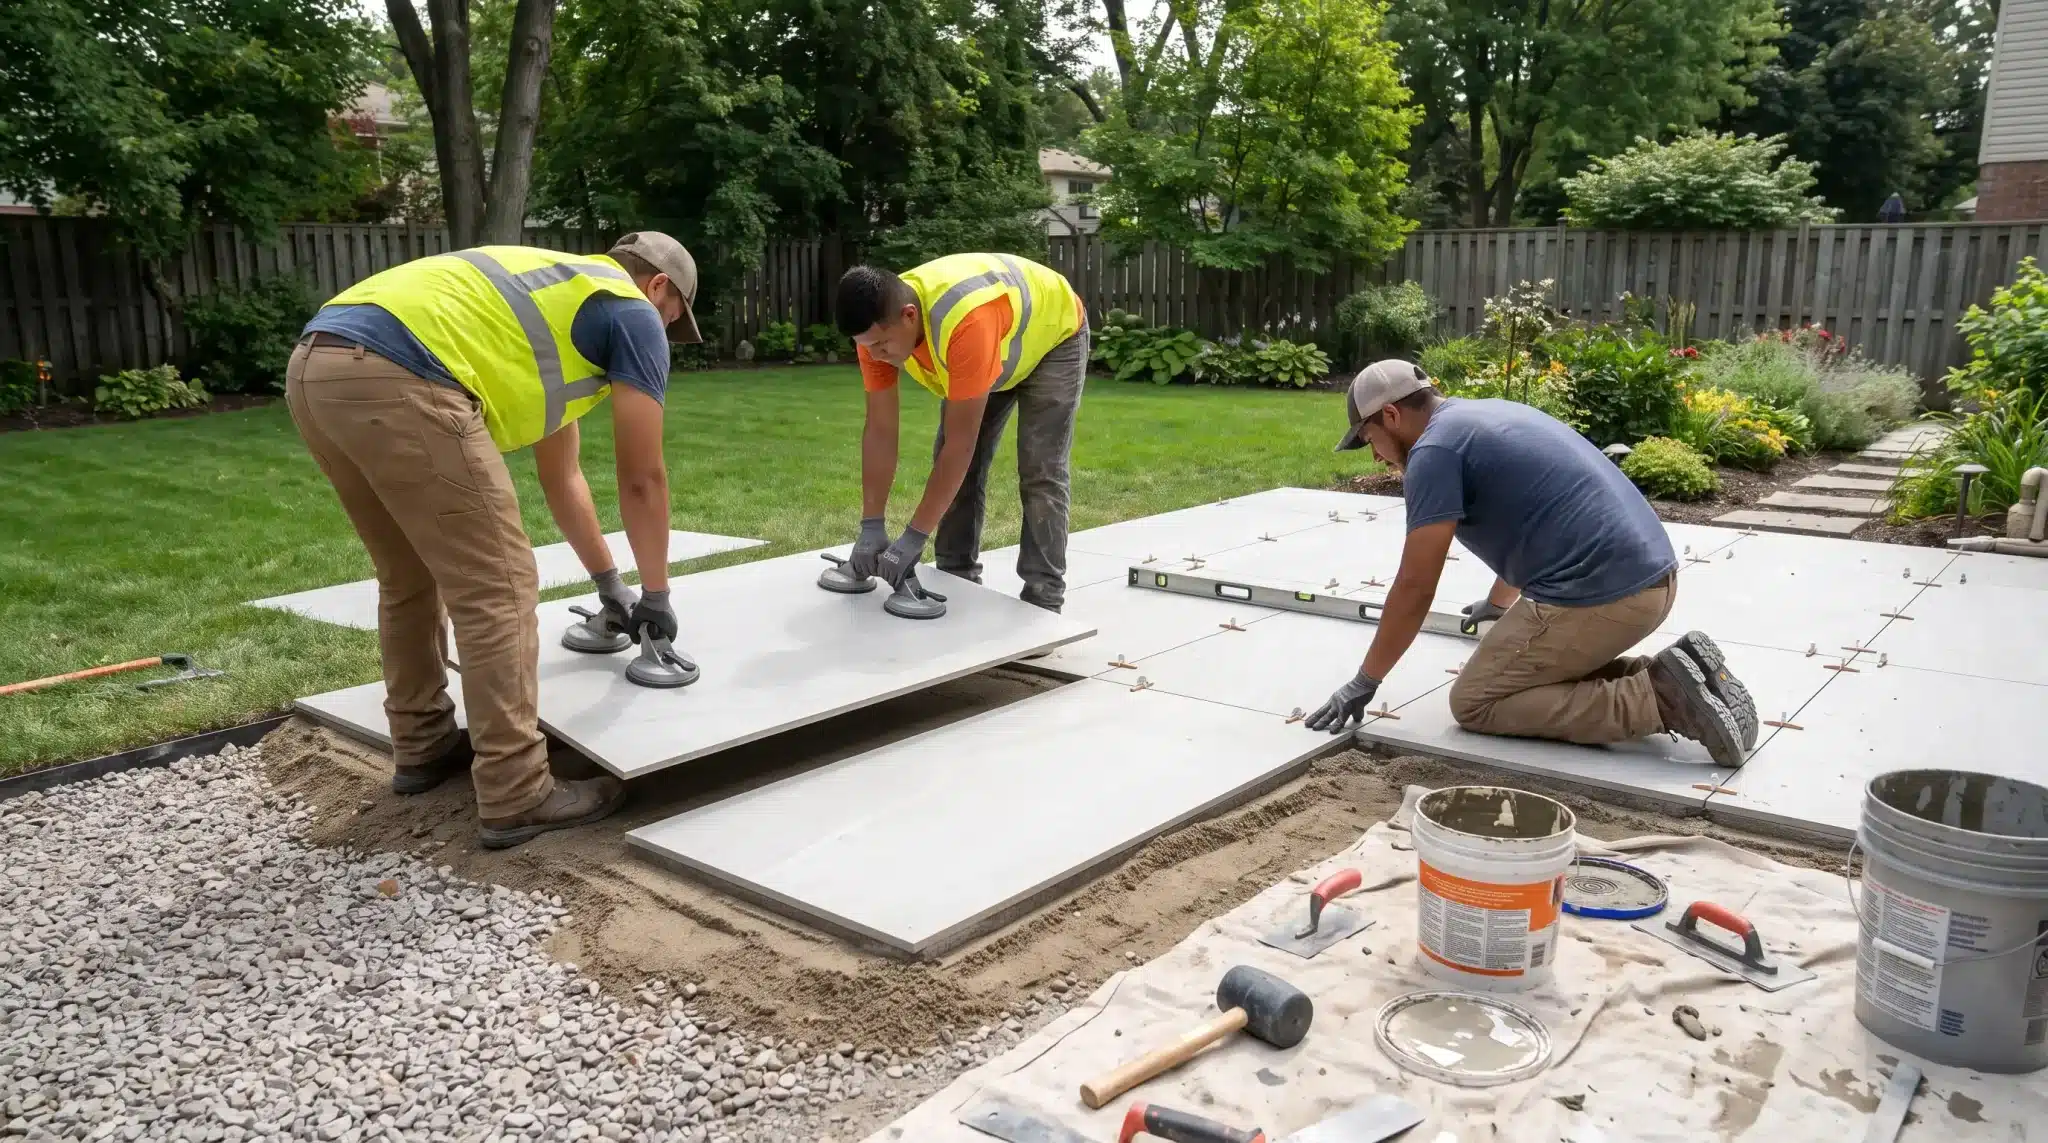

Laying porcelain slabs correctly is what separates a patio that lasts for decades from one that cracks within a year.
I’ve helped with this process, and the surface only performs as well as the base beneath it.
Porcelain resists frost, stains, and daily wear better than most paving materials, but skipping proper prep undoes that fast.
This blog breaks down five trusted methods for laying porcelain slabs, so you can pick the right one and keep your patio level, strong, and attractive for years.
What You’ll Need Before You Start
Before starting, gather all materials and tools. Porcelain’s low porosity means missing equipment or using the wrong bonding product can quickly cause installation problems.
| Category | You’ll Need |
|---|---|
| Base | Crushed stone or gravel, sharp sand, concrete sand, and geotextile fabric |
| Bonding | Thin-set mortar or bedding mortar, plus priming slurry for mortar-set installations |
| Spacing & Jointing | 3–5mm tile spacers, polymeric sand, or outdoor grout |
| Tools | Wet saw with porcelain blade, rubber mallet, plate compactor, spirit level, notched trowel, and screed board |
Best Methods for Installing Porcelain Paving
Use the right installation method to keep porcelain paving level, stable, and long-lasting while preventing cracks, movement, and poor drainage.
1. Laying Porcelain Slabs on a Concrete Base
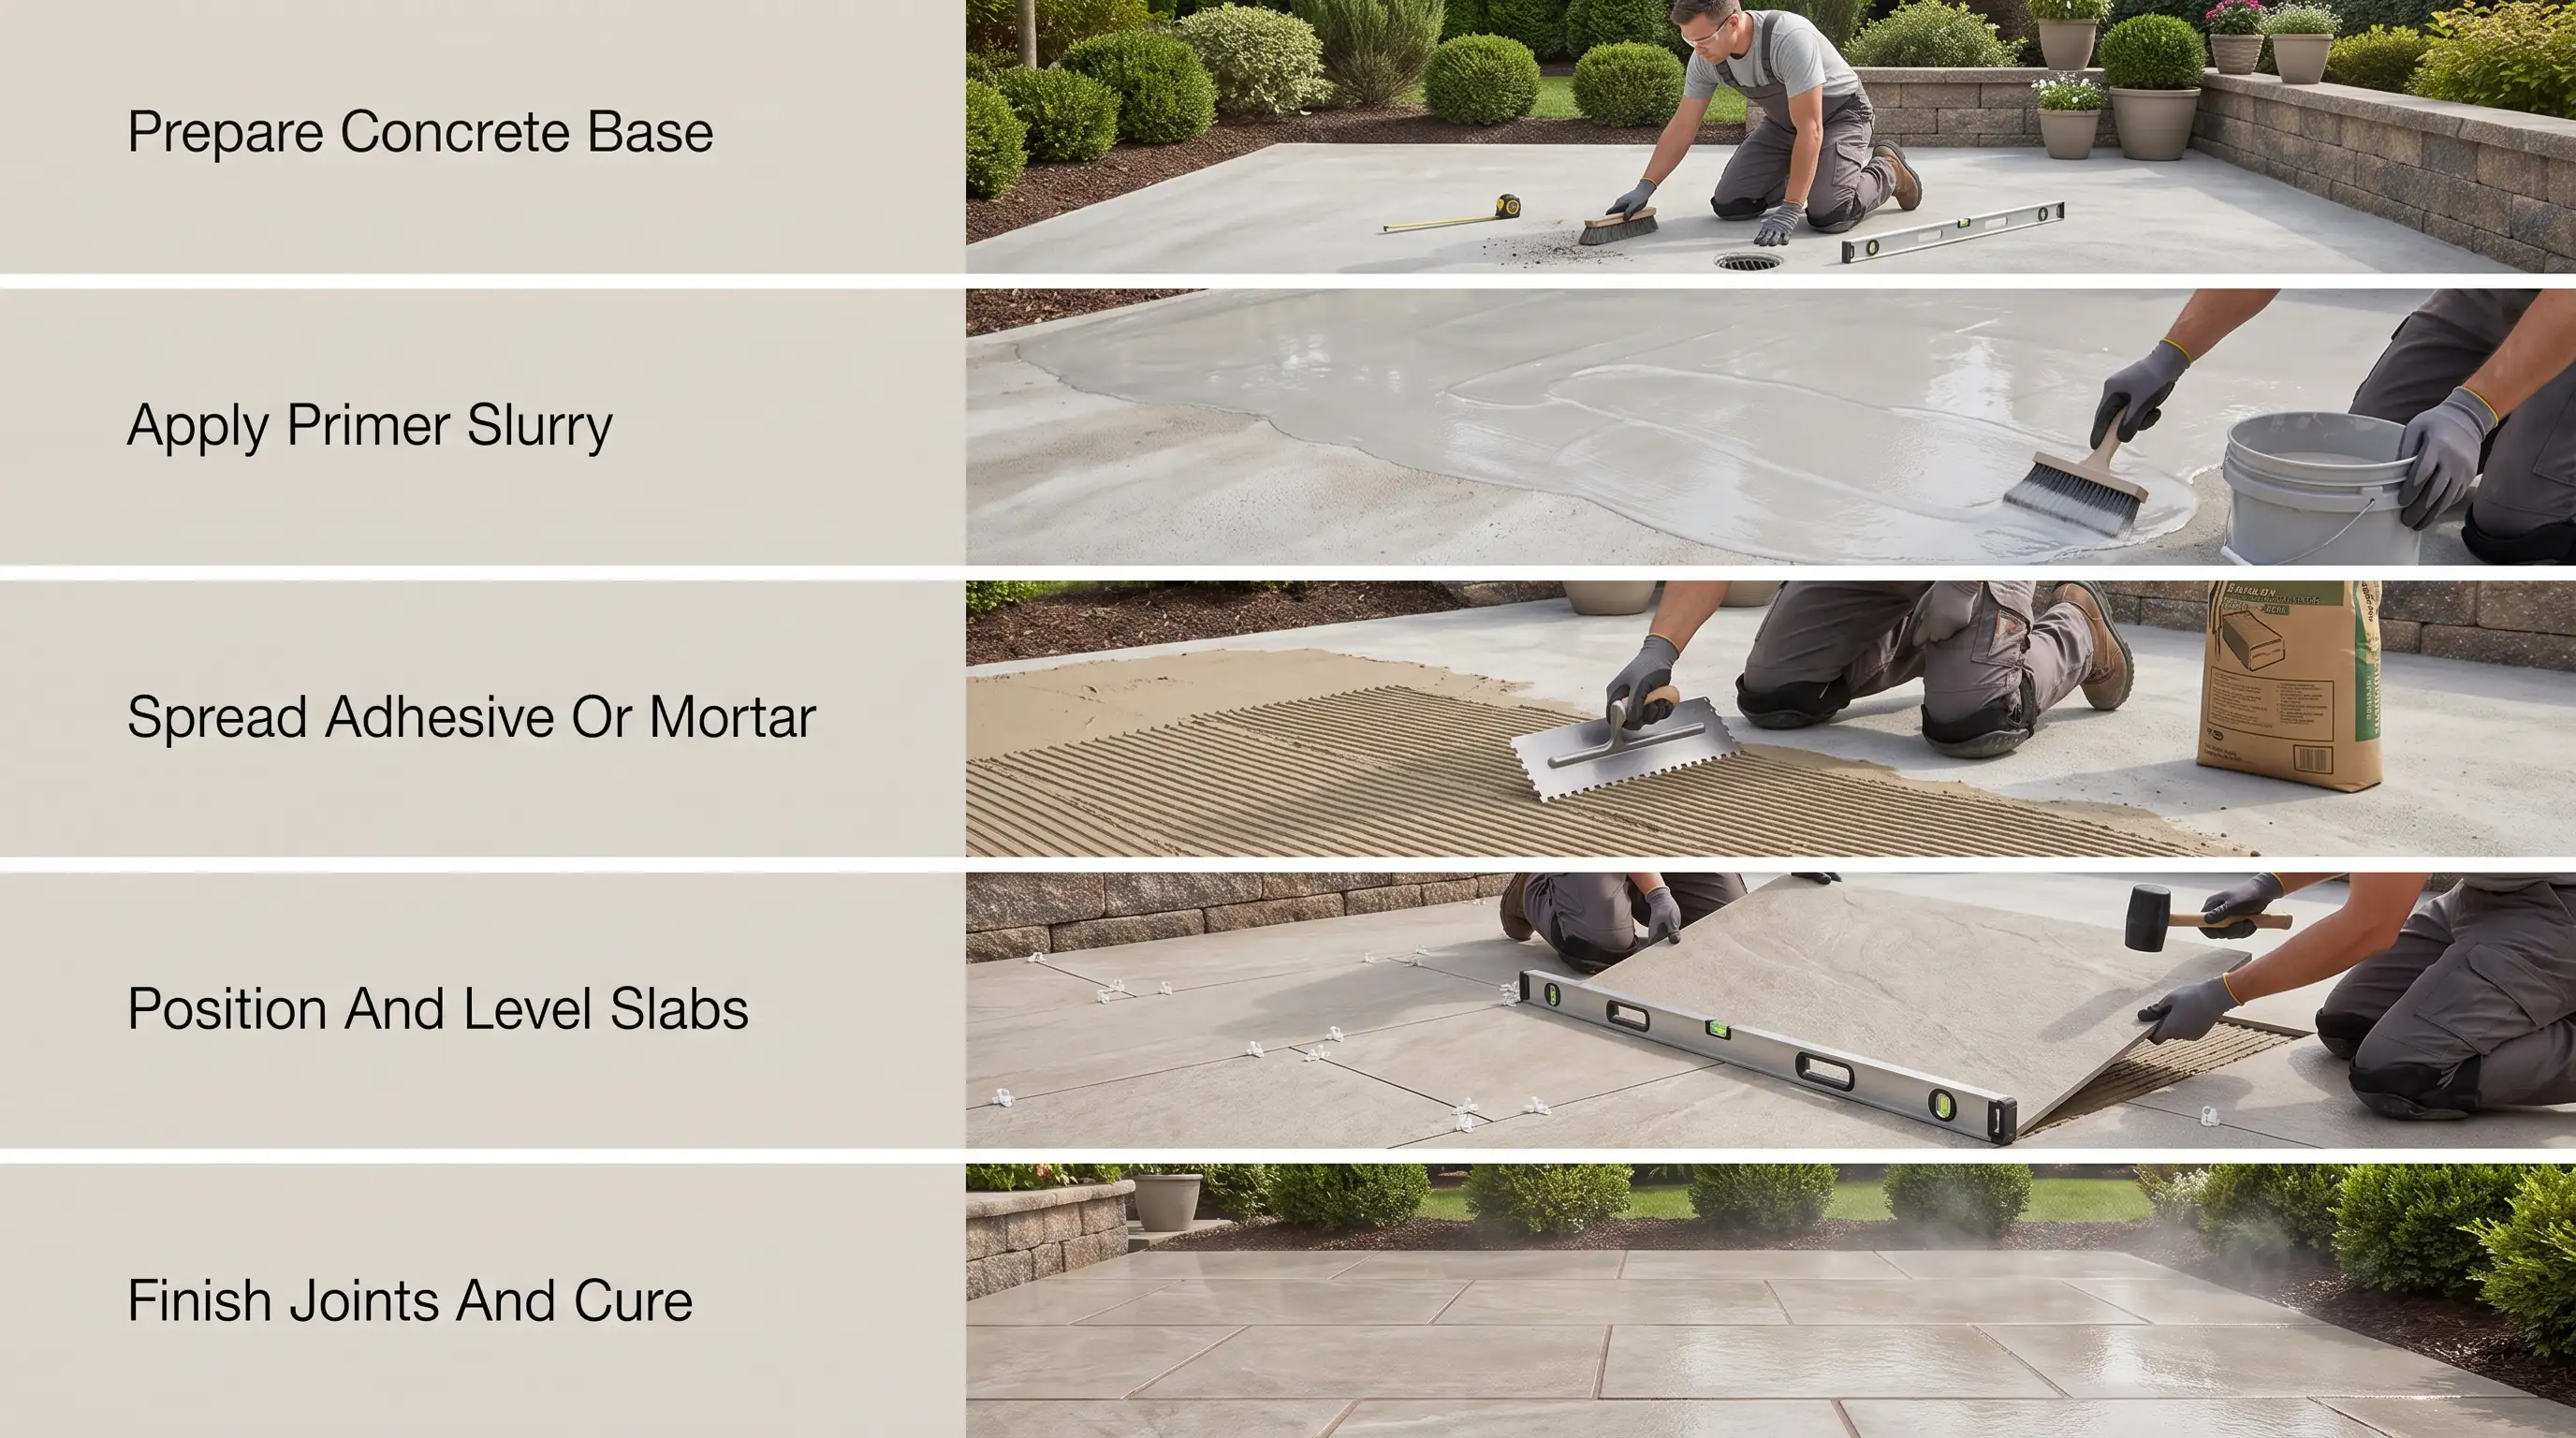
A concrete base is one of the most durable and reliable methods for installing porcelain slabs.
It works especially well for permanent patios, outdoor dining spaces, and areas that experience regular foot traffic.
I recommend this method to clients who want a patio they will never need to relay.
This method creates a strong foundation that helps prevent movement, cracks, and uneven surfaces. The key is preparing the base correctly before fixing the slabs in place.
Step 1: Prepare The Concrete Base
Before laying porcelain slabs, clean the concrete surface thoroughly and remove any dust, debris, loose material, or contaminants that could affect adhesion.
The concrete should be fully cured, stable, and strong enough to support the paving.
Check that the base has the correct slope so water can drain away from the surface instead of pooling against the slabs.
A properly prepared foundation creates a secure starting point and helps prevent future problems such as loose slabs, shifting, or uneven areas.
Step 2: Apply A Primer Slurry
A bonding slurry primer creates a stronger connection between the porcelain slabs and the concrete base.
Apply the slurry evenly across the surface or underside of the slabs according to the product instructions before installation.
This additional bonding layer helps improve adhesion and reduces the risk of weak points forming beneath the paving.
Skipping this step can affect the stability of the installation, especially in outdoor areas exposed to changing weather conditions.
Step 3: Spread Adhesive Or Mortar Evenly
Apply a suitable outdoor-rated adhesive or mortar across the prepared surface, making sure it provides full coverage beneath each porcelain slab.
Empty spaces underneath can create pressure points where the slabs may crack or become unstable over time.
Using the correct trowel technique helps create an even layer and improves contact between the slab and base.
Proper coverage is especially important for large porcelain slabs, which require consistent support across their entire surface.
Step 4: Position And Level The Slabs
Carefully place each porcelain slab into position and make adjustments before the adhesive or mortar begins to set.
Use spacers to maintain consistent gaps between slabs and check the level regularly during installation.
A rubber mallet can help gently settle slabs into place without damaging the surface.
Taking time at this stage ensures a smooth, even patio finish and prevents uneven edges, trip hazards, or poor drainage caused by incorrect positioning.
Step 5: Complete The Joints And Allow Curing
Once all porcelain slabs are positioned correctly, complete the joints using a suitable outdoor jointing compound.
Properly filled joints help stabilize the paving and create a finished appearance while reducing the chance of debris collecting between slabs.
Allow enough curing time before walking on or placing furniture on the surface.
Rushing this stage can disturb the installation and weaken the bond, affecting the durability and stability of the finished patio.
2. Laying Porcelain Slabs On A Mortar Bed
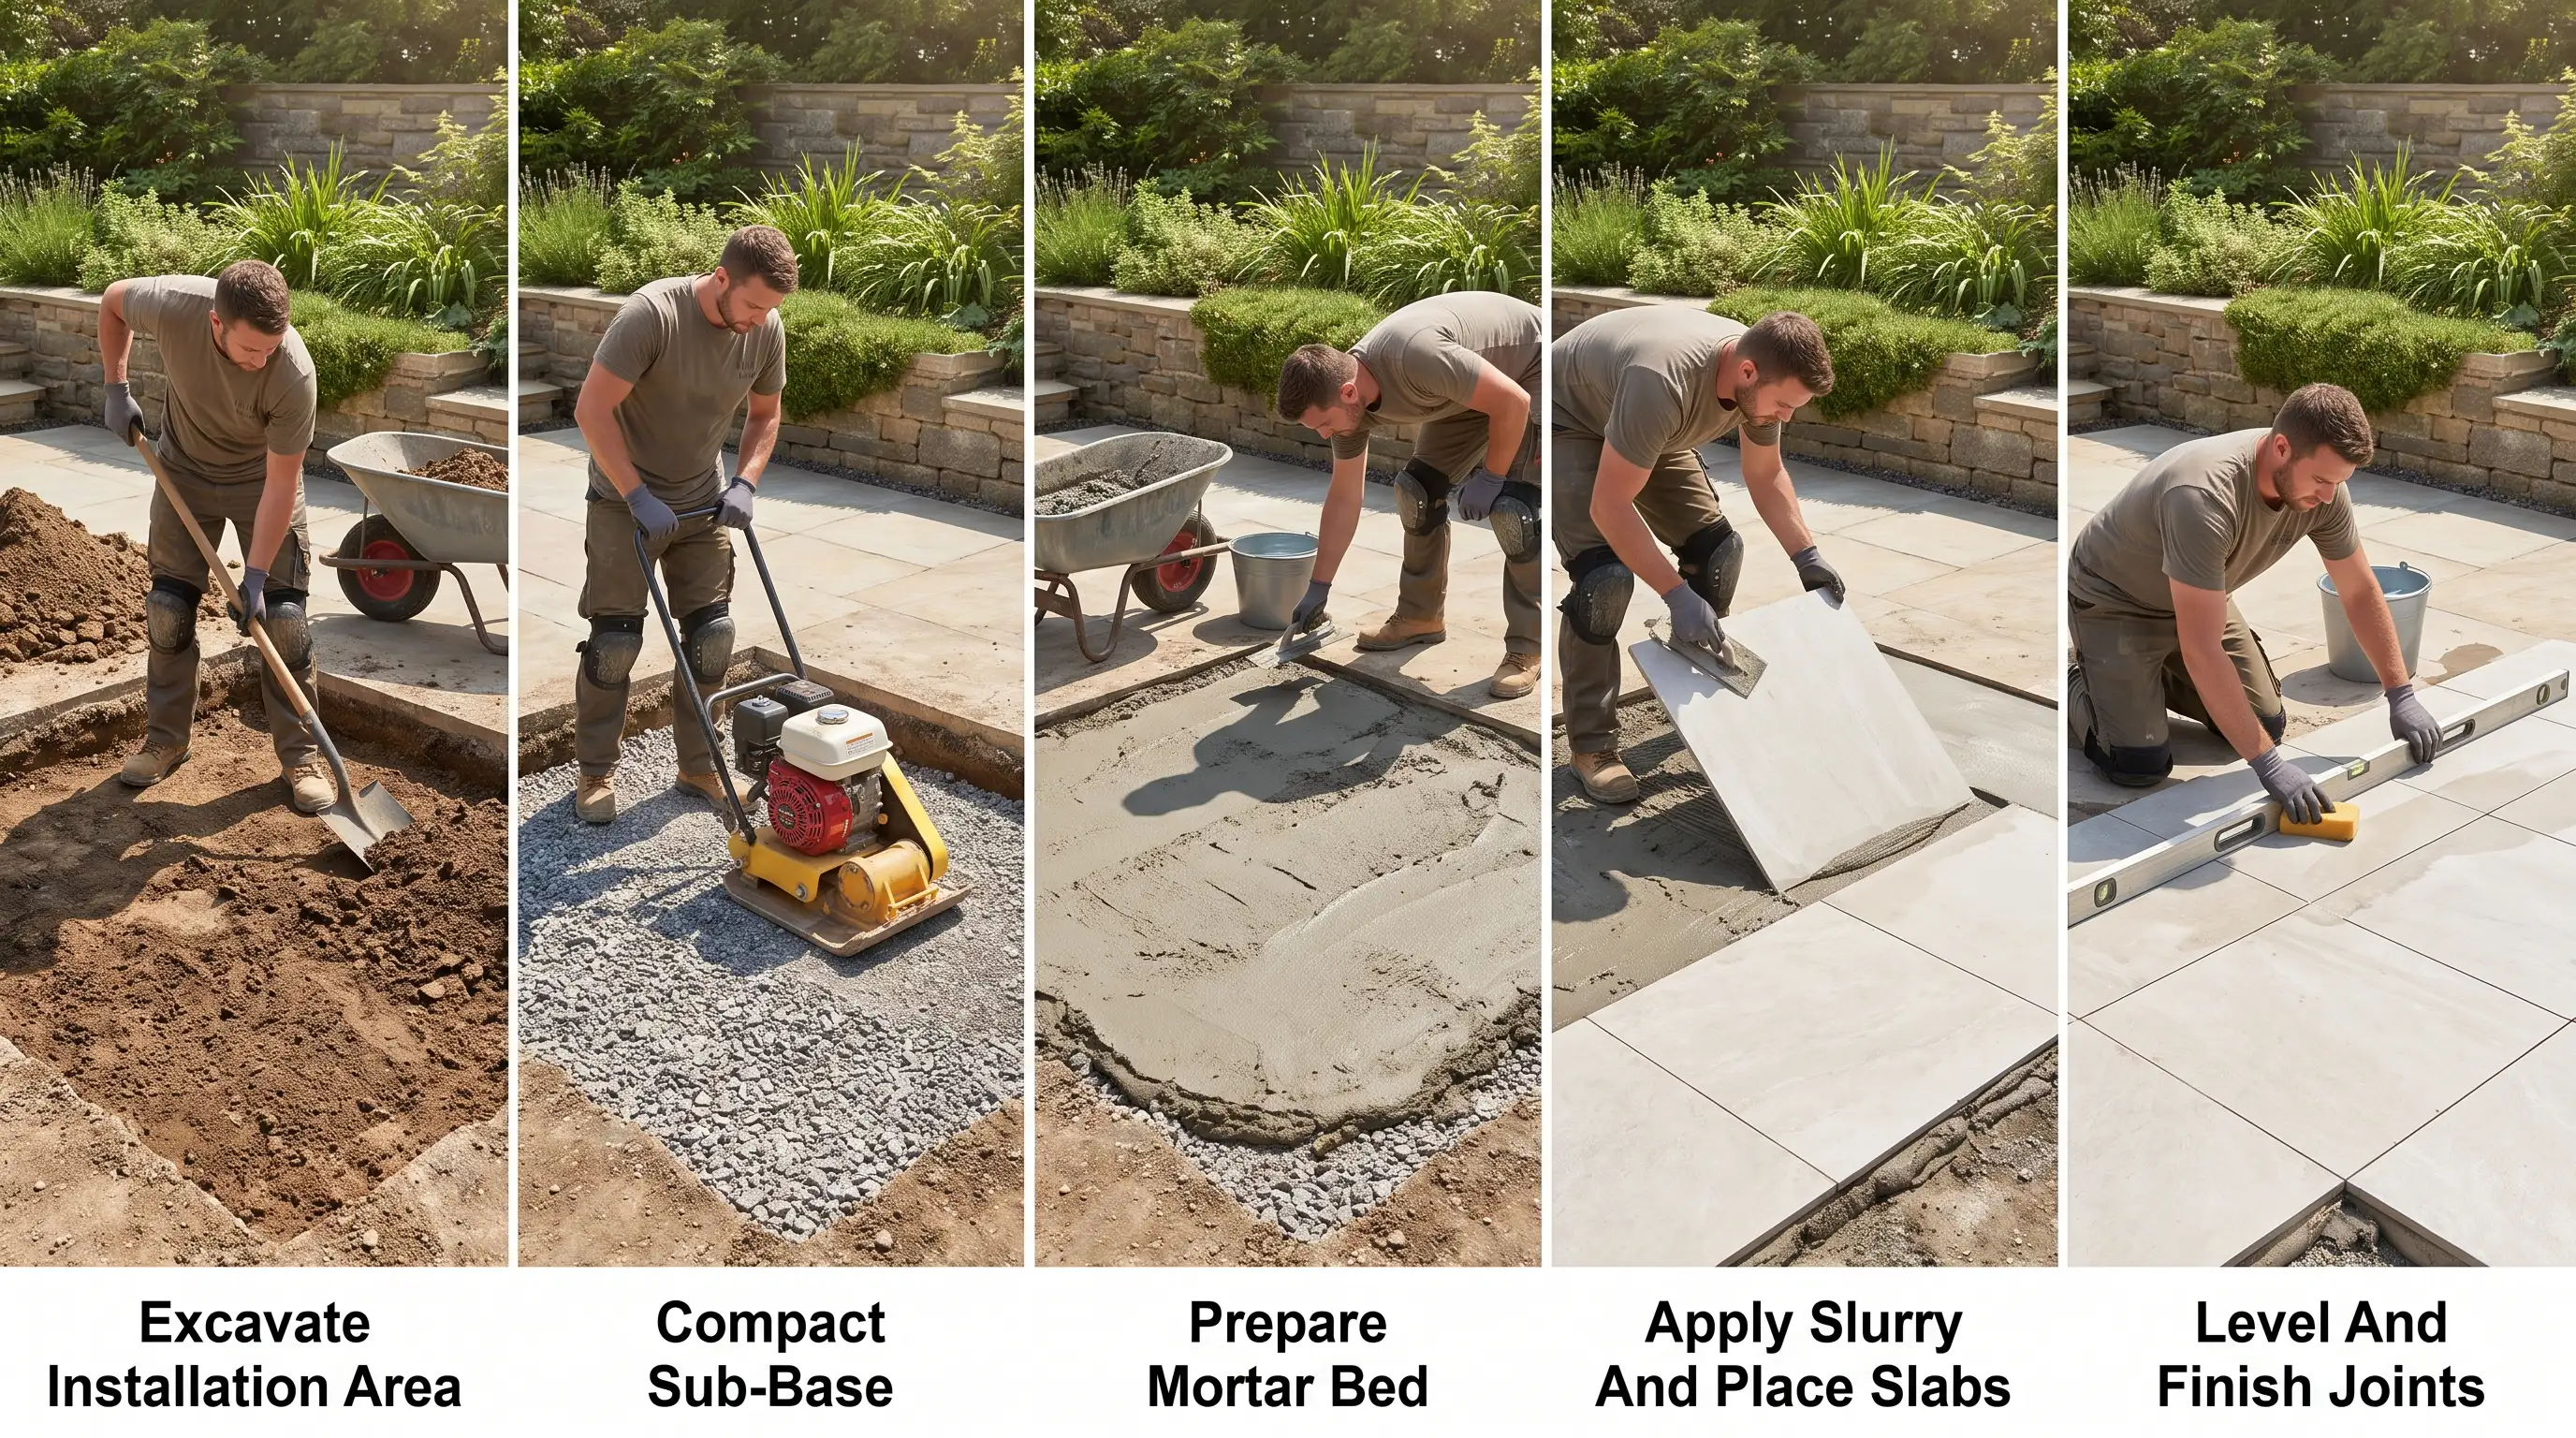
The mortar bed method is a traditional installation approach that provides a strong and dependable foundation for porcelain paving.
It works well for patios and outdoor areas where deeper preparation is possible, and a fixed installation is preferred.
This method allows the slabs to sit securely on a carefully prepared mortar layer, helping create a stable surface that can handle regular outdoor use when installed correctly.
Step 1: Excavate The Installation Area
Remove existing soil, grass, old paving, or loose materials to create enough depth for the sub-base and mortar layers.
The required excavation depth depends on the thickness of the porcelain slabs, ground conditions, and expected level of foot traffic.
Proper excavation prevents the finished paving from sitting too high or becoming unstable.
Creating enough space for each layer ensures the foundation can support the slabs and reduces the chance of sinking or movement later.
Step 2: Add And Compact The Sub-Base
Install a suitable sub-base material across the excavated area and compact it thoroughly to create a firm and stable foundation.
Proper compaction removes weak areas and provides consistent support beneath the mortar layer.
A poorly compacted base can lead to movement, dips, or uneven surfaces after installation.
Taking time to prepare this layer correctly improves the strength of the paving system and helps porcelain slabs remain level over time.
Step 3: Prepare The Mortar Bedding Layer
Mix the mortar to the correct consistency and spread it evenly across the prepared sub-base.
The mortar layer should provide a stable surface where each porcelain slab can sit securely without movement.
An uneven mortar bed can create height differences between slabs and affect the final appearance of the patio.
Careful application ensures better support, improved stability, and a smoother finished surface once the paving is complete.
Step 4: Apply Slurry Primer And Place Slabs
Apply a slurry primer to the underside of each porcelain slab before placing it onto the prepared mortar bed.
This additional bonding layer helps create a stronger connection between the slab and mortar, reducing the chance of movement over time.
Carefully position each slab while the mortar is still workable and make adjustments as needed.
Ensuring proper contact between the slab, slurry primer, and mortar layer helps create a stable installation that can handle outdoor conditions.
Step 5: Level The Slabs And Finish The Joints
Check the alignment, spacing, and height of each porcelain slab throughout the installation process.
Maintaining the correct level helps prevent uneven surfaces and ensures water drains properly across the finished patio area.
Once all slabs are securely positioned, complete the joints using a suitable outdoor jointing compound.
A properly finished joint system improves stability, prevents debris buildup, and gives the paving a clean, professional appearance.
3. Laying Porcelain Slabs With Outdoor Adhesive
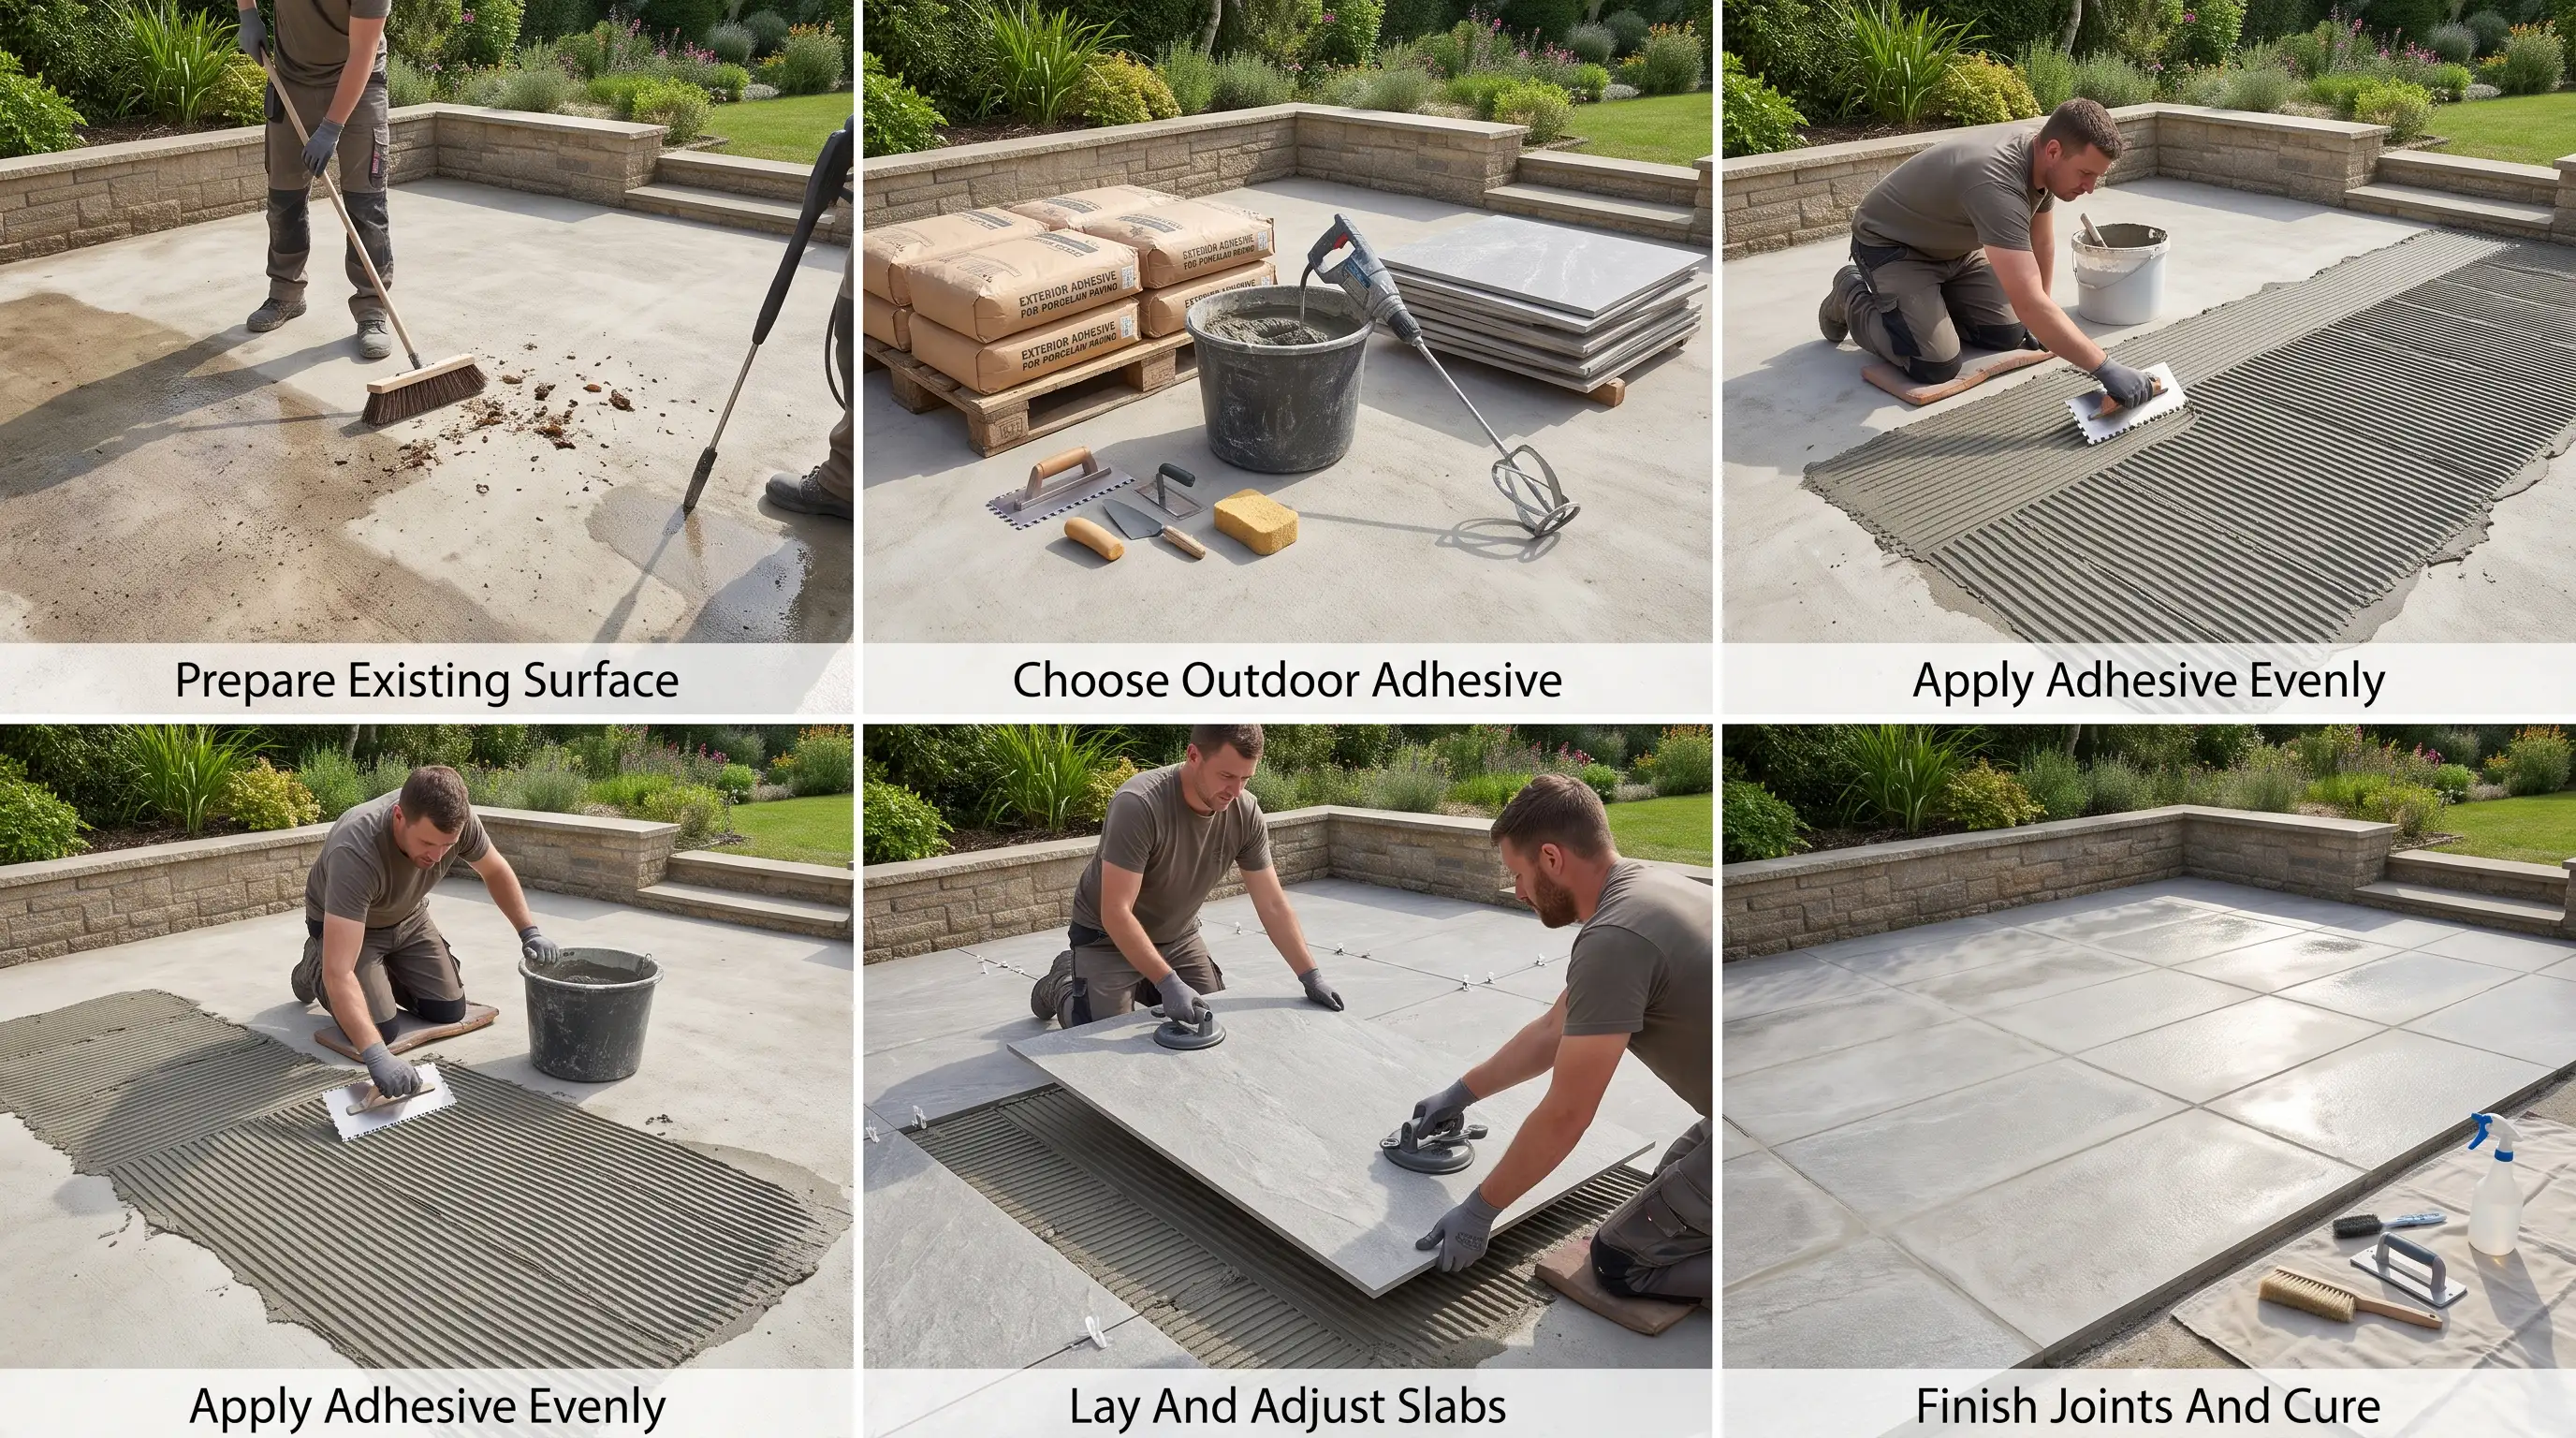
An adhesive installation method works well for smaller porcelain paving projects where a strong, flat, and stable surface already exists.
It allows for accurate slab placement and creates a neat finish when the correct exterior products are used.
This method is often chosen for areas where precise positioning is important, but proper surface preparation and adhesive selection are still essential for creating a durable outdoor installation.
Step 1: Prepare The Existing Surface
Clean the existing surface thoroughly and remove dust, dirt, grease, loose particles, or any damaged material before applying adhesive.
The base must be flat, stable, and free from cracks that could affect the porcelain slabs.
A properly prepared surface allows the adhesive to bond effectively and helps prevent movement after installation.
Skipping this stage can lead to poor adhesion, uneven slabs, or areas where the paving becomes loose over time.
Step 2: Choose An Outdoor-Rated Adhesive
Select an adhesive specifically designed for exterior porcelain paving installations.
Outdoor-rated products are formulated to handle moisture, temperature changes, and seasonal movement that indoor adhesives cannot withstand.
Using the wrong adhesive may cause the slabs to loosen, especially in areas exposed to rain, frost, or temperature fluctuations.
Choosing a suitable product creates a stronger bond and improves the long-term reliability of the paving system.
Step 3: Apply Adhesive Evenly
Spread the adhesive evenly across the surface using the correct trowel technique to create full contact beneath each porcelain slab.
Complete coverage is important because empty spaces underneath can create weak areas.
A consistent adhesive layer helps distribute weight more evenly and reduces pressure points that may cause cracking.
Taking care during application also makes it easier to achieve a level finish across the entire paved area.
Step 4: Lay And Adjust The Slabs
Place each porcelain slab carefully onto the adhesive and make adjustments before the material begins to set.
Use spacers to maintain consistent gaps and check the level of each slab as you work.
Small corrections during installation help prevent uneven edges and alignment issues later.
Taking time to position each slab correctly ensures a cleaner appearance and creates a stable surface that performs well over years of outdoor use.
Step 5: Finish The Joints And Allow Curing
Complete the joints once the porcelain slabs are securely positioned and the adhesive has started to set.
A suitable jointing compound helps protect the gaps between slabs and contributes to the overall stability of the paving.
Allow the adhesive to cure fully before walking on the surface or placing outdoor furniture.
Giving the installation enough curing time prevents movement and helps the finished patio achieve maximum strength.
4. Installing Porcelain Slabs On Pedestal Supports
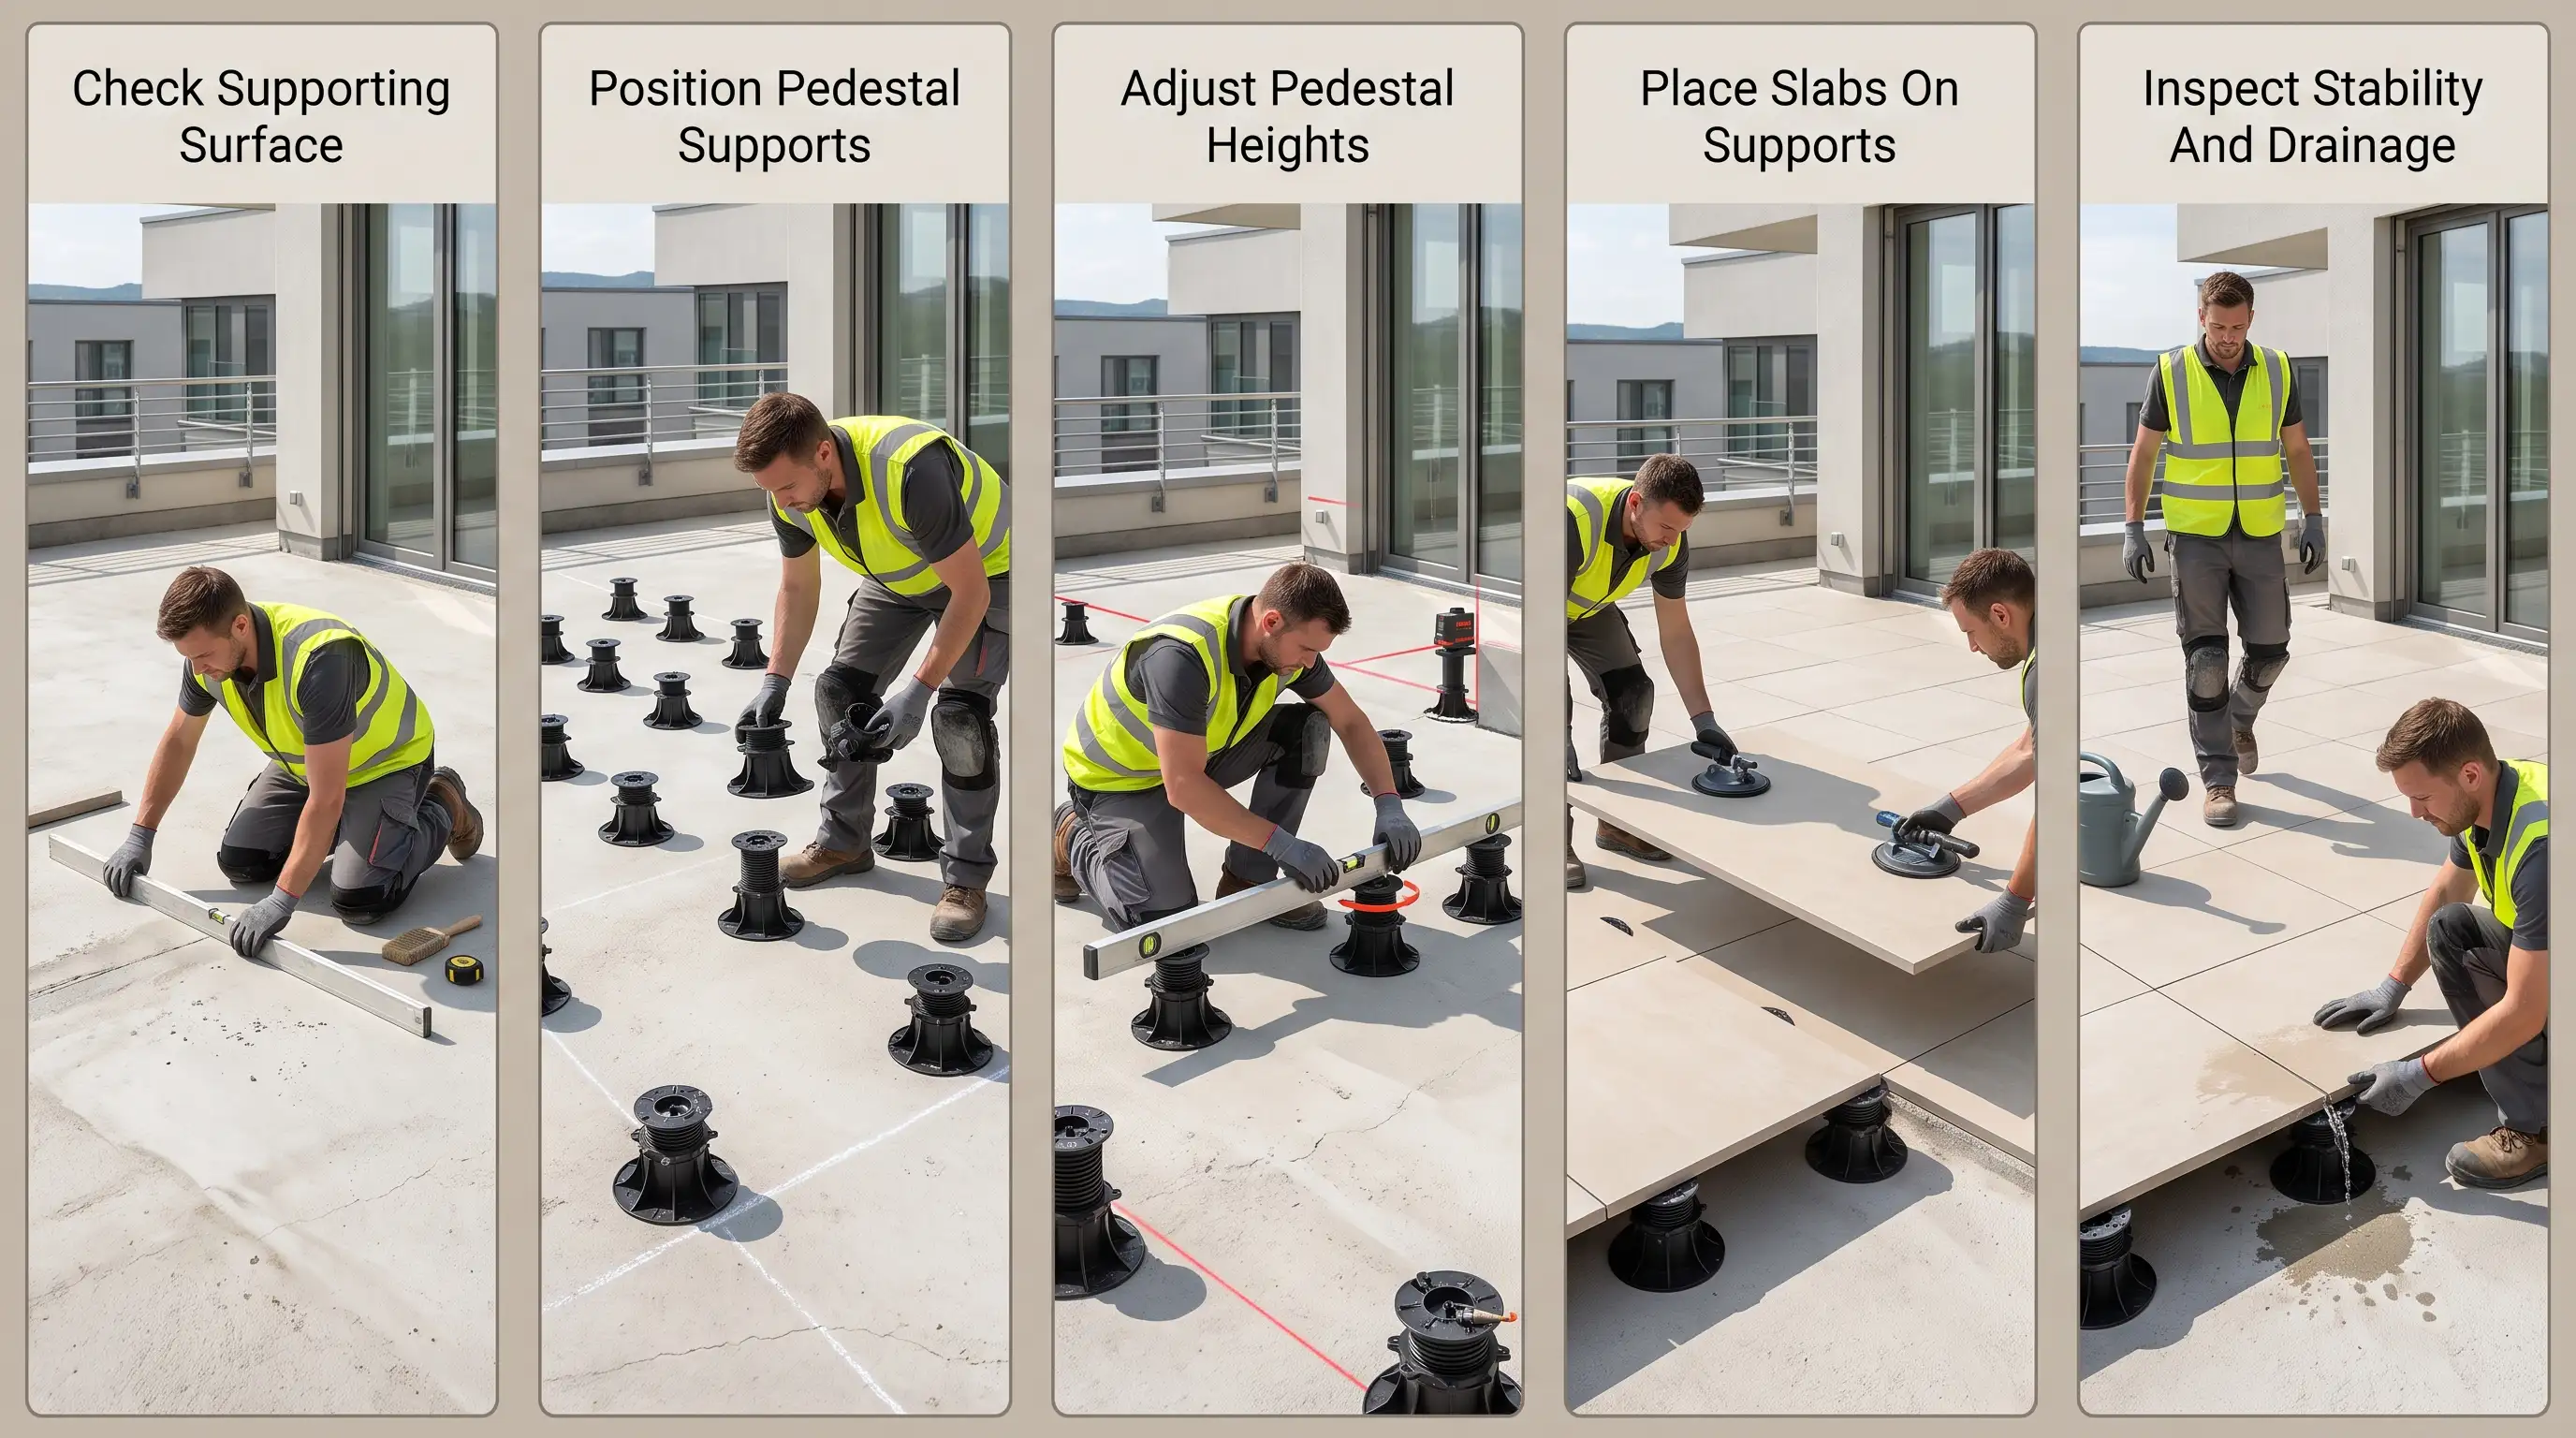
Pedestal systems are a practical solution for balconies, rooftops, and raised terraces where drainage and access beneath the paving are important.
This installation method creates a raised surface that allows water to flow underneath while making future adjustments easier.
Unlike fixed installations, pedestal-supported slabs can provide better access to waterproofing layers, drainage systems, and utilities beneath the surface when required.
Step 1: Check The Supporting Surface
Inspect the existing area to confirm that it is structurally sound, waterproofed, and suitable for supporting a pedestal system.
The surface must be strong enough to handle the weight of the slabs and expected outdoor use.
A stable foundation ensures the pedestal supports remain secure and prevents movement after installation.
Carefully checking the surface before starting helps avoid problems with drainage, alignment, or long-term stability.
Step 2: Position Pedestal Supports
Arrange the pedestal supports according to the slab size, weight requirements, and manufacturer recommendations.
Correct spacing ensures that each porcelain slab receives balanced support across its surface.
Poorly positioned supports can create uneven pressure points and increase the risk of slab movement or damage.
Accurate placement creates a stable framework and helps maintain a level finish across the entire paved area.
Step 3: Adjust Pedestal Heights
Adjust each pedestal height carefully to create an even and level surface across the installation area.
This step allows small corrections to compensate for uneven base conditions while maintaining the required drainage slope.
Proper height adjustment ensures that adjoining slabs align correctly and prevents raised edges or uneven transitions.
Taking time during this stage improves both the appearance and performance of the finished porcelain paving.
Step 4: Place Porcelain Slabs Onto Supports
Carefully position each porcelain slab onto the pedestal supports, ensuring every corner sits securely and evenly.
Check the alignment between adjoining slabs and make small adjustments before moving on to the next piece.
Proper placement helps distribute weight evenly across the support system and prevents rocking or movement.
Taking time during this stage ensures the finished surface remains level, stable, and visually consistent across the entire paved area.
Step 5: Inspect Stability And Drainage
After all porcelain slabs are installed, inspect the surface carefully to confirm that each slab feels stable and the drainage system works correctly.
Walk across different areas to identify any movement or uneven sections.
A final inspection helps catch small issues before the patio or terrace is regularly used.
Ensuring water can flow freely beneath the slabs also helps protect the installation and maintain long-term performance.
5. Dry Laying Porcelain Slabs On Gravel Or Sand
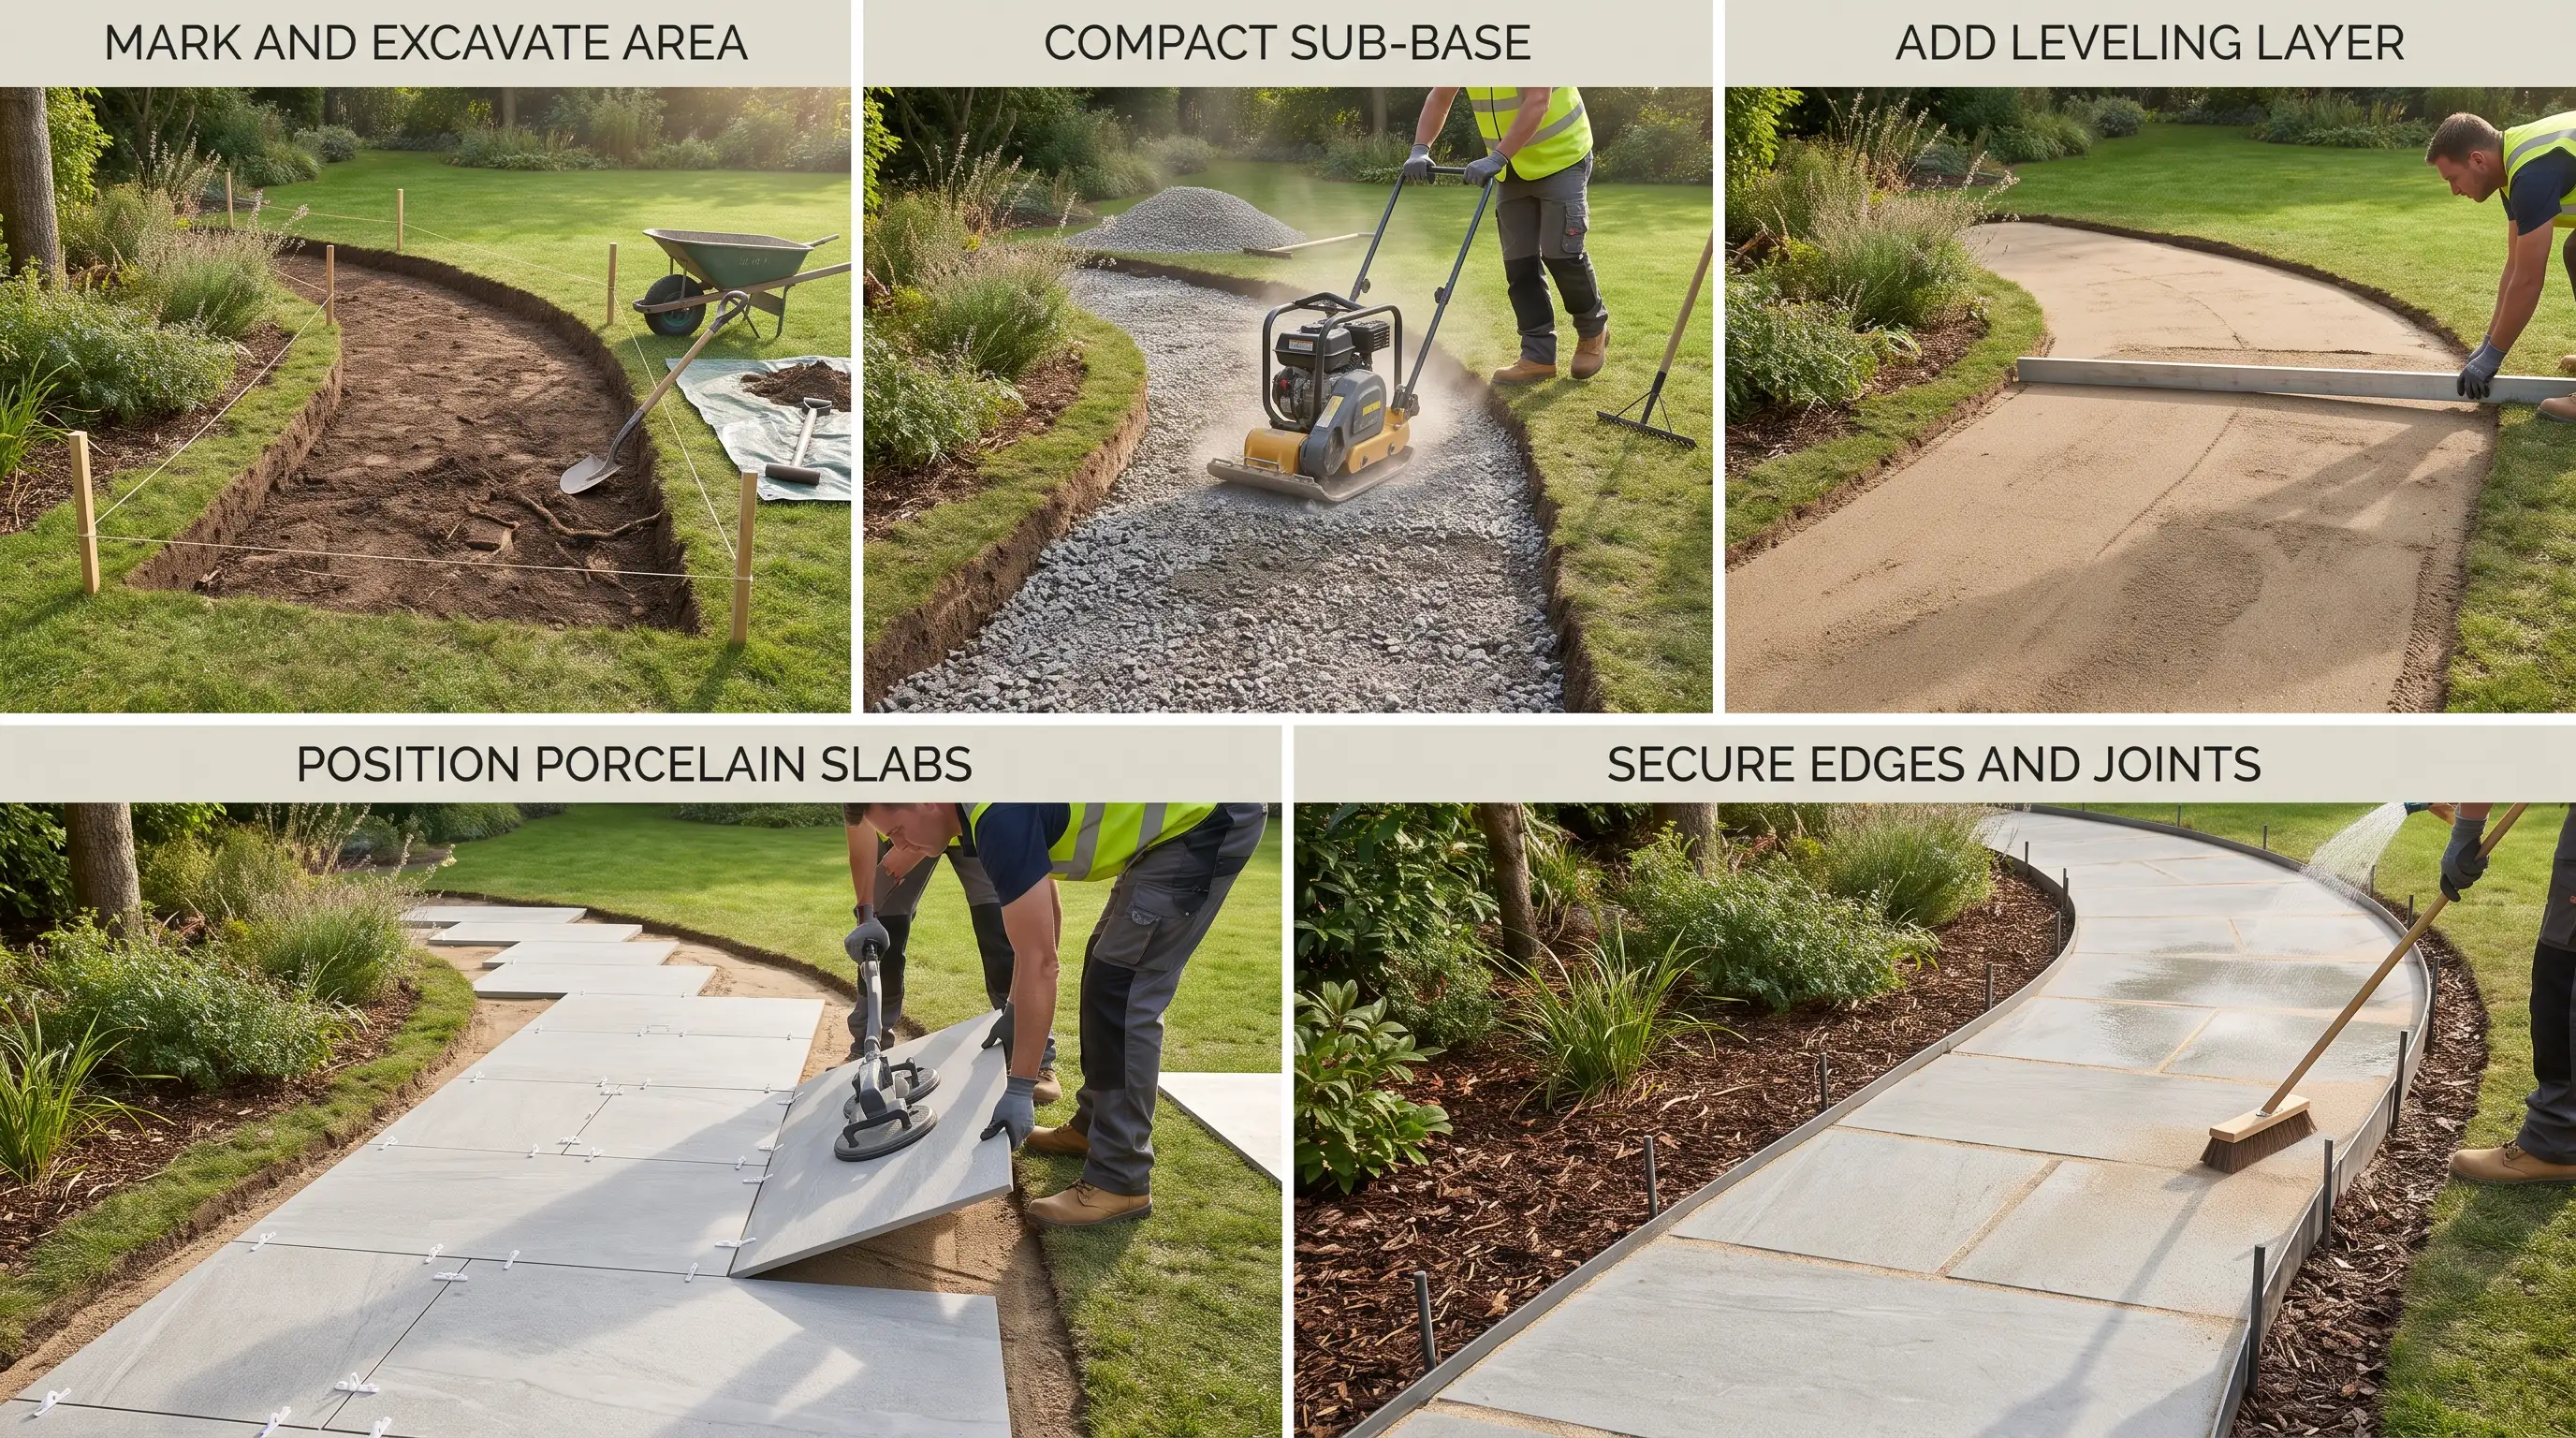
Dry laying porcelain slabs is one of the more flexible installation methods and works well for garden paths, decorative areas, and outdoor spaces where a removable paving system is useful.
Although this method is simpler than fixed installations, proper preparation remains important.
A stable sub-base, accurate leveling, and careful placement help prevent slabs from shifting, sinking, or becoming uneven over time.
Step 1: Mark And Excavate The Area
Begin by marking the paving layout and removing soil, grass, or existing materials to create enough depth for the required base layers.
Accurate measurements help ensure the final design fits properly within the space.
The excavation depth depends on the slab thickness, ground conditions, and intended use of the area.
Proper preparation creates enough room for the sub-base and leveling layer, helping the porcelain slabs remain stable after installation.
Step 2: Install And Compact The Sub-Base
Add the appropriate sub-base material across the excavated area and compact it thoroughly to create a firm foundation.
This layer provides support and helps distribute weight evenly across the paving surface.
Insufficient compaction can lead to sinking, movement, or uneven slabs after installation.
Taking time to create a solid base improves stability and helps the finished porcelain paving maintain its appearance and function over time.
Step 3: Add A Leveling Layer
Spread a thin, even layer of sand or fine gravel across the prepared sub-base to create a smooth surface for positioning the porcelain slabs.
This layer allows minor adjustments while keeping the slabs properly supported.
An uneven leveling layer can cause height differences between slabs and affect the finished appearance.
Careful preparation at this stage makes it easier to achieve a flat, aligned surface with consistent spacing.
Step 4: Position The Porcelain Slabs
Place each porcelain slab carefully onto the prepared leveling layer and adjust the position until the spacing and alignment are correct.
Use a rubber mallet if needed to gently settle the slabs without damaging their surface.
Check the level regularly as you work to prevent uneven areas. Accurate placement helps create a stable paving layout and ensures the finished surface looks clean and professionally installed.
Step 5: Secure Edges And Finish Joints
Add edge restraints where needed to help keep the porcelain slabs securely positioned and prevent movement along the boundaries.
Complete the joints using suitable materials to improve stability and create a finished appearance.
A properly secured edge system is especially important for paths and flexible layouts.
Finishing these details helps protect the installation, reduce shifting, and maintain a neat outdoor surface for years.
How To Pick The Right Method For Your Project?
Choosing the right way to lay porcelain slabs comes down to a few key factors:
- Space and use: A small garden path doesn’t need the same foundation as a busy patio, outdoor kitchen, or dining space.
- Location and drainage: Ground conditions and drainage needs shape which method holds up best.
- Ground stability: Soft or uneven ground needs more prep, while frost, heavy rain, or frequent use call for a stronger installation approach.
- Slab size and thickness: Larger, heavier slabs need better underlying support.
- Budget and tools: Your budget, available tools, and DIY experience narrow down the most practical option.
Mistakes To Avoid When Laying Porcelain Slabs
Laying porcelain slabs goes wrong in a few predictable ways, and most come down to rushing the base or the bond. Here are the five mistakes worth avoiding most.
- Skipping proper ground preparation: Installing slabs on an unstable or poorly prepared base can cause movement, uneven surfaces, and cracks over time.
- Leaving out the slurry primer: An unsuitable adhesive or a skipped slurry primer can weaken the bond and leave slabs loose or damaged.
- Ignoring drainage planning: Poor drainage can allow water to collect beneath the slabs, affecting stability and causing long-term damage.
- Skipping level checks during installation: Failing to check levels and spacing throughout the process can leave slabs uneven and create trip hazards.
- Walking on slabs before curing: Using the surface before the adhesive has fully cured can disturb the slabs and weaken the installation.
How To Maintain Porcelain Slabs After Installation?
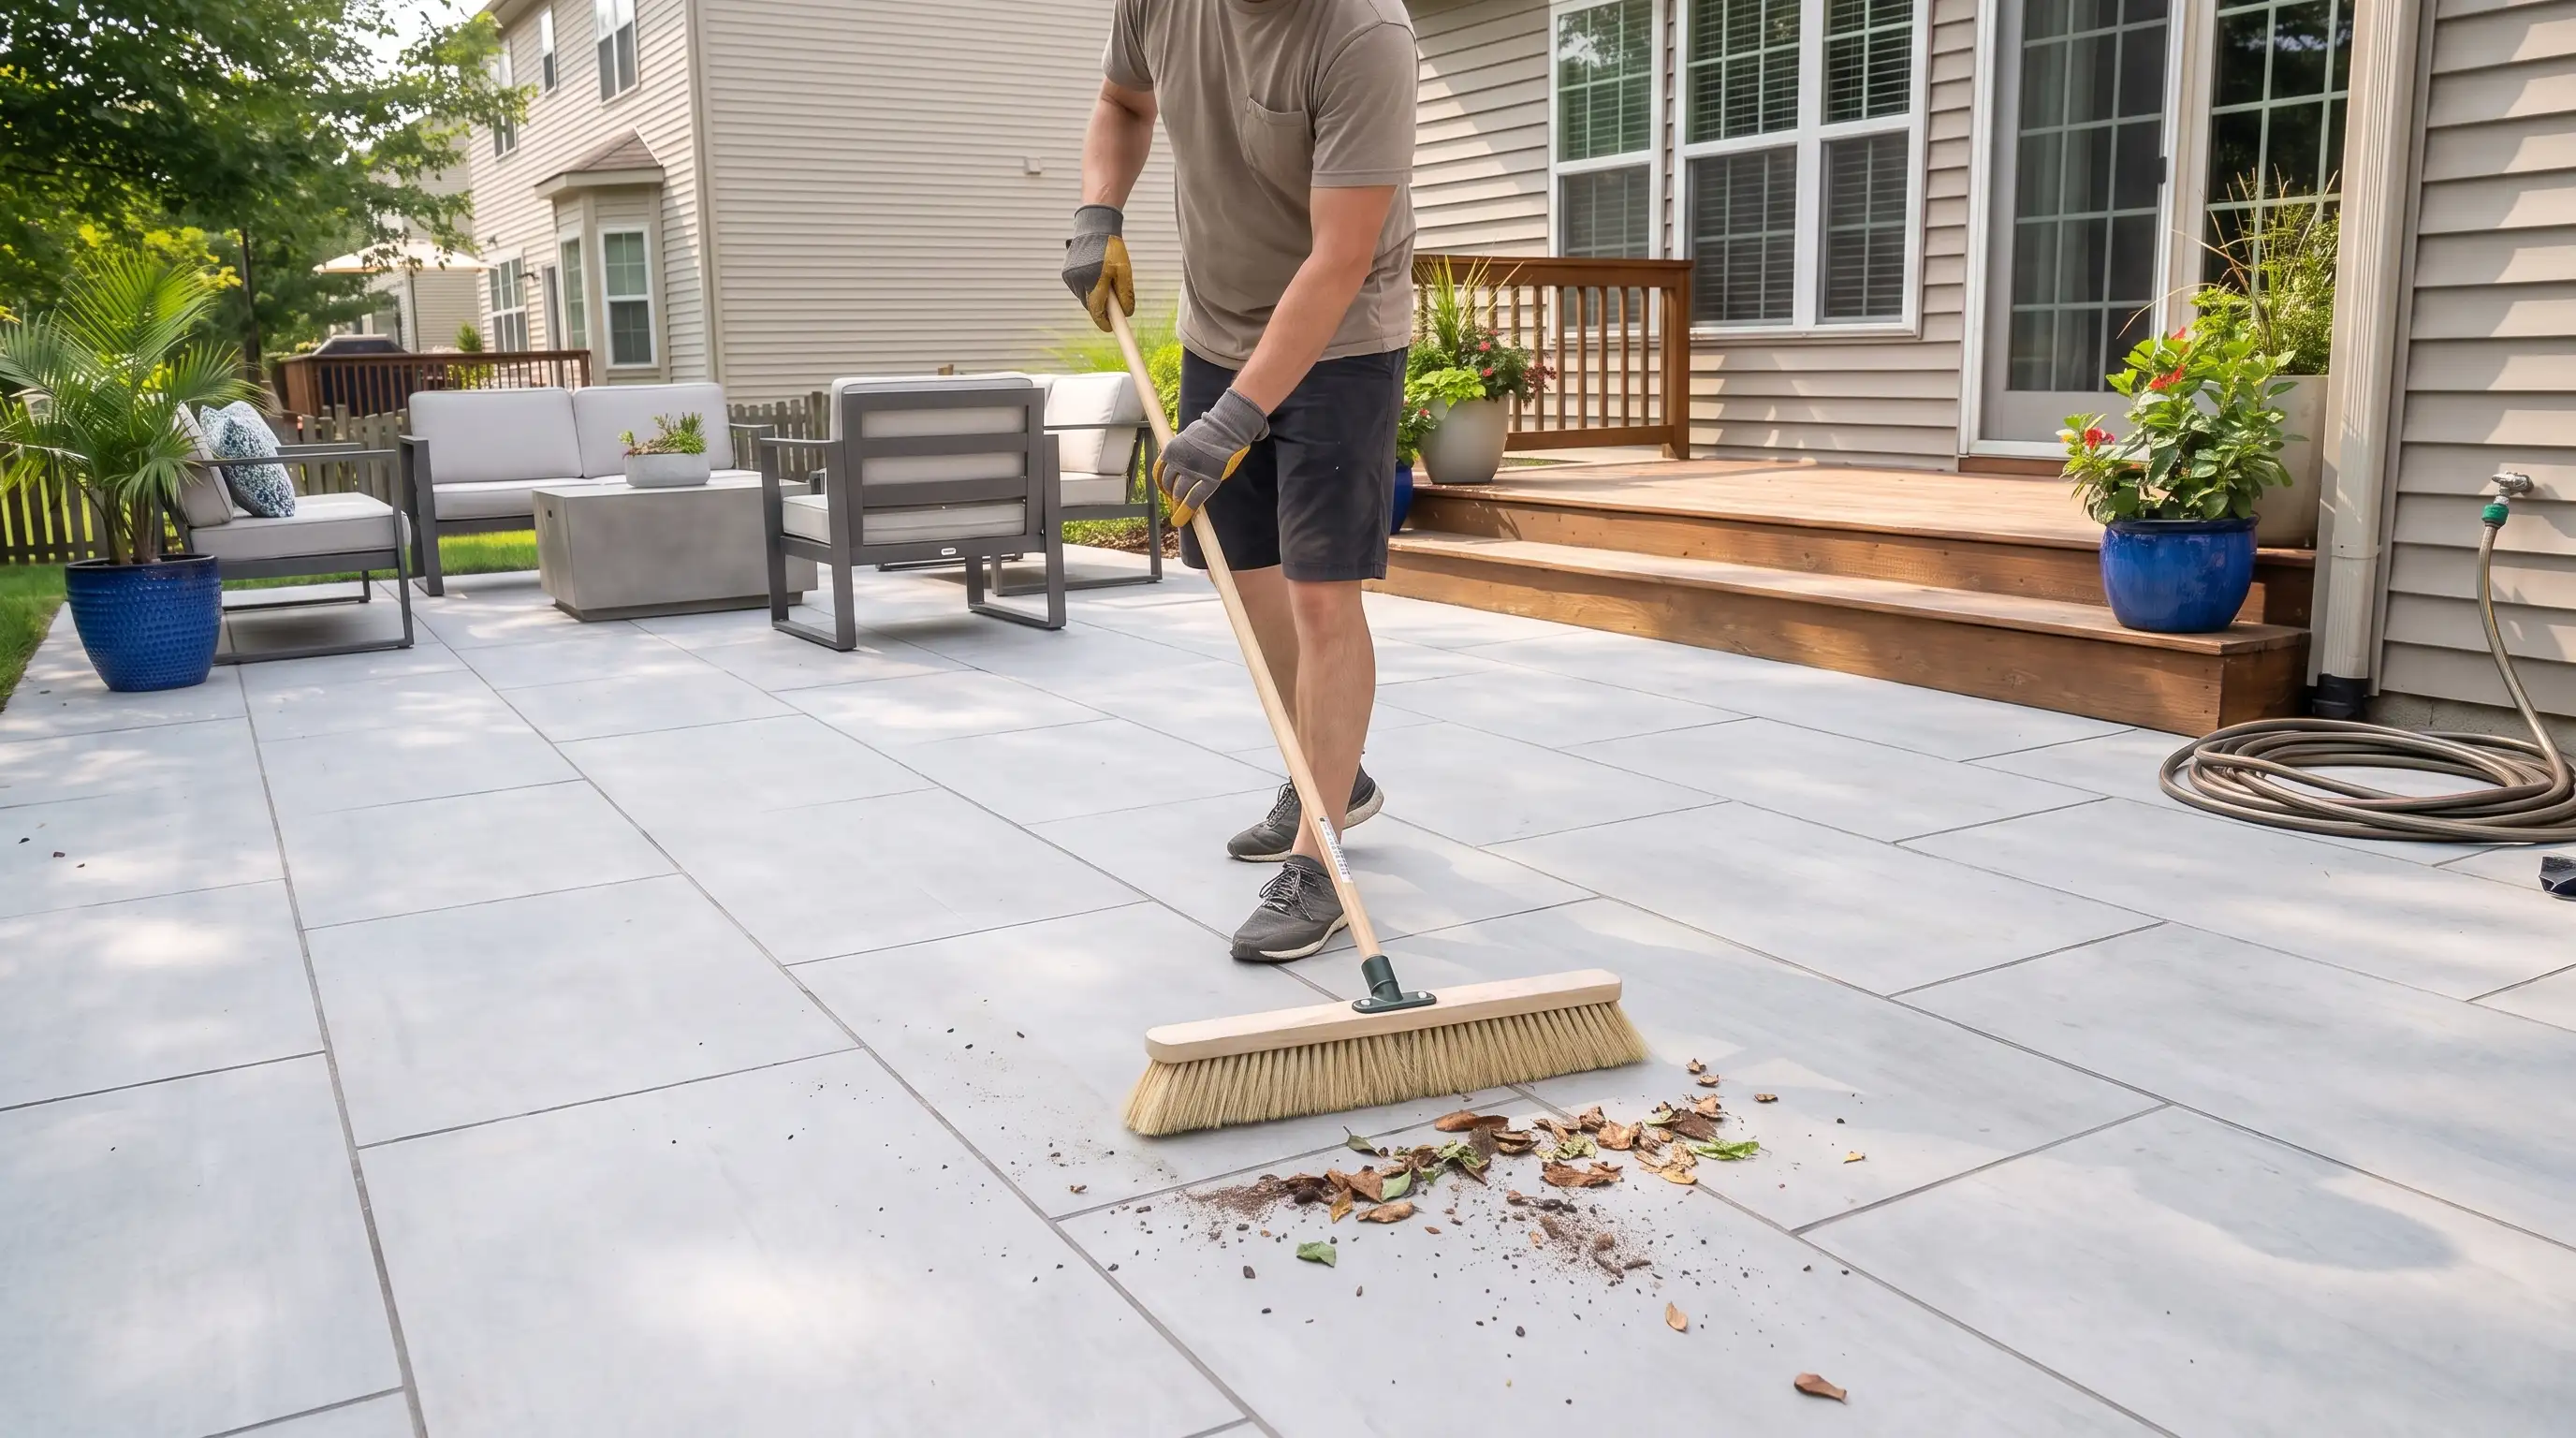
Porcelain slabs are low-maintenance, but regular care keeps them looking their best. A simple cleaning routine is usually enough to keep outdoor paving looking fresh.
I sweep my own patio once a week and give it a proper wash every couple of months with warm water and a mild outdoor cleaner, and it still looks close to new years later.
Sweep away dirt, leaves, and debris regularly to prevent buildup on the surface.
For deeper cleaning, use warm water and a suitable outdoor cleaner to remove marks without damaging the finish.
It is also worth checking the joints and surface occasionally for signs of movement, cracks, or drainage problems.
Clean spills quickly, remove weeds around the edges, and avoid harsh products that may affect the paving.
With basic upkeep and occasional checks, porcelain slabs can continue to provide a durable, attractive outdoor surface for many years.
Conclusion
A well-laid patio is something you notice every time you step outside.
Laying porcelain slabs the right way takes patience, but the payoff is a surface that holds up through rain, frost, and daily use for years.
I always tell clients that small steps- priming, leveling, joints- make the difference between a patio you love and one you keep repairing.
Ready to get started? Measure your space, pick the method that fits your ground, and give your porcelain slabs a base built to last.
Frequently Asked Questions
Can You Lay Porcelain Slabs Over Existing Paving?
Yes, porcelain slabs can sometimes be installed over existing paving if the surface is stable, level, and free from damage.
How Long Do Porcelain Slabs Usually Last Outdoors?
Porcelain slabs can last several decades when installed correctly and maintained properly. Their dense surface helps them resist weather damage, stains, and everyday outdoor wear.
Do Porcelain Slabs Become Slippery When Wet?
Porcelain slabs can turn slippery when wet unless they have a textured, slip-resistant finish. Look for this feature on any slab going near a pool, entryway, or rainy climate.
Can You Replace A Single Damaged Porcelain Slab?
Yes, individual porcelain slabs can usually be replaced if they become damaged. The replacement process depends on the installation method, as fixed systems may require more careful removal.