
A single cantaloupe vine can sprawl 10 feet across a garden bed and produce fruit weighing 3 to 5 pounds in under 100 days.
That kind of output from one plant surprises most first-time growers. The cantaloupe plant is not fussy, but it does follow a specific growth pattern that changes how you water, feed, and handle it at each stage.
Miss the timing on any of those, and you end up with bland fruit or no fruit at all.
This blog helps you figure out the full process, from seed germination through harvest day, and explains what to do (and what to stop doing) at each phase of growth.
Quick Cantaloupe Plant Profile:
| Botanical name | Cucumis melo var. reticulatus |
| Family | Cucurbitaceae |
| Plant type | Annual vine |
| USDA zones | 4–11 |
| Days to maturity | 70–100 days |
| Sun | Full sun, 6–8 hours minimum |
| Soil pH | 6.0–6.5 |
| Water | 1–2 inches per week; reduce at fruit set |
What is a Cantaloupe Plant?
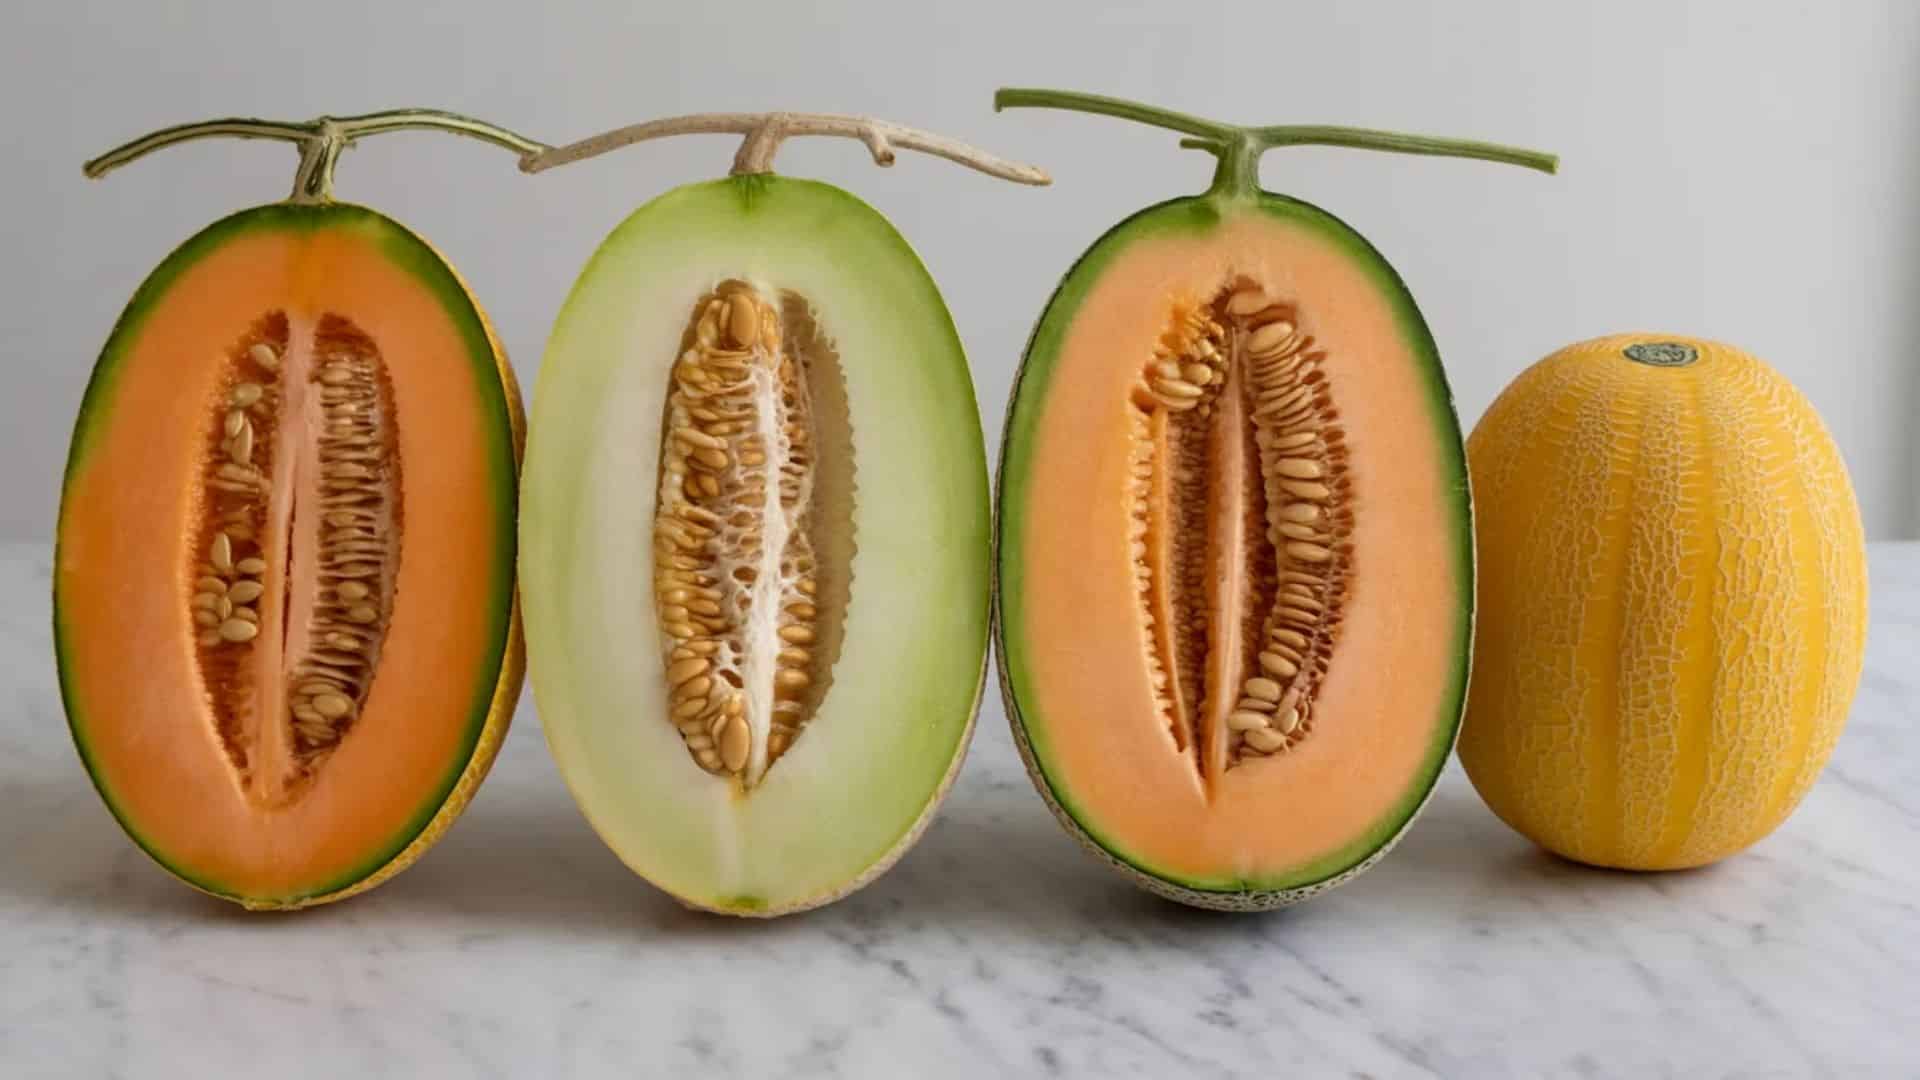
The cantaloupe is in the cucurbit family, the same group as cucumbers, squash, and zucchini. It is an annual vine that sprawls to 6 to 10 feet in a single season and produces the familiar netted, round-to-oval fruit with orange flesh.
A small clarification that actually matters if you are buying seeds: what Americans call cantaloupe is technically a muskmelon (Cucumis melo var. reticulatus).
True cantaloupe, the kind grown in Europe, has rough, warty skin and is almost impossible to find in US stores.
The names get swapped freely here, and that is fine day-to-day, but if you are ordering seeds and see “European cantaloupe,” expect a noticeably different fruit.
The vine has shallow roots. That fact shapes most of the watering decisions later. It also produces separate male and female flowers on the same plant, so it needs pollinators or some help from you to set fruit.
North American vs. European Cantaloupe
North American cantaloupe has a coarse net-patterned skin and bright orange flesh. It handles heat reliably, ripens on a predictable timeline, and is what most US gardeners grow.
European cantaloupe has smooth, ribbed skin and is usually sweeter, but it is less forgiving in varying climates and harder to source.
Choosing the Right Cantaloupe Variety
Not every variety works in every climate. Picking the right one saves a lot of trouble later.
Here’s how to choose based on your situation:
| If You Have… | Best Variety Type | Why |
|---|---|---|
| Short growing season | Early-maturing varieties (Hale’s Best) | Ripens in 75-80 days |
| Hot, dry climate | Heat-tolerant hybrids (Athena) | Handles high temps |
| Small garden space | Compact or bush types (Minnesota Midget) | Takes up less ground; produces fruit in about 70 days |
| Want sweeter fruit | Heirloom types (Honey Rock, Hearts of Gold) | Richer flavor |
| First-time grower | Open-pollinated varieties | Forgiving and reliable |
Heirloom vs. Hybrid Varieties
Heirloom seeds come from plants saved across generations and tend to have a stronger flavor. Hybrids are bred for disease resistance and consistent yields.
If this is your first season, a hybrid like Athena is more forgiving of late planting, uneven watering, and heavy soil than most heirlooms.
I have pointed first-time growers toward Athena for years, and it rarely disappoints. If flavor matters more, Hale’s Best is a solid starting point.
Cantaloupe Plant Growth Stages
This section is the one most growing guides skip. Knowing what the plant is doing at each stage tells you when extra water helps, when it does damage, when fertilizer does anything useful, and when you are just feeding leaves that contribute nothing to the fruit.
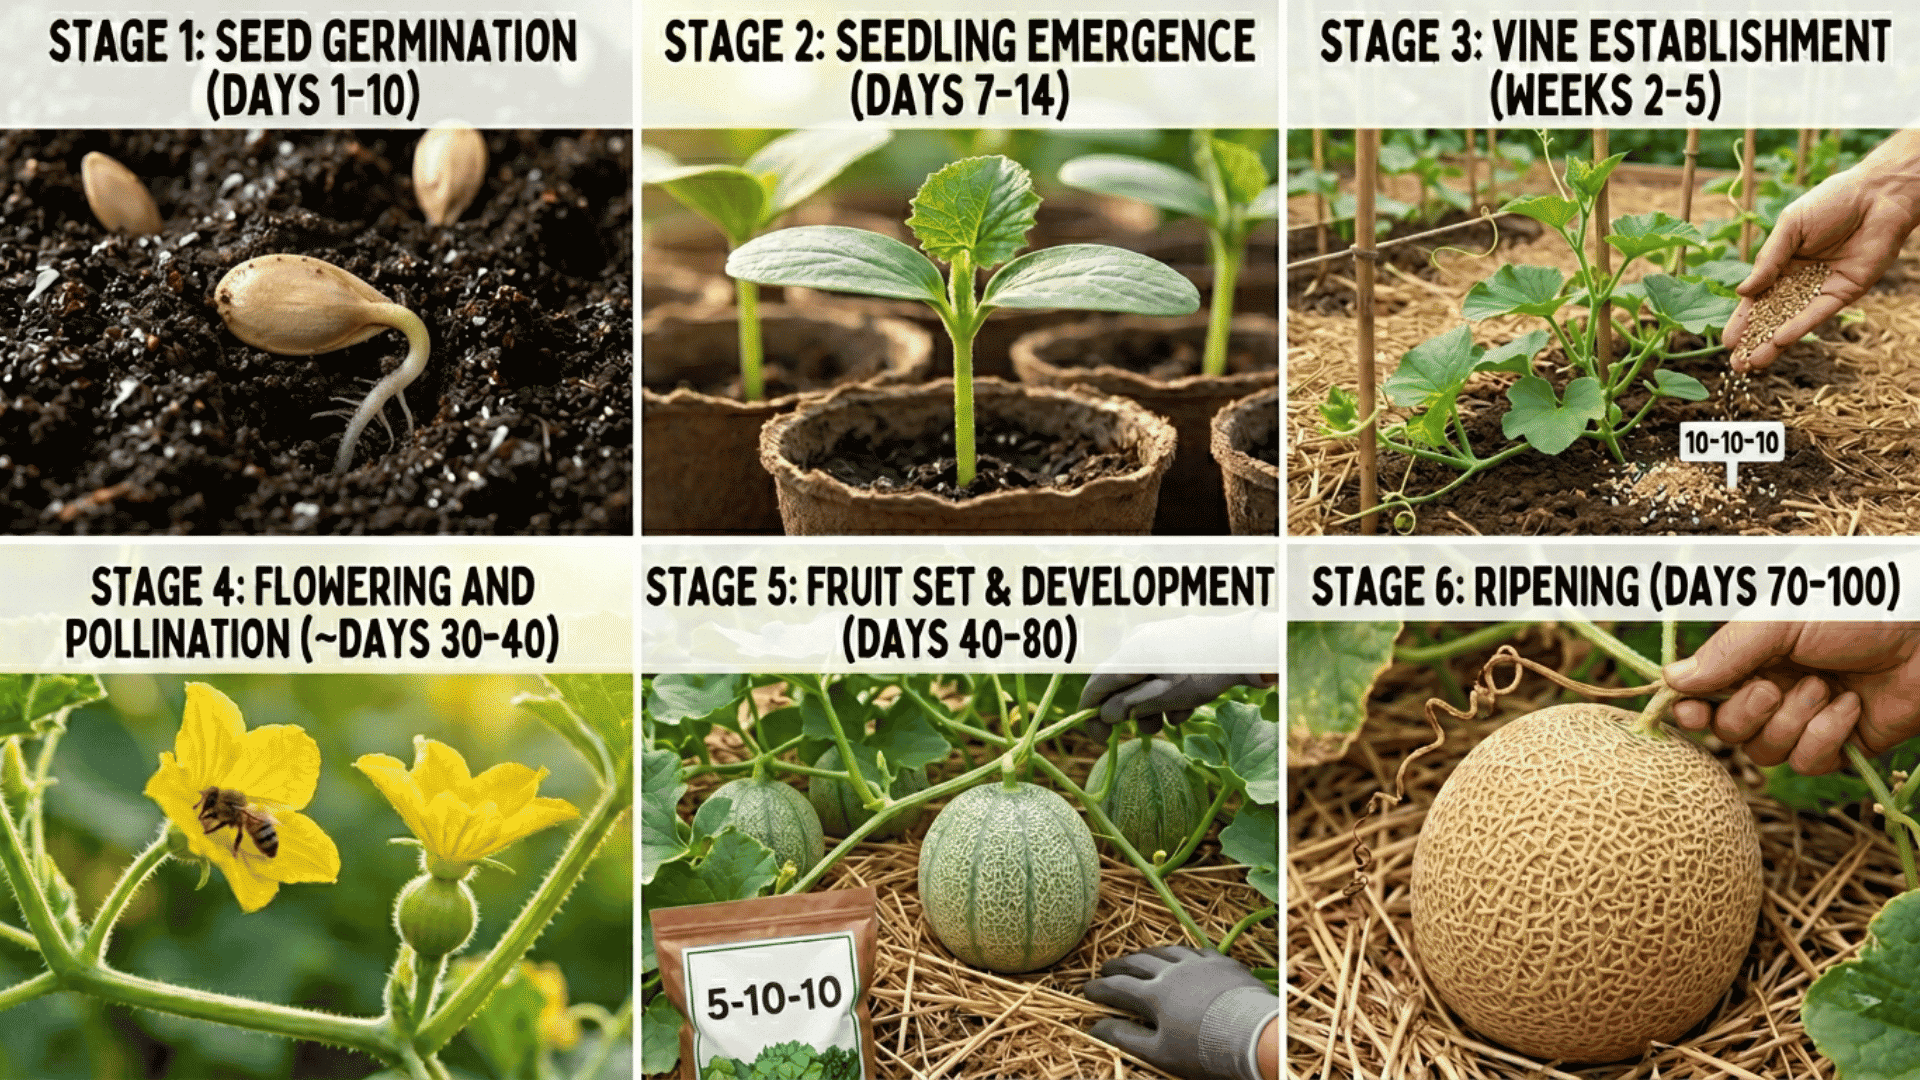
Stage 1: Seed germination, Days 1–10
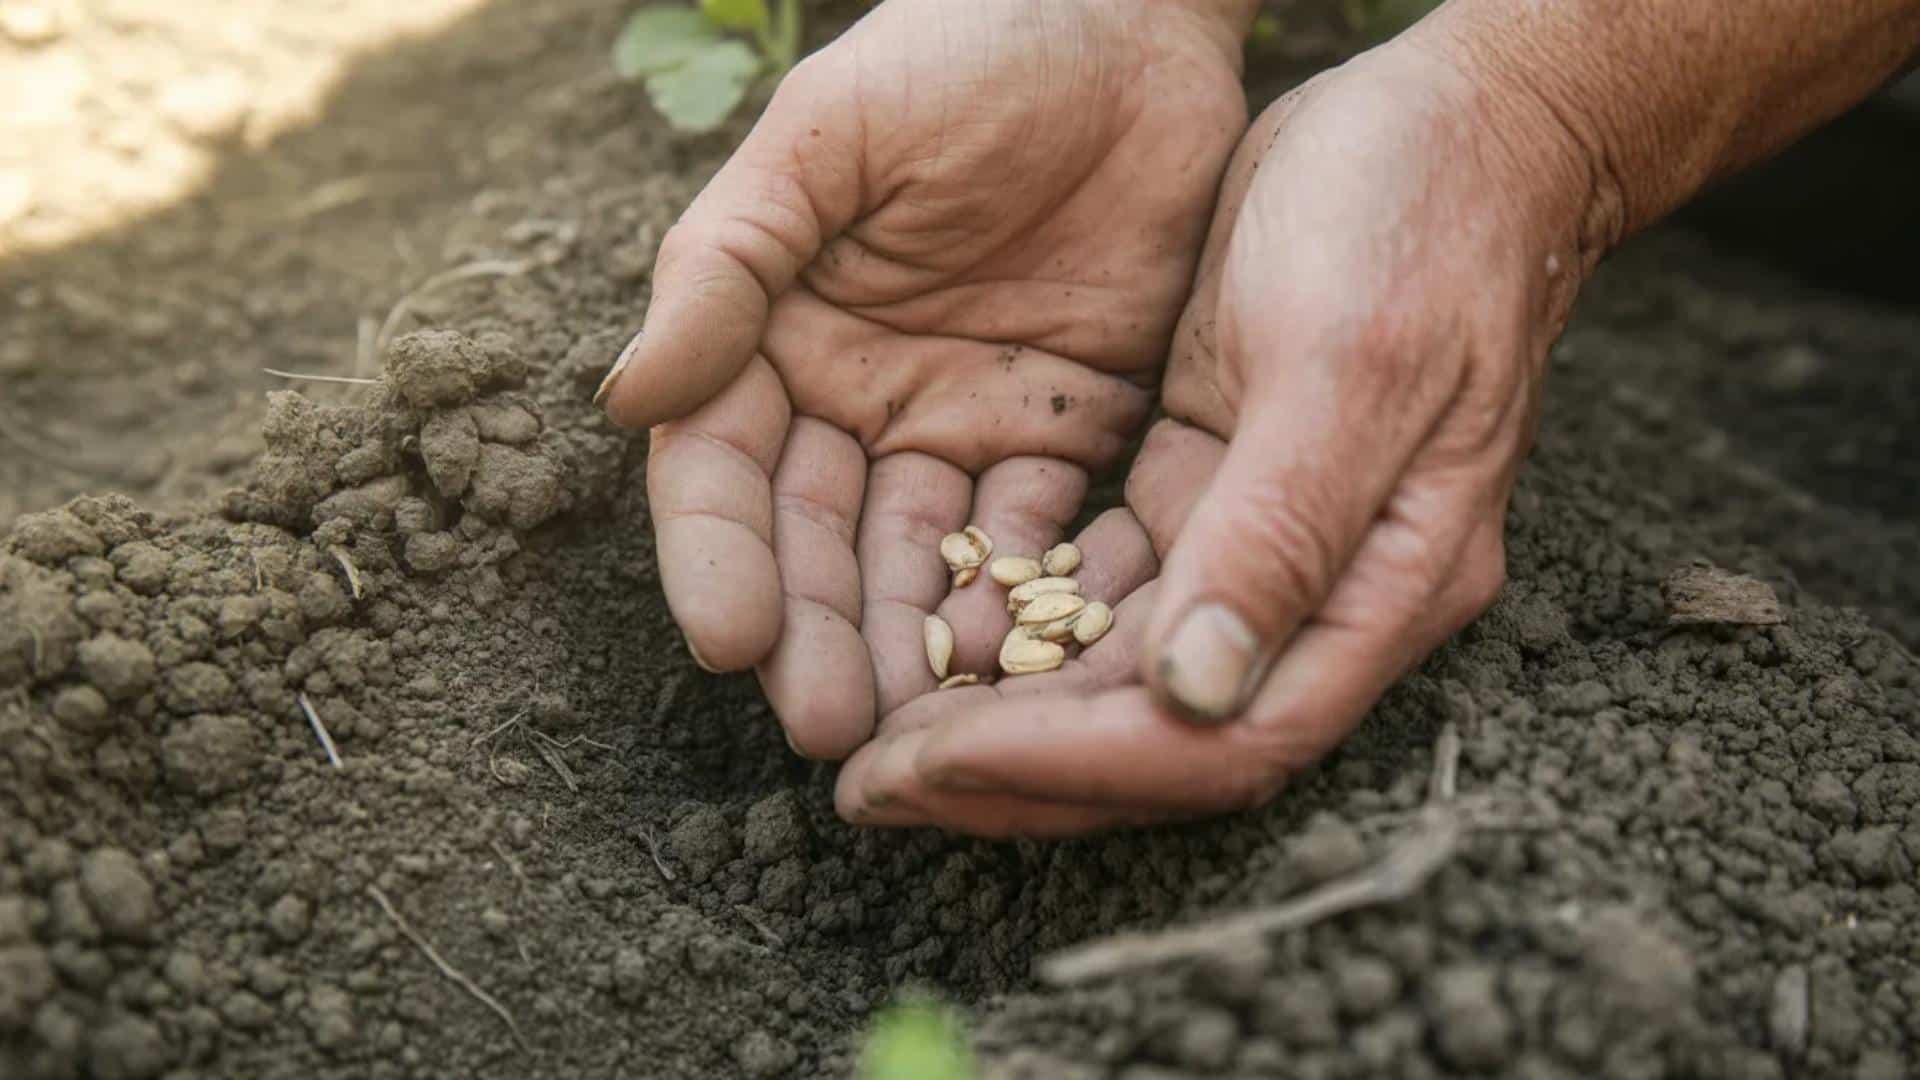
Seeds need warm soil. 70–90°F is the range for reliable germination. In cold soil, seeds rot rather than sprout, and planting too early is the most common reason cantaloupe never gets started properly.
Germination takes 7–10 days under good conditions. When you place seeds in the soil, put the narrow end down. Roots emerge from that tip. The seed germinates either way, but with the pointy end down, the seedling doesn’t have to reorient itself.
Keep the soil consistently moist through this period. Not saturated, just moist. If the surface dries out between waterings, germination stalls.
Stage 2: Seedling emergence, Days 7–14
The cotyledons appear first, then the first true leaves within a week or two. Once you see those true leaves, thin to the strongest seedling per cell or hill by snipping the others at the soil level rather than pulling. Yanking them disturbs the roots of the plant you’re keeping.
If your seedlings look tall and spindly at this stage, they are not getting enough direct light. Move them to a brighter spot or closer to a grow light.
Weak, stretched stems at this point result in thin and floppy transplants that struggle once they go outdoors.
Stage 3: Vine establishment, Weeks 2–5
The vine starts moving fast during this phase. Tendrils form and grab anything nearby. This is the period of the fastest structural growth, as the plant builds the framework it’ll eventually use to support the fruit.
Nutrient demand increases noticeably here. If you haven’t already worked fertilizer into the soil, apply a balanced 10-10-10 now.
Spacing becomes critical at this point, too: 36–42 inches between plants in the ground, with rows at least 5 feet apart. Crowded vines produce poor fruit.
Stage 4: Flowering and pollination, around Days 30–40
Male flowers appear first, sometimes by a week or more. First-time growers often see flowers open, watch them drop, and assume something failed. Nothing has. Male flowers do that.
The female flowers follow and are easy to spot: there’s a small, rounded swelling at the base where a male flower just has a straight stem. That swelling is the future fruit.
The pollination window per flower is one day. Bees handle most of it and work hardest in the morning. If you’ve had row covers on for warmth or pest control, get them off before flowers open, or you’ll have blocked the pollinators you need.
When bee activity is low, hand-pollination is straightforward. Take a small dry paintbrush, collect pollen from an open male flower, and transfer it to the center of an open female flower. Morning, when both flowers are fully open.
Stage 5: Fruit set and development, Days 40–80
After successful pollination, a small swelling appears below the female flower and begins to enlarge. This is where most growers make the season’s biggest mistake: keeping the same watering schedule they used during vine growth.
Cut watering back by roughly half once fruit is visibly developing. Excess moisture at this stage dilutes sugars. I have seen gardeners follow every other step perfectly and still end up with bland melons because they never reduced watering through August.
Switch fertilizer, too. Move from balanced 10-10-10 to something lower in nitrogen and higher in phosphorus and potassium, like 5-10-10. High nitrogen now feeds leaves, not fruit.
If you are growing a small number of plants, thin to one or two fruits per vine. Fewer melons means each one gets more of what it needs.
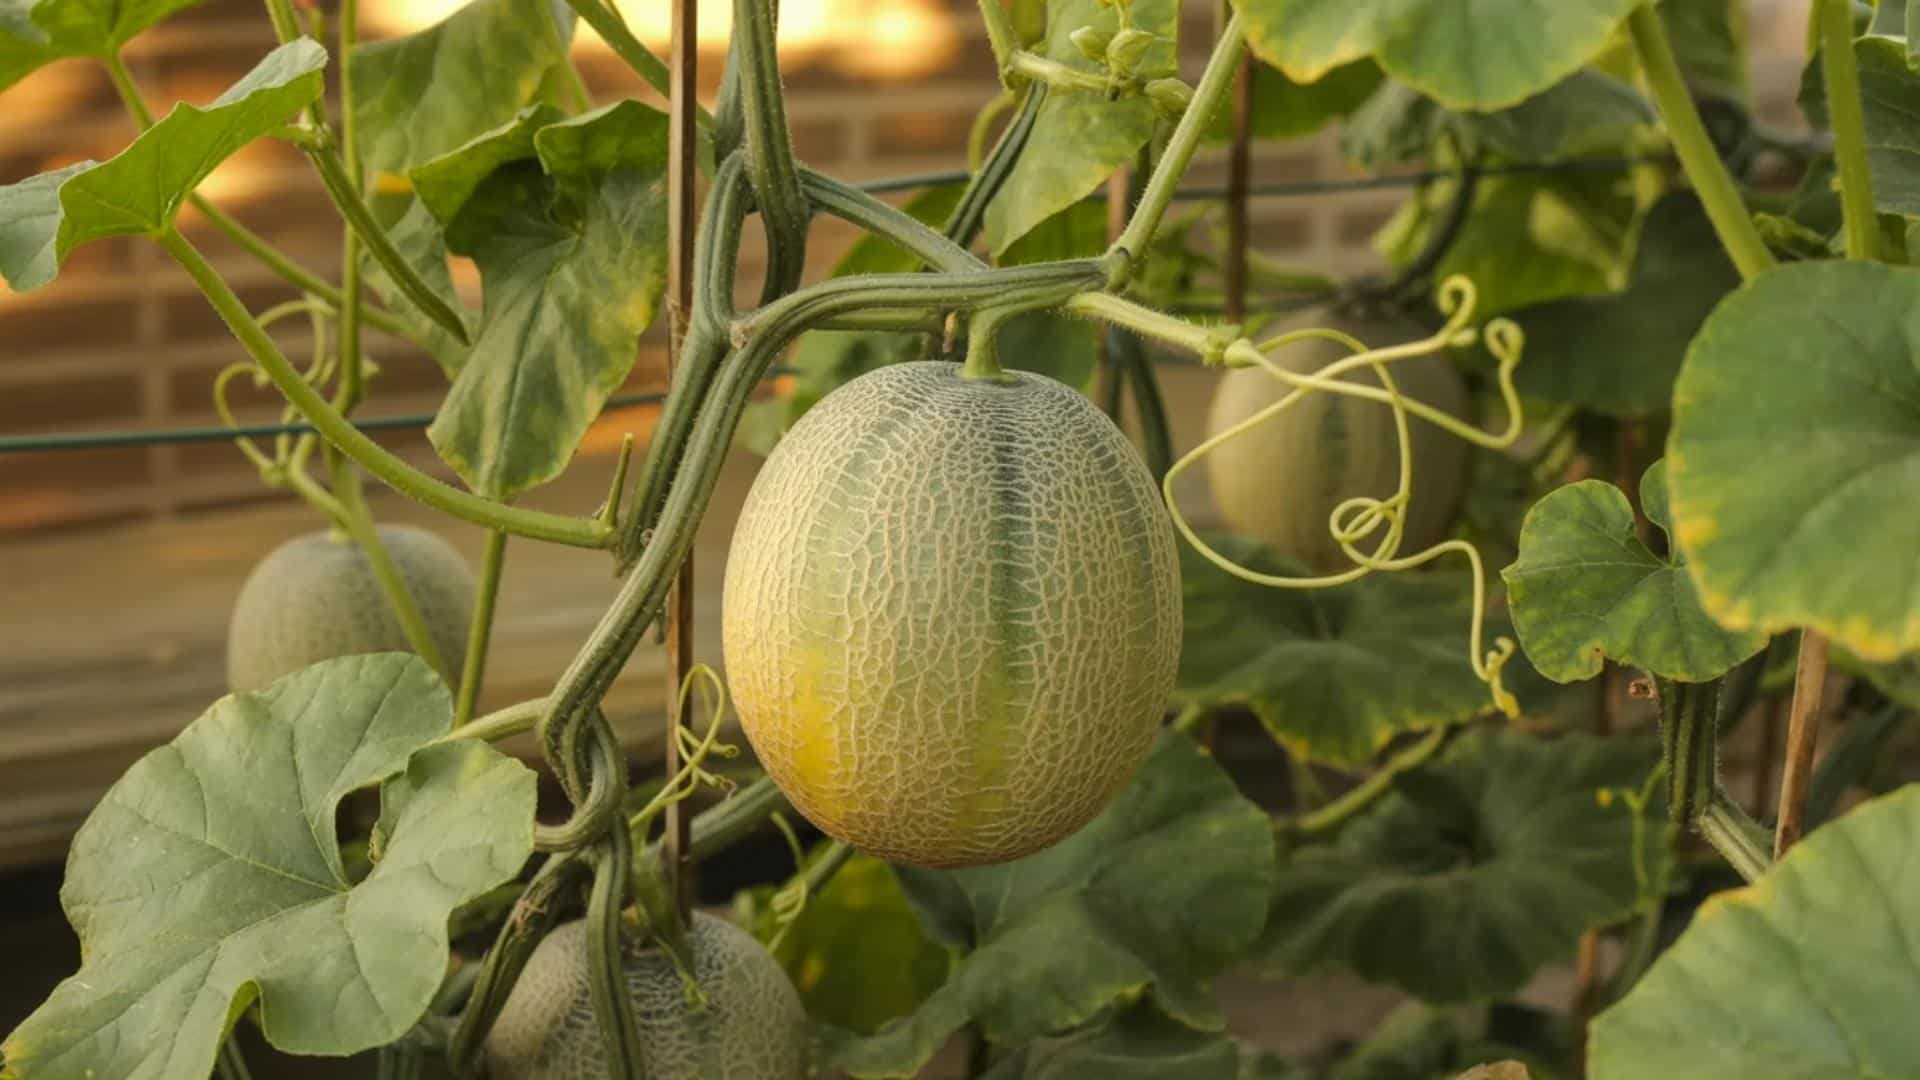
Stage 6: Ripening, Days 70–100
The skin shifts from green to tan between the netting. The netting raises and roughens. The curly tendrils nearest the fruit dry out and go brown. The smell changes too: a ripe cantaloupe smells sweet from a foot away, noticeably so.
The most reliable signal is what growers call a full slip. The fruit separates from the vine with a gentle twist, not a cut. If it doesn’t come free easily, give it a few more days.
How to Prepare Your Garden for Cantaloupe
Good soil really helps everything thrive! Cantaloupes love loose, well-drained soil, which helps them grow healthy and strong.
Soil and Sunlight
- Sunlight: Choose a spot that gets at least 6–8 hours of direct sun daily. Less than that, and your fruit will be small and bland.
- Soil pH: Aim for a soil pH between 6.0 and 6.8. Test your soil with a basic kit from any garden store.
- Soil texture: Sandy loam works best. It drains fast and warms up quickly in spring.
- Amendment tip: Mix compost into the top 6–8 inches of soil before planting. This improves both drainage and nutrition.
Raised Beds vs. Ground Planting
Raised beds warm up faster and drain better, two things cantaloupes genuinely love. If your garden soil is heavy clay, a raised bed makes a real difference.
Ground planting works well when the soil is already loose and drains nicely. This makes the process smoother and more successful.
Using Black Plastic Mulch
Many experienced melon growers lay black plastic over the planting area two to three weeks before transplanting.
The plastic warms the soil faster, retains moisture beneath it, and prevents weeds from competing with young vines. Cut slits in the plastic where each seedling goes.
This technique is especially useful in cooler climates where soil temperature is the limiting factor early in the season.
How to Plant Cantaloupe Seeds and Seedlings
Timing is everything with cantaloupe. Plant too early, and a cold snap kills the seedlings. Plant too late and the fruit won’t fully ripen.
Starting Indoors vs. Direct Sowing
| Method | When to Start | Best For |
|---|---|---|
| Start indoors | 3–4 weeks before last frost | Short growing seasons |
| Direct sow outdoors | When soil hits 65°F (18°C) | Long growing seasons |
| Transplant seedlings | After the last frost date | All climates |
Planting Steps
Once your soil is warm and your bed is prepped, follow these steps to get your cantaloupe seeds or transplants in the ground the right way.
- Step 1: Sow seeds 1 inch deep in the soil with the narrow end facing down.
- Step 2: Space seeds or transplants 2 to 3 feet apart, with 5 to 6 feet between rows.
- Step 3: Water right after planting to settle the soil around the seeds.
- Step 4: Add a thin layer of mulch to hold moisture and slow weed growth.
- Step 5: Wait 7 to 10 days for germination in warm soil. If conditions are cooler than 65°F, expect closer to 10 days. Seeds sitting in cold, wet soil are more likely to rot than sprout.
If you are starting indoors, use peat pots or large cell trays so you can transplant without disturbing the roots. Cantaloupe seedlings do not recover well from root damage during the move outdoors.
Caring for Your Cantaloupe Plant
Once the vines start growing, the job becomes mostly watering, feeding, and watching for problems.
1. Watering at Each Growth Phase
Cantaloupes need 1 to 2 inches of water per week, applied at the base rather than from above. Wet leaves encourage mildew. Drip irrigation works best if you have it.
Consistency matters more than volume. Uneven watering causes cracking and bland fruit. Once the melons start ripening, cut them back by half.
Less water in the final two to three weeks before harvest concentrates the sugars inside the fruit.
2. Feeding Schedule
Before planting, work a balanced fertilizer (10-10-10) into the soil. When vines start to run, switch to a low-nitrogen fertilizer. Too much nitrogen grows big leaves but little fruit. When flowers appear, use a fertilizer higher in potassium and phosphorus to support fruit development.
3. Pollination
Cantaloupe plants produce both male and female flowers. The male flowers appear first. Female flowers come a bit later and have a small bulge at the base. That bulge is the future fruit.
Bees handle most of the pollination. If you don’t see bees visiting your plants, use a small paintbrush to move pollen from a male flower to a female one.
4. Vine Management
Vines can spread up to 6 feet. You have two options:
Let them sprawl on the ground. This is the easier method for most home growers. If growing on the ground, place a small board, piece of cardboard, or straw under each developing fruit to prevent the bottom from sitting directly on damp soil, which invites rot.
Or trellis them vertically. This saves space but requires you to support developing fruit with small fabric slings as the melons gain weight. A melon left unsupported on a trellis will snap its own vine once it reaches 2 to 3 pounds.
5. Pruning Side Shoots
Cantaloupe vines send out secondary growth shoots (suckers) from the junction where leaves, tendrils, and flowers meet the main stem.
Removing about a third of these suckers improves airflow between leaves and helps the plant direct energy toward fewer, larger melons rather than more foliage.
Do not remove more than a third unless you are growing many plants over a large area, because too few flowers reduces your chances of successful pollination.
Growing Cantaloupe in Containers
Cantaloupes can grow in containers if you choose the right setup. Use a pot at least 18 to 24 inches deep, a compact variety like Minnesota Midget, a well-draining potting mix, and a small trellis for the vine to climb.
Water more often than you would in-ground plants because containers dry out faster. Expect fewer and smaller fruit, but the flavor holds up if you stay on top of feeding and moisture.
One caution: containers heat up fast in direct sun, and cantaloupe roots sit shallow. That combination can cook the roots in midsummer.
Move the pot to afternoon shade when temperatures hold above 95°F, or wrap it with a light-colored cloth to reflect heat.
Pests, Diseases, and Common Problems
Most cantaloupe problems come from a few repeat offenders. Here’s what to watch for:
| Problem | Signs | Fix |
|---|---|---|
| Cucumber beetles | Yellow/black beetles on leaves | Row covers early in season; neem oil |
| Aphids | Clusters of small insects on stems | Blast off with water; introduce ladybugs or lacewings |
| Powdery mildew | White powder on leaves | Improve airflow; avoid overhead watering |
| Root rot | Wilting despite watering | Improve drainage; reduce water frequency |
| Squash vine borers | Sudden vine collapse | Remove damaged stems and extract larvae from entry holes with a knife. |
| Bacterial wilt | Leaves wilt and do not recover overnight; stems ooze sticky sap when cut | No cure, destroy infected plants and control cucumber beetles. |
Prevention Tips
Most cantaloupe problems start with crowding, wet foliage, or planting in the same spot too long. These habits prevent the worst of it.
- Space plants 36 to 42 inches apart. Poor airflow invites mildew.
- Rotate cucurbits every three to four seasons. Shared pests and diseases build up in the same soil.
- Mulch around each plant to hold moisture and keep fruit off damp ground.
- Spray off small dark insects clustering on stems early, then follow with neem oil.
- Use row covers at transplant time; remove them at flowering. This is the best defense I have found against cucumber beetles, which carry bacterial wilt.
When and How to Harvest Cantaloupe
Knowing when to pick is a key skill for gardeners. Picking too early results in flat-tasting fruit, while waiting too long makes it mushy. Unlike tomatoes or bananas, cantaloupe doesn’t ripen after harvest—what you pick is what you get.
Signs Your Cantaloupe Is Ready
The skin shifts from green to tan or yellow-beige between the netting. A ripe cantaloupe separates from the vine with gentle pressure.
Growers call this “full slip.” If the stem resists or you need to tug, the melon is not ready. A ripe cantaloupe smells sweet at the blossom end, opposite the stem.
The netting on the skin becomes raised and rougher to the touch. Most varieties are ready 35 to 45 days after pollination.
How to Harvest
If the fruit is completely ripe, it should easily come off the vine with just a gentle twist.
If you are harvesting slightly before full slip (sometimes called “half slip“) for transport or longer storage, use garden scissors or a sharp knife and cut the stem, leaving about an inch attached to the fruit.
Do not pull the fruit off by force. It damages the vine and can cause rot at the cut point.
Storage
At room temperature, an uncut cantaloupe keeps for 5 to 7 days. Once cut, store in an airtight container in the refrigerator for up to 5 days.
Whole, unripe-smelling fruit can sit at room temperature for a day or two to soften slightly, but it will not develop more sweetness after being picked.
Storing cut food in the fridge is essential for safety and freshness. This simple step helps you enjoy meals without worry.
Conclusion
Growing a cantaloupe plant takes patience, but it’s not complicated. Start with good soil, plant at the right time, and water consistently.
The most common mistakes, overwatering, planting too early, and picking before the fruit is ready, are easy to avoid once you know what to watch for.
If your first season doesn’t go perfectly, that’s fine. Most growers see noticeably better results the second time around. Try a different variety, adjust your watering, and give it another go.
Have questions about your cantaloupe plant? Drop them in the comments below.
Frequently Asked Questions(FAQ(
How Long Does a Cantaloupe Plant Live?
Cantaloupe is an annual plant. It grows, fruits, and dies within one season, usually 70-90 days from planting to harvest.
Do Cantaloupes Grow Well in Raised Beds?
Raised beds warm faster and control drainage, which cantaloupe prefers. Ensure vines have space or a trellis for growth.
Why Does My Cantaloupe Taste Watery?
Overwatering in the final weeks before harvest can cause issues. If the skin turns from green to tan and netting is raised, cut watering by half. Less moisture helps the plant concentrate sugars.
Why Are My Cantaloupe Leaves Turning Yellow?
Yellow leaves usually point to one of three things: overwatering, nitrogen deficiency, or a fungal issue. Check your watering schedule first. Soggy soil is the most common culprit.
Can Cantaloupe Cross-Pollinate with Cucumbers or Squash?
Cantaloupes and cucumbers are different species that can’t cross-pollinate, and squash belongs to another genus. Cross-pollination among melon varieties may affect saved seeds but won’t change this season’s fruit.