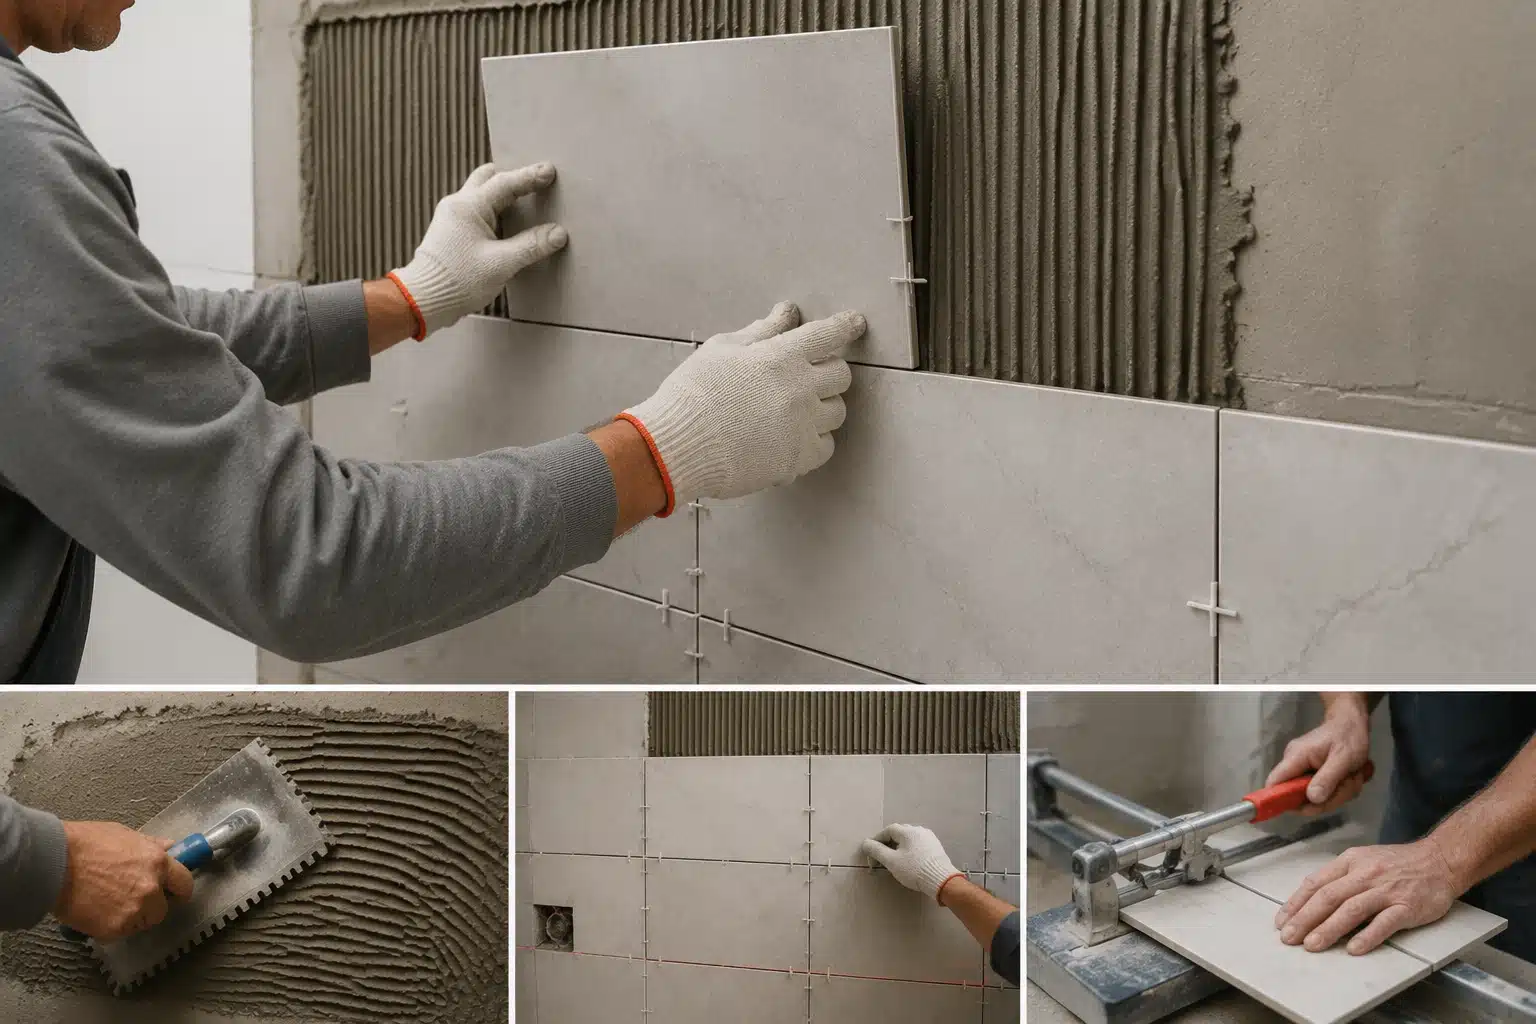

Tiling can change a boring room fast, adding color, texture, and a clean finish.
But it goes wrong in the same few spots every time: tiles slip, edges look uneven, and grout cracks within months.
This blog walks you through the full process, from planning and prepping to laying, cutting, and grouting, plus the small details pros use to get a cleaner result.
By the end, you’ll know exactly how to tile a wall with confidence, from the very first cut to the final wipe-down.
What You Need to Know Before Tiling a Wall
Before you buy a single tile, check a few basics. This step saves you time and money later.
The wall surface, the tile material, and the room’s exposure to moisture all affect how well your finished job holds up, so it pays to slow down here before you spend on materials.
Is Your Wall Suitable for Tiling?
Most walls can be tiled, but few are ready for it straight away. Some surfaces need extra prep before adhesive will hold, while others are already a solid base to build on.
| Wall Type | What to Know |
|---|---|
| Plasterboard | Often needs priming first so the adhesive bonds properly instead of soaking into the board. |
| Cement board | A strong, moisture-resistant base that’s ideal for wet areas like bathrooms and shower walls. |
| Painted walls | Can work for tiling, but only if the paint is in good shape, with no flaking, peeling, or bubbling. |
Avoid tiling straight onto glossy paint. Tiles may not stick well and can fall off later.
Most walls can be tiled, but few are ready for it straight away. Some surfaces need extra prep before adhesive will hold, while others are already a solid base to build on.
Types of Wall Tiles
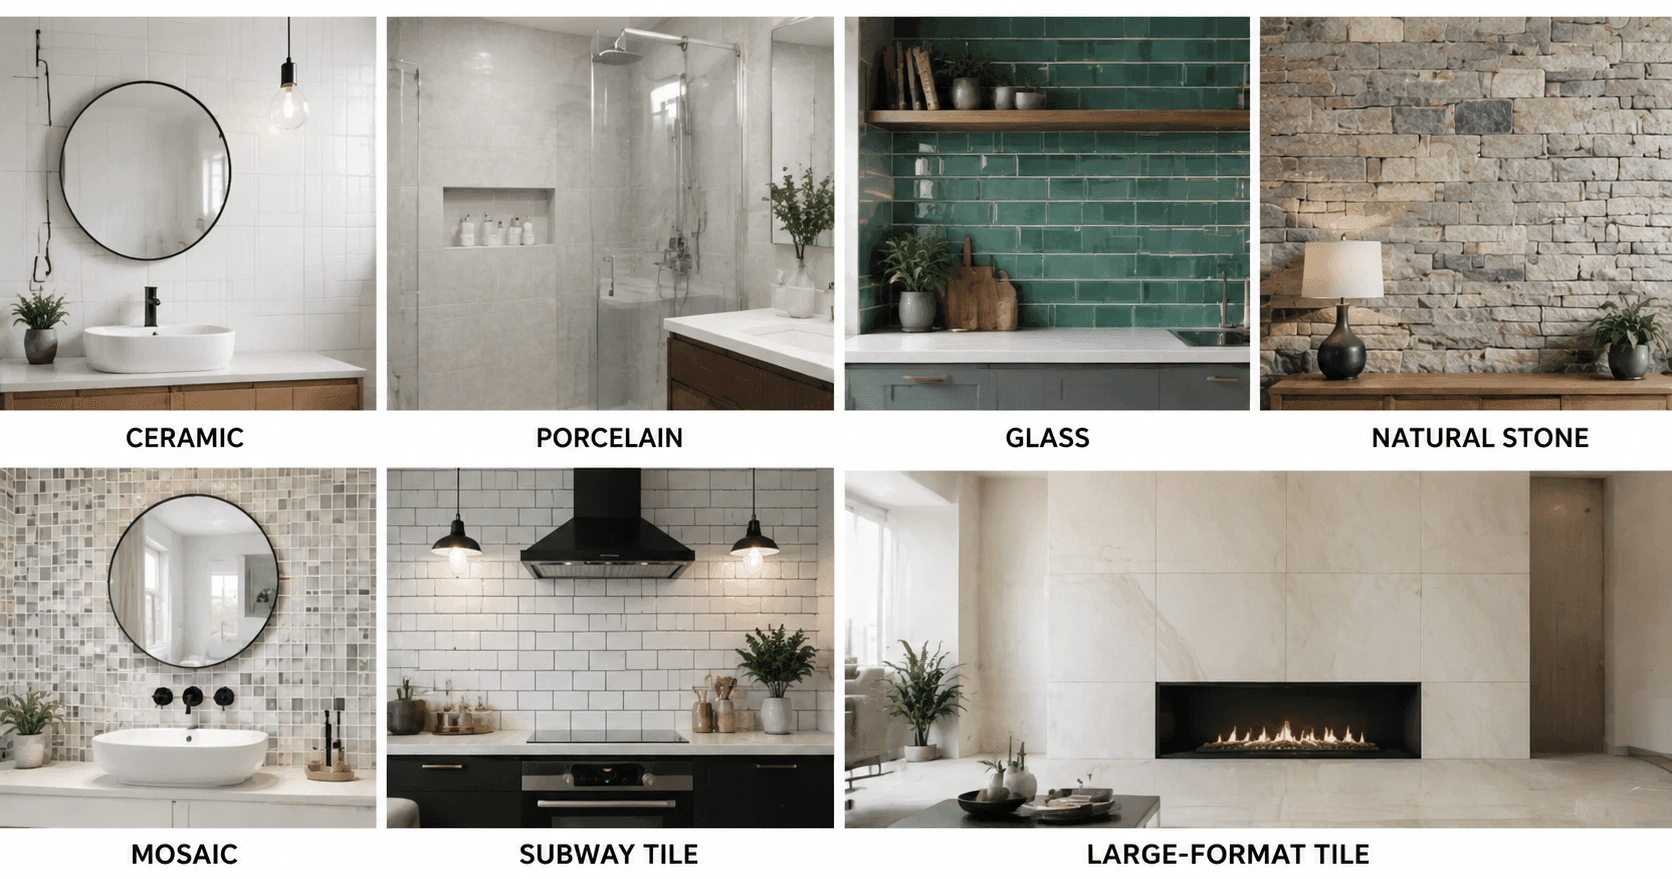
Choose a tile type that fits your room, budget, and installation needs. Compare materials based on moisture resistance, durability, and ease of cutting.
| Tile Type | What to Know |
|---|---|
| Ceramic | Light and easy to cut. Good for beginners. |
| Porcelain | Harder and more durable. Best for busy areas. |
| Glass | Great for a bright look, but can chip easily. |
| Natural stone | Adds a rich look, but it’s heavy and needs strong support. |
| Mosaic | Comes on mesh sheets, so it’s fast to install and easy to fit around corners. |
| Subway tile | Simple and classic, with a shape that’s easy to cut and lay in straight rows. |
| Large-format tile | Fewer grout lines and a clean look, but heavier and harder to handle alone. |
If you’re patching in a new section of board before you tile, cutting plasterboard cleanly makes the priming and tiling stages far easier later on.
Pro Tip: Heavier tiles need stronger adhesive and a solid wall. Check the weight limit before you choose.
Where Wall Tiling Commonly Fails
A lot of tiling problems trace back to just a handful of avoidable mistakes. Knowing what they are before you start makes it much easier to spot and avoid them.
- Poor surface prep
- Wrong adhesive choice
- No expansion gap left at the edges
- Skipping a level guideline for the first row
- Rushing the drying or curing time
Fixing these early stops cracks, gaps, and loose tiles down the road. A little extra care at this stage saves you from having to redo the whole wall later.
Tools and Materials Required
Good tools make tiling faster and neater. Having the right gear on hand before you start also means fewer trips to the store mid-project. Here’s what you’ll need.
| Tool or Material | Purpose |
|---|---|
| Tile cutter | Manual cutters suit small jobs; electric cutters handle thick tiles. |
| Notched trowel | Spreads adhesive evenly; larger tiles need deeper notches. |
| Spacers and leveling clips | Keep joints straight, level, and evenly spaced. |
| Adhesive | Ready-mix suits small walls; powder works for larger areas. |
| Grout | Sanded suits wide gaps; unsanded suits narrow joints; epoxy resists stains. |
Getting these basics together upfront sets you up for a smoother job from the first tile to the last.
Pro Tip: Professionals often mix their own powder adhesive for better control. Beginners may find ready-mix easier to handle.
Preparing the Wall Surface: Step-by-Step Guide
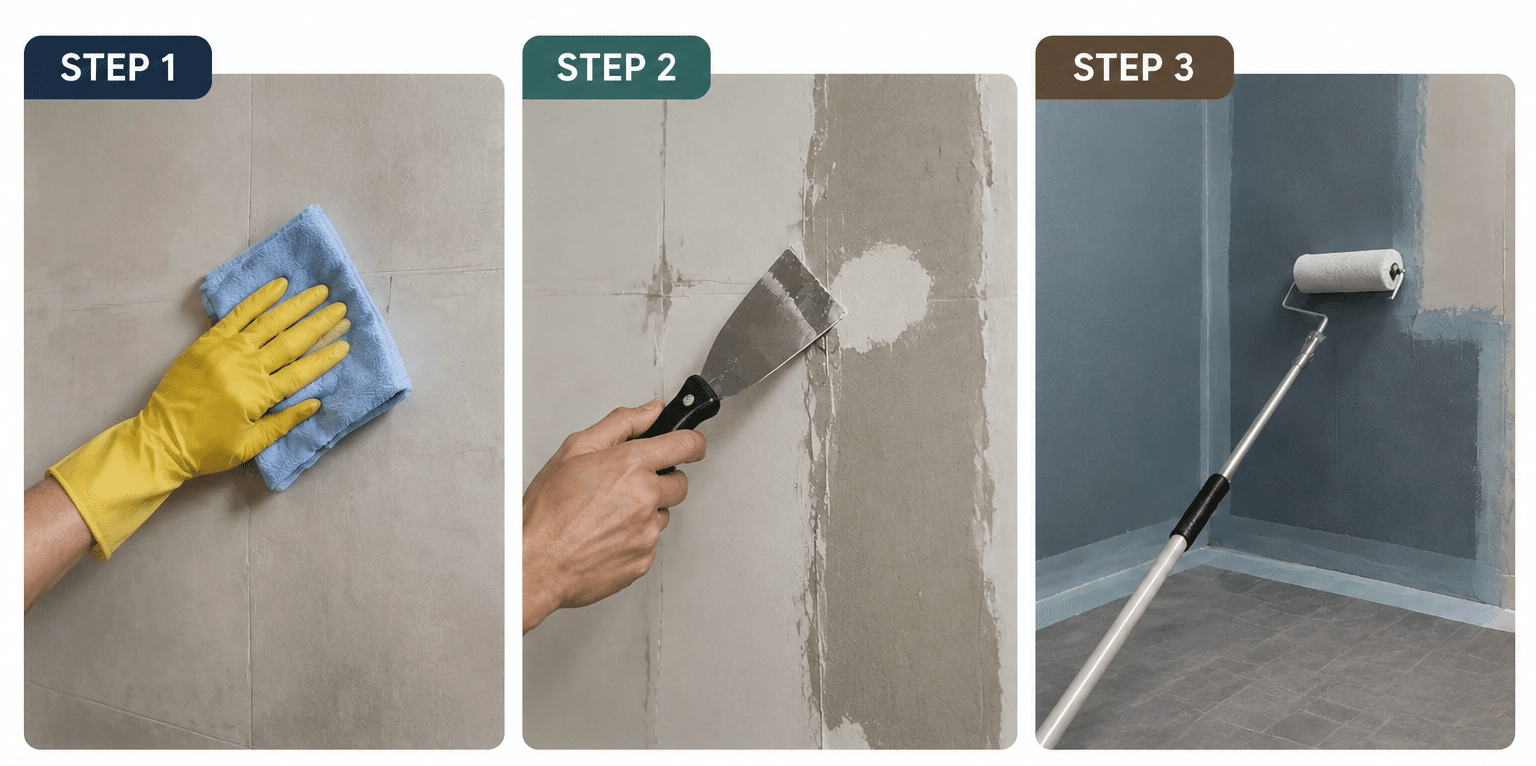
Now, let’s find out about the steps to prepare the surface for tiling.
Getting this stage right sets the foundation for everything that follows, so it’s worth working through each step carefully rather than rushing ahead to laying tiles.
Step 1: Cleaning and Priming the Wall
Remove grease, dust, and old paint before you start.
Even a light film of dust or kitchen grease can stop adhesive from bonding properly, so it’s worth giving the wall a thorough wipe-down rather than a quick pass.
A clean wall helps adhesive stick better. Wipe the surface down and let it dry fully.
On smooth or previously painted walls, a coat of primer designed for tiling also helps the adhesive grip rather than slide once the tiles go up.
Step 2: Repairing Imperfections
Fill cracks and holes with wall filler, then let it dry fully. Sand down any raised areas until the surface feels smooth.
Run your hand or a straight edge over the wall to spot hidden dips or bumps. Repair these before tiling.
A flat wall keeps tile lines straight, improves adhesion, and prevents tiles from cracking or sitting unevenly.
Step 3: Rendering a Very Uneven Wall
If the wall is badly uneven, filler may not be enough. Apply a layer of plaster or cement render over brick or blockwork to create a flat, stable surface.
This is often needed on older or rough walls. Use a straight edge to check the surface and correct any low spots before it sets.
Allow the render to dry fully before waterproofing, marking the layout, or fixing tiles. Tiling over damp render can weaken the adhesive and lead to loose tiles.
Step 4: Waterproofing
Bathrooms, kitchens, and other wet areas need extra protection. Install a waterproof backer board or apply a suitable waterproof membrane before tiling.
Cover corners, joints, and pipe openings carefully, as these areas are most likely to leak. Let the waterproofing layer dry fully before applying tile adhesive.
This step helps prevent damp, mold, and costly water damage behind the tiles.
Planning the Tile Layout
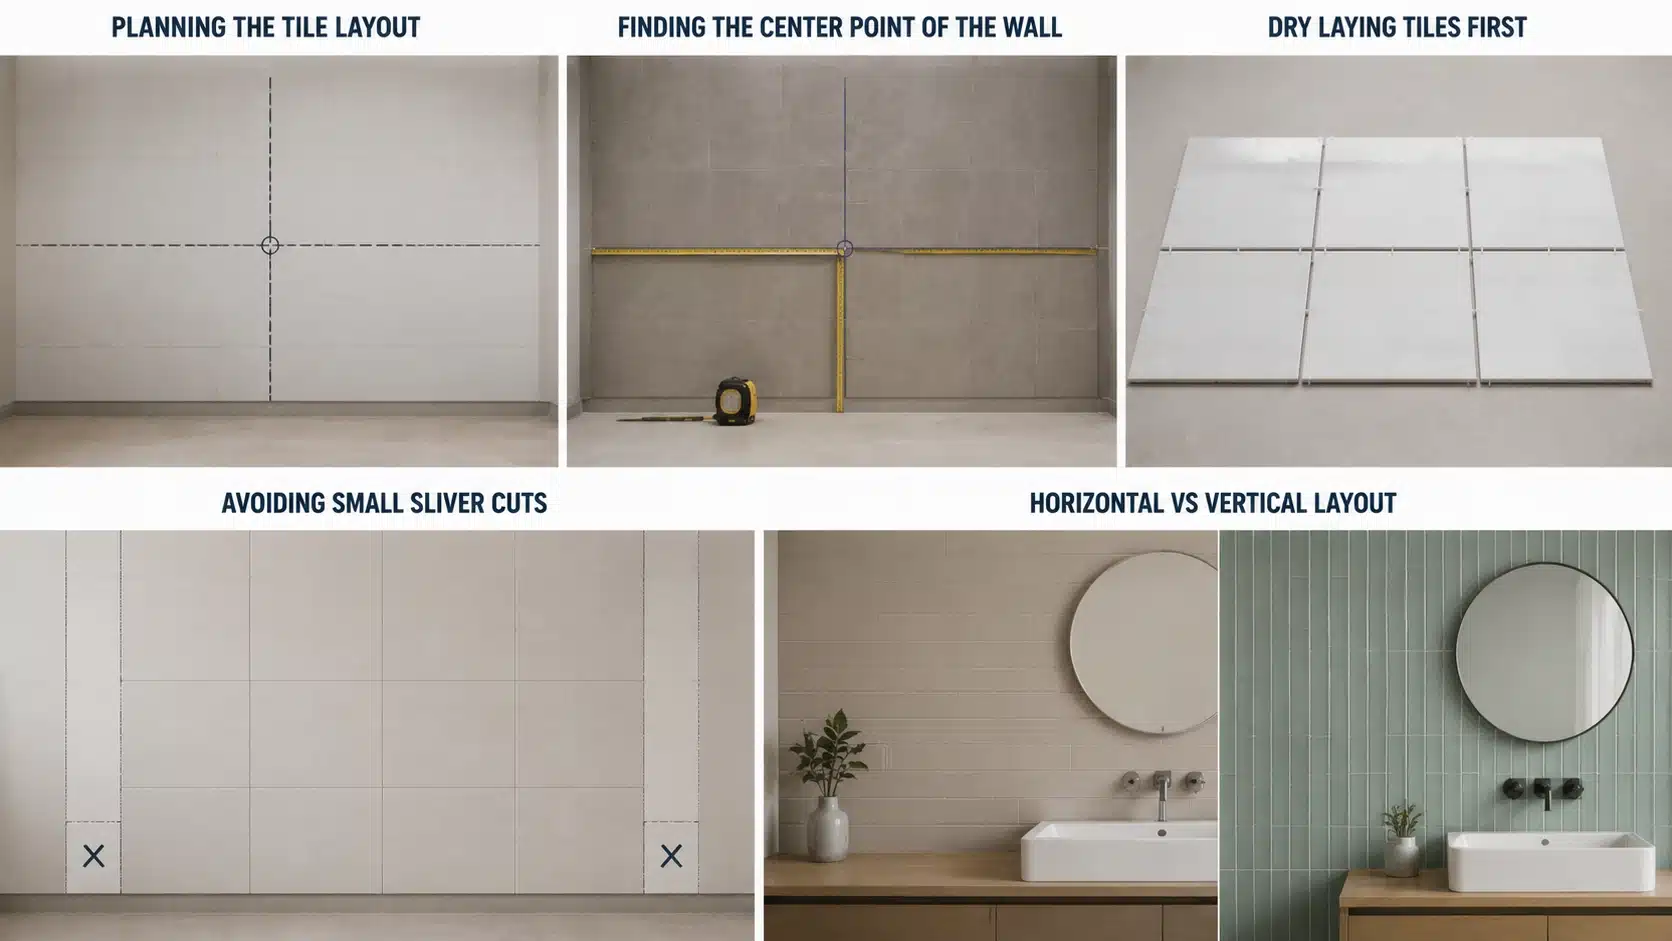
Layout planning prevents tiling mistakes. Spending a few minutes measuring and dry-fitting tiles can avoid crooked rows, awkward cuts, and off-center patterns after finishing the wall.
- Why Layout Planning Matters: A good layout plan can prevent the most frequent tiling errors. Rushing into placement often leads to crooked rows.
- Finding the Center Point of the Wall: Measure your wall and mark the center point. Starting from the middle keeps your tile pattern balanced on both sides.
- Dry Laying Tiles First: Lay your tiles on the floor before fixing them to the wall. This lets you check the pattern and spacing without any mistakes.
- Avoiding Small Sliver Cuts: Small, thin tile pieces at the edges look messy. Adjust your starting point so edge cuts are wider and neater.
- Horizontal vs Vertical Layout: Horizontal layout makes a wall look wider, while vertical layout makes a wall look taller. Pick the direction that suits your room size and style.
Step-by-Step: How to Tile a Wall
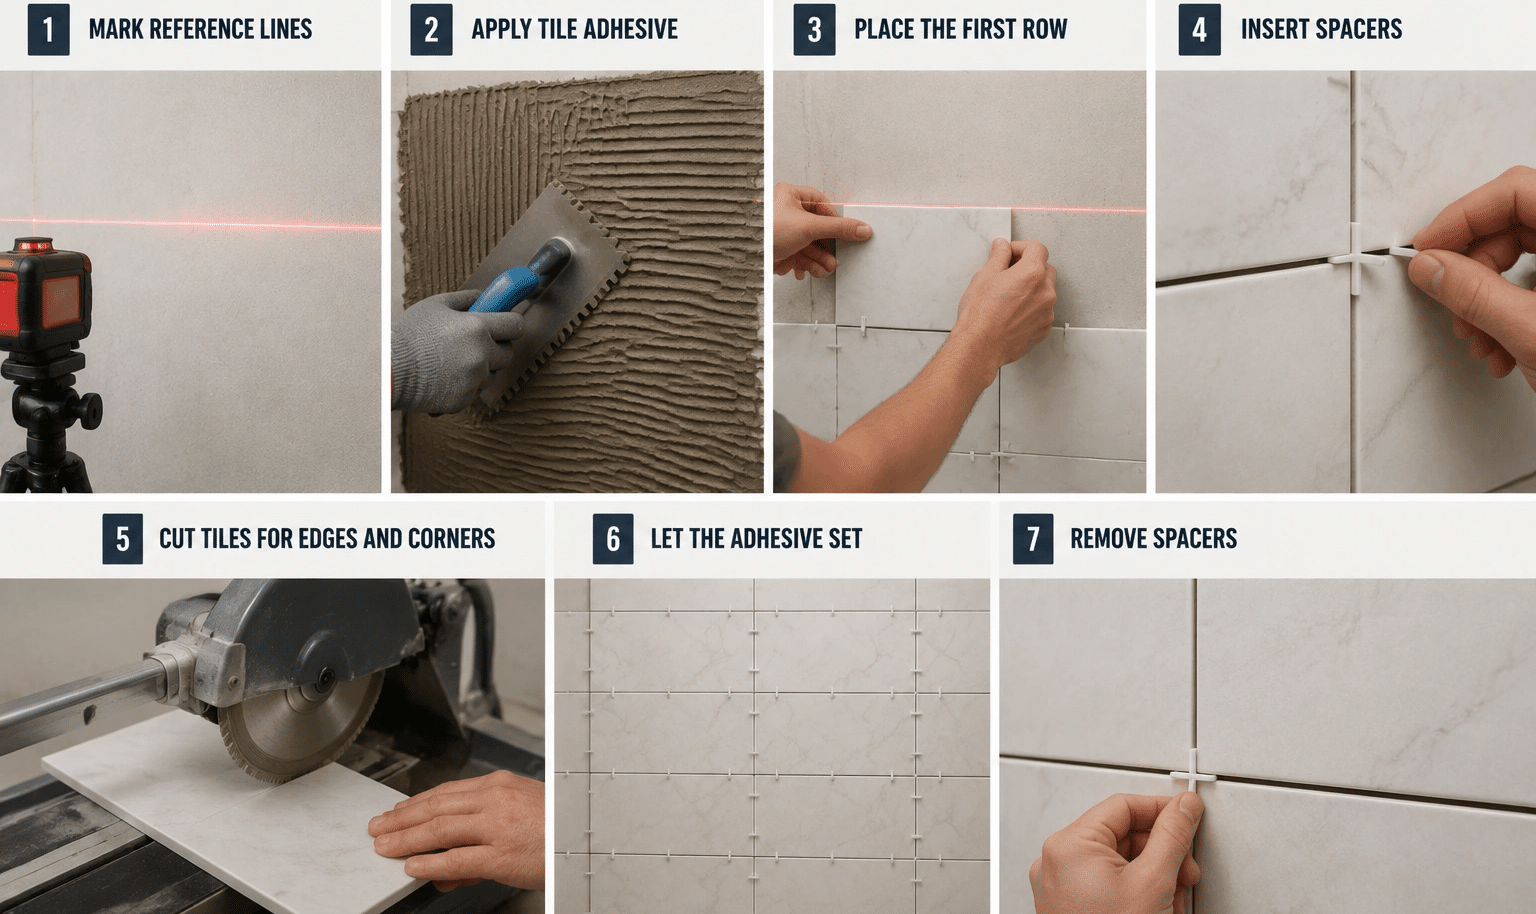
Follow these steps in order to achieve the best results. Working through them one at a time, rather than skipping ahead, is what keeps the whole wall level and even from the first tile to the last.
Step 1: Mark Reference Lines
Use a laser level or chalk line to draw a straight horizontal guide. This line keeps your first row level, even if the floor below is not.
Floors are rarely perfectly straight, so working off this line rather than the floor edge is what keeps the whole wall looking even once you’re a few rows up.
Step 2: Apply Tile Adhesive
Spread it on the wall with the flat side of your trowel, then drag the notched edge through it at a slight angle. This leaves even ridges that help the tile grip and sit flat.
Only spread as much adhesive as you can tile over in about 10 to 15 minutes, since adhesive that skins over too soon won’t bond properly.
Step 3: Place the First Row
Press each tile onto the adhesive with a slight twist, then push it flush along your guideline. This row sets the tone for the whole wall, so take your time and check it with a level often.
Any drift in this first row gets magnified as you work upward, so it’s worth double-checking every few tiles.
Step 4: Insert Spacers
Push a spacer into each corner where tiles meet. This keeps the gaps even between every tile, both across and up the wall.
Consistent spacing here also makes the grouting step much easier later, since uneven gaps are hard to fix once the adhesive sets.
Step 5: Cut Tiles for Edges and Corners
Measure the gap at the edge, mark your tile, and cut slowly with a tile cutter or wet saw. Measure twice before you cut, since tiles are hard to reuse once cut wrong.
Leave a small allowance for the expansion gap at the edge rather than cutting the tile flush to the wall.
Step 6: Let the Adhesive Set
Leave the wall undisturbed and follow the drying time on the product label. Touching or bumping tiles too early can knock them out of line.
This is also a good time to double-check spacing and levelness while there’s still a small window to make adjustments.
Step 7: Remove Spacers
Pull out each spacer once the adhesive has fully set, working carefully so you don’t shift any tiles as you go.
Check the joints one more time for any adhesive squeeze-out and clean it away while it’s still soft. Your wall is now ready for grouting.
Pro Tip: Work in small sections rather than the whole wall at once. This gives you more control and fewer mistakes.
Cutting Tiles Like a Pro
Clean cuts make a big difference in the final look. A ragged or chipped edge stands out immediately, especially on tiles near eye level or around fixtures. Picking the right cutting method for the job goes a long way toward avoiding wasted tiles.
| Cut Type | Best Tool |
|---|---|
| Straight cuts | Use a tile cutter or wet saw. |
| Curved cuts | Use tile nippers for small notches, like around pipes or outlets. |
| Wet saw | Gives the cleanest edges, especially on hard tiles like porcelain. |
| L-shaped cuts | Use a wet saw or angle grinder to notch corners around outlets and switches. |
| Diagonal cuts | Mark the angle with a straight edge, then cut slowly with a wet saw for a clean, even line. |
Matching the cut to the tile and the tool to the job is what separates a clean finish from a messy one.
Pro Tip: Cut slowly to avoid chipped edges. Rushing the cut is the top cause of wasted tiles.
Grouting the Tiles
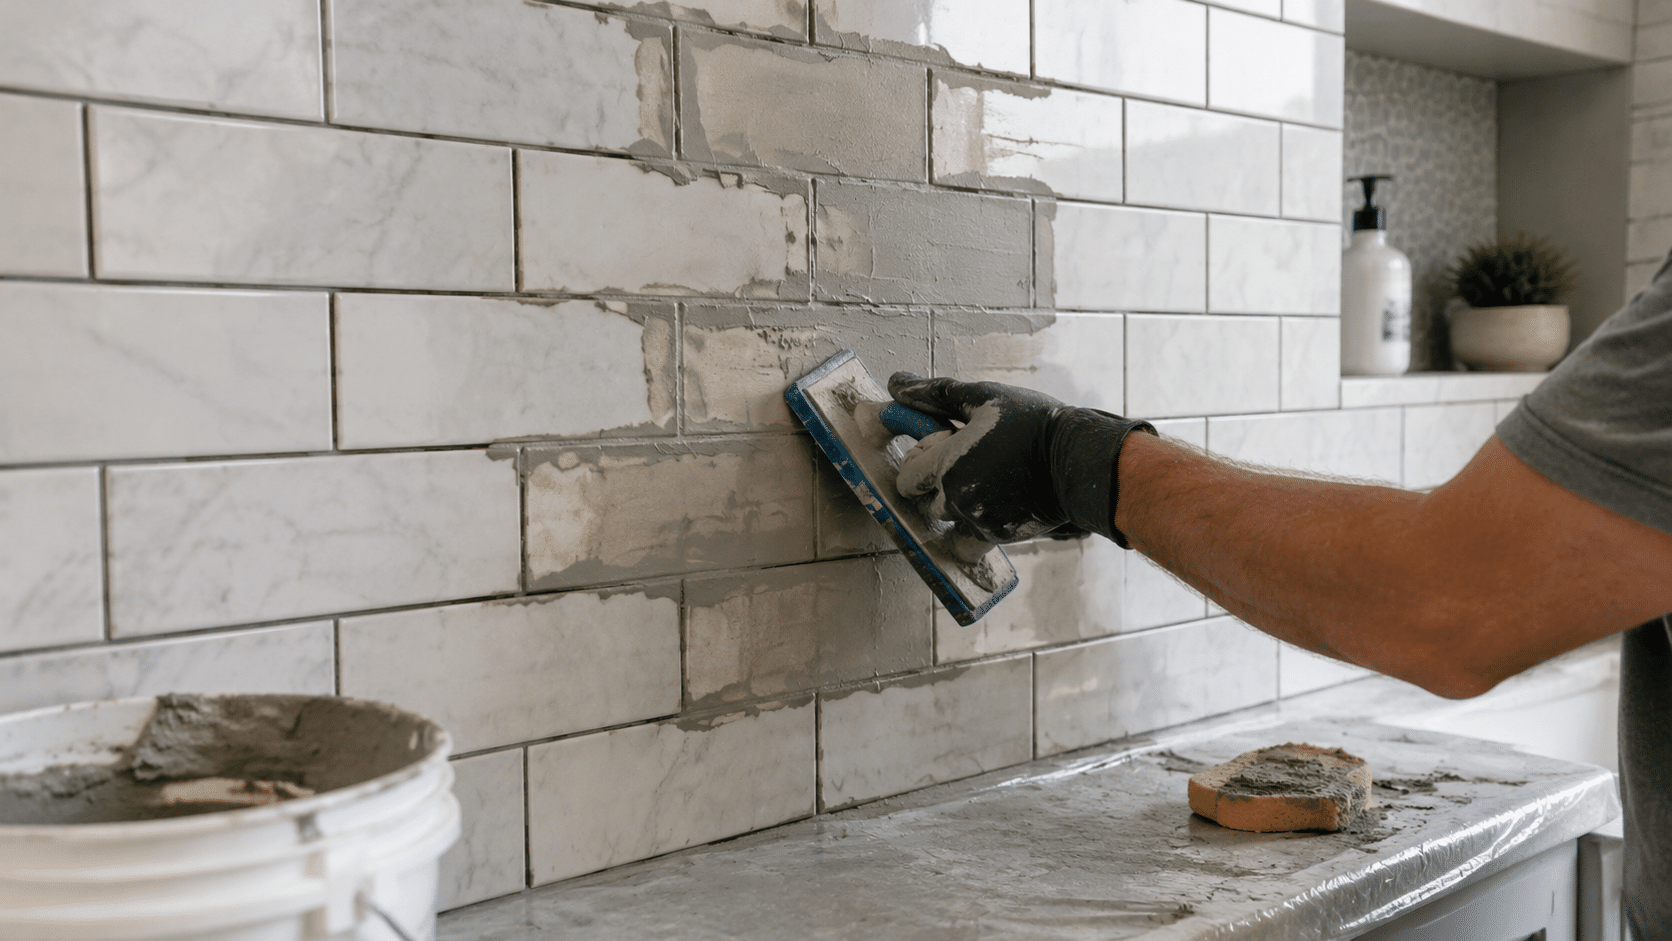
Grouting fills the gaps, protects the adhesive from moisture, and gives the wall a clean, finished look. Good timing and careful application help prevent cracks, stains, and uneven joints.
- Step 1: Wait Before Grouting: Let the tile adhesive set fully. Check the product instructions for the correct drying time.
- Step 2: Apply Grout Evenly: Use a rubber float to press grout into the joints at an angle. Work in small sections for better control.
- Step 3: Remove Excess Grout: Wipe the tiles with a damp sponge before the grout dries. Rinse the sponge often to keep the surface clean.
Errors We Make While Grouting
Most grouting problems trace back to mixing or timing rather than the grout itself. Knowing what causes each issue makes it much easier to avoid on your next section of wall.
| Grout Error | Cause |
|---|---|
| Cracking | Grout mixed too thin |
| Shrinking | Grout dried too fast |
| Color change | Poor mixing |
| Crumbling | Grout mixed too dry or applied too thickly |
| Grout haze | Excess grout was not wiped off before it dried |
| Uneven joints | Float pressure is applied inconsistently across the wall |
Finishing Touches
Small final steps protect your work and make it last. Skipping them can leave your tiling looking finished on the surface while still being vulnerable to moisture, cracking, or dulling over time.
- Seal the Grout: Apply grout sealer, especially in showers and other wet areas, to reduce staining and water absorption.
- Add Silicone to Corners: Use silicone where walls meet, as flexible sealant is less likely to crack when surfaces shift.
- Polish the Tiles: Once everything is dry, wipe the tiles with a soft cloth to remove grout haze and restore their shine.
- Touch Up Missed Areas: Check the edges, corners, and joints for gaps or uneven spots, then correct them before finishing.
- Inspect the Whole Wall: Step back and check the tiles in good lighting for uneven joints, raised edges, or other visible flaws.
If your wall backs onto a noisy room, you can also add a soundproofing layer before you tile. This isn’t needed for most homes, but it can help in shared walls or busy street-facing rooms.
Wall Tiling Errors That Lead to Cracks and Gaps
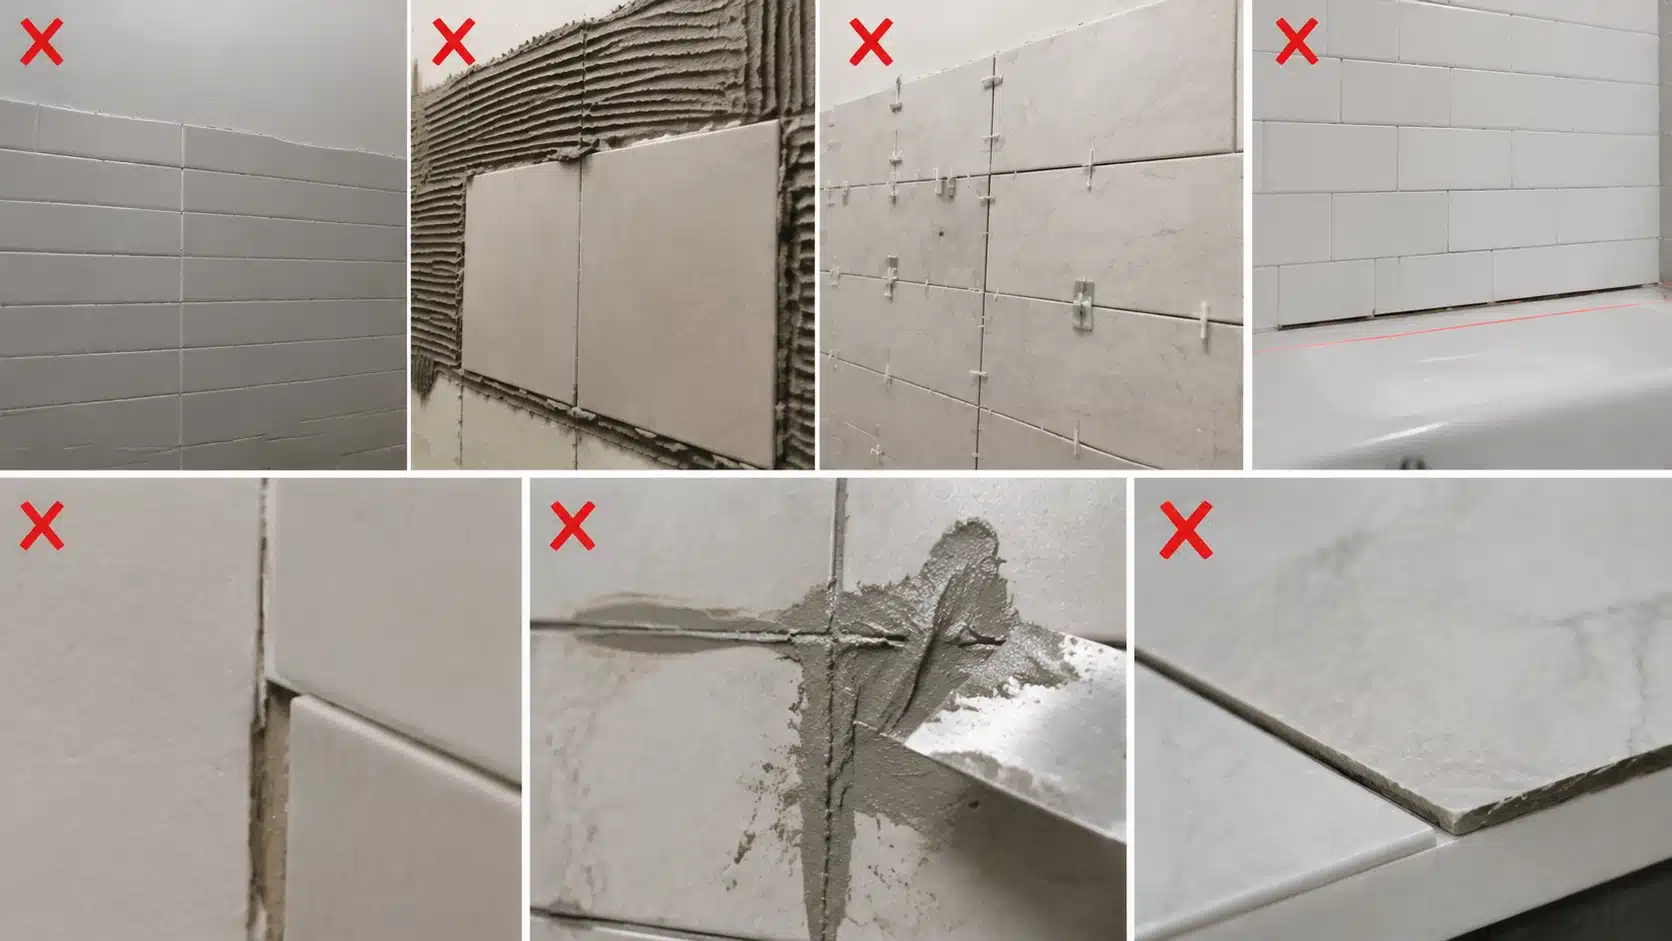
Watch out for these frequent errors you may make, since most of them are easy to avoid once you know what to look for:
- Skipping wall leveling. An uneven wall makes every row harder to keep straight.
- Using the wrong adhesive thickness. Too thin, and tiles slide. Too thick, and they sit unevenly.
- Ignoring curing time. Tiles moved too soon can shift out of place before the adhesive sets.
- Starting the first row out of line. Every row after it will follow the same mistake.
- Forgetting expansion gaps at the edges. Tiles need room to shift slightly as the wall settles.
- Mixing grout too thin or too thick. This is a common cause of cracking or shrinking after it dries.
- Rushing tile cuts near corners. Fast cuts often chip the tile edge, leaving a rough finish.
Steering clear of these mistakes early on can really save you a lot of hassle down the line, so it’s worth taking the time to get it right from the start.
Cost Breakdown
Wall tiling costs vary by tile choice, wall condition, and installation method. Planning for materials, tools, labor, and extra supplies helps prevent unexpected spending.
| Cost Type | Estimated Cost | What It Covers |
|---|---|---|
| DIY project | $200–$800 | Tiles, adhesive, grout, and basic tools |
| Professional installation | $7–$25 per sq. ft. | Materials and labor |
| Tools | $50–$250 | Cutter, trowel, spacers, and level |
| Hidden costs | $50–$200 | Wastage, clips, repairs, and special cuts |
| Extras | $30–$150 | Waterproofing, sealant, and edge trim |
Costs may rise for natural stone, patterned layouts, damaged walls, or wet-room waterproofing.
Time Required for Wall Tiling
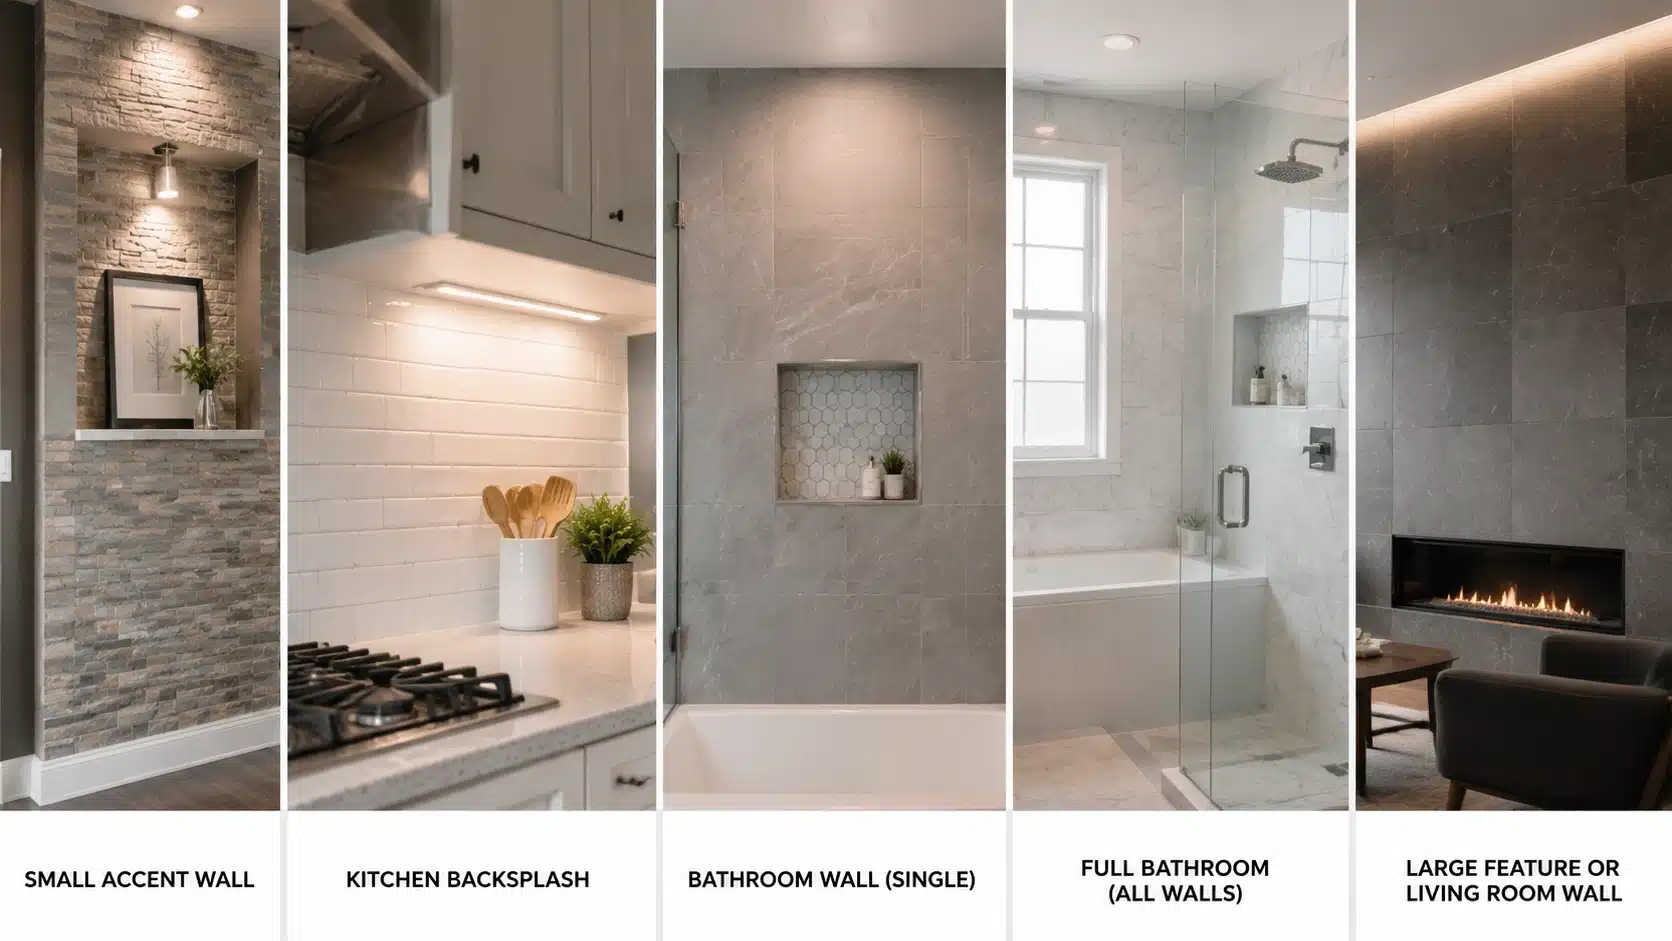
Time needed depends on wall size, tile type, and where in the house you’re tiling.
| Area | Typical Time | Notes |
|---|---|---|
| Small accent wall | Half a day to a full day | Simple layouts with fewer cuts finish faster |
| Kitchen backsplash | 1 to 2 days | Extra time needed for cutting around outlets and fixtures |
| Bathroom wall (single) | 2 to 3 days | Includes waterproofing before tiling starts |
| Full bathroom (all walls) | 4 to 6 days | Drying and curing time adds up across multiple walls |
| Large feature or living room wall | 2 to 4 days | Larger tiles need more careful leveling and support |
Always check the adhesive and grout labels for exact curing times. Rushing this step can weaken your finished wall.
When to Hire a Professional
Some jobs are best left to experts.
Consider hiring a pro if you’re dealing with:
- Large-format tiles that are hard to handle alone
- Uneven or structurally weak walls
- Waterproof installations in bathrooms
- Cutouts for electrical or plumbing fixtures
There’s no shame in calling in help for a tricky wall. It can save you time, materials, and stress.
Conclusion
How to tile a wall well comes down to the prep, not the tiling itself.
A flat, clean, primed wall beats rushing to the tiles, and skipping a step shows up later as a crooked row or a loose tile.
If tile isn’t right for every wall in the room, wall paneling adds texture without the same wet-area prep.
Already tackled a wall like this? Drop what helped you in the comments below; it might save the next reader a cracked tile or two.
Frequently Asked Questions
When Tiling a Wall, Where Do You Start?
Start from the center and work outward, beginning on the second row up. This keeps your layout even and avoids thin cuts at the edges.
Can You Tile Over Existing Tiles?
Sometimes, if the old tiles are sound, flat, and clean. Loose, cracked, or hollow-sounding tiles need to come off first, or the new layer will fail too.
Can You Tile Over Plasterboard?
Yes, in dry areas like a kitchen backsplash or feature wall. Avoid it in wet spaces like showers or bath surrounds.
How Long Should You Wait Before Grouting?
Most adhesives need about 24 hours to set before grouting, longer in cold or damp rooms. Always check the product label for exact timing.
How Much Tile Adhesive Do You Need Per Square Meter?
Wall tiles typically need 3 to 5 kg of adhesive per square meter. Larger or heavier tiles and uneven walls both push that figure higher.